Heartfelt Congratulations

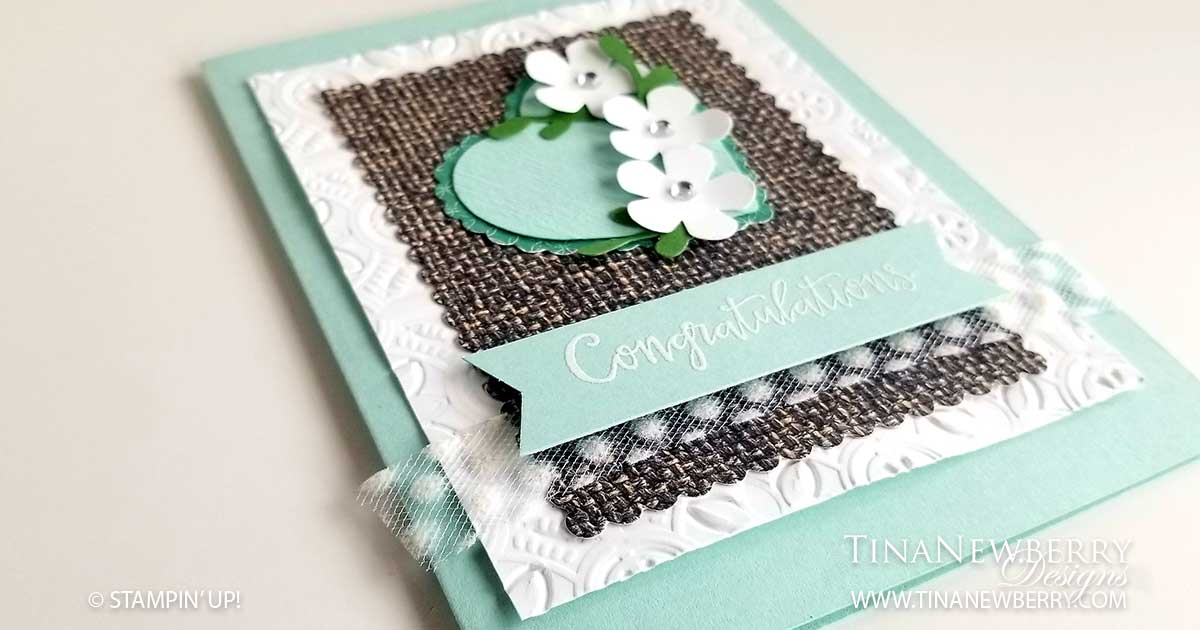
This week I am using the Heartfelt Stamp Set and coordinating Hearts Punch Pack to convince myself that hearts are NOT just for February. Isn’t this design gorgeous (Don’t get too excited, I totally copied it)?! I mean I’m convinced already with this one design, but I did two more like I usually do and then even a bonus design for fun. My favorite parts of this design is the subtle embossed heart and the Thoughtful Blooms flowers! Plus you can never go wrong with white heat embossed anything. I hope you enjoy making this card as much as I did.

Cutting Dimensions

This project uses a Die Cutting Machine. Full list of supplies needed, listed below.
Card Base: Pool Party Cardstock 5 1/2″ h x 8 1/2″ w folded to 5 1/2″ h x 4 1/4″ w
Background: Whisper White 4 3/4″ h x 3 3/4″ w
Pattern Layer: In Good Taste Designer Series Paper Die Cut with Stitched So Sweetly Dies
Ribbon: 4″ of Whisper White Tulle Ribbon

Instructions

  1. Affix all stamps to Acrylic Blocks.
  2. Fold the Card Base in half using a Bone Folder to sharpen the crease.
  3. Emboss the Background with the Tin Tile Embossing Folder.
  4. Use Snail Adhesive to affix the Background.
  5. Use Snail Adhesive to affix the Pattern Layer.
  6. Punch the Scalloped Heart from the Flowers For Every Season DSP.
  7. Emboss a scrap piece of Pool Party Cardstock with the Subtles Embossing Folder and punch the Plain Heart out of it.
  8. Use Snail Adhesive to adhere the two Hearts together and also to adhere to the card.
  9. Stamp the Sentiment in Versamark ink on a scrap piece of Pool Party Cardstock.
  10. Heat emboss the Sentiment with White Stampin’ Powder and a Heat Tool.
  11. Cut Sentiment down to size and use the Paper Snips to create Banner ends.
  12. Use Tear & Tape to affix a piece of the Tulle Ribbon.
  13. Use Dimensionals to affix the Sentiment Banner.
  14. Punch 3 of the Small Bloom Punch flowers from scrap Whisper White Cardstock.
  15. Affix to flowers with Mini Glue Dots.
  16. Adhere Clear Epoxy Raindrops to the center of the Flowers.
  17. Punch two of the Sprig Punches from scrap Garden Green Cardstock.
  18. Use the Snips to cut the Springs into smaller pieces and affix with Snail Adhesive.
  19. That’s it! Who are you going to send it to?

Product List


Recommended Stamper’s Tool Kit


Design CASEd from Trisha Magnus.

Buy One, Get One

My Retired Used Products BOGO Starts Today!
All right here’s how this works… Here on my website I have posted all of my retired items, with new items added in the past week,  some are new most are used, read the descriptions carefully to be sure of what you are buying. All the items are marked 60% off. Put all the retired items you want in your cart, make note of the total and then check out use the coupon code 2020BOGO to reduce the price to $0. All you pay is shipping on those items. THEN within 48 hours, place an order from the NEW catalog for the total price of the retired items and I will ship the retired items to you. You can order items from the new catalog on my product website using the host code EXHRKQ62 or send your order directly to me and I’ll take care of it for you! BOGO ends June 10th.

Butterfly Congratulations

For this card I really wanted to play some more with the Vellum Butterflies and I knew I wanted to use some yellows because this card is going to celebrate a friend’s graduation from St. Leo University and gold is one of their colors. The new Bumble Bee In-Color is very pretty and the Bumble Bee Gingham Ribbon is adorable. Both are perfect for this card. I’m very pleased with how it came out.

Cutting Dimensions

Full list of supplies needed, listed below. You will need a Die Cutting Machine for this project.
Card Base: Whisper White Thick 5 1/2 w” x 8 1/2″ h folded to 4 1/4″ w x 5 1/2″ h
Background: Whisper White 4″ w x 5 1/4″ h Stitched Rectangle
Decorative Layer 1: Bumble Bee Designer Series Paper
Decorative Layer 2: Whisper White die cut with the 3″ w x 4″ h Stitched So Sweetly Rectangle
Sentiment Layer: Whisper White die cut with the 1 1/4″ h x 2 1/2″ w Stitched Rectangle

Instructions

  1. Affix all stamps to Acrylic Blocks
  2. Stamp the Butterflies on the Vellum in So Saffron Ink. Set aside to dry.
  3. Fold the Card Base in half using a Bone Folder to sharpen the crease
  4. Emboss the Background Layer with the Subtle 3D Embossing folder and use Snail Adhesive to adhere it to the Card Base.
  5. Use Snail Adhesive to adhere the Decorative Layer 2 to Decorative Layer 1.
  6. Tie the Bumble Bee Gingham Ribbon in a bow around the Decorative Layers
  7. Use Dimensionals to affix the Decorative Layers.
  8. Stamp the Sentiment in Crushed Curry Ink onto the Sentiment Layer.
  9. Use Dimensionals to affix the Sentiment Layer.
  10. Punch the Butterflies out and attach with Mini Glue Dots
  11. Add Basic Pearls to the butterfly bodies.
  12. You’re Done!! Who will you send it to? Mine is going to Madison Lynn!! Happy Graduation!

Product List

Recommended Stamper’s Tool Kit

You Make an Ordinary Day Special

I just love the delicate Vellum Butterfly and Vellum layer on this card designed by Ronda Wade. I had to make it. I am sad to see the Peaceful Poppies Designer Series paper retiring in a few weeks, but was so happy to use this gorgeous piece with Pool Party, Old Olive, Poppy Parade and Rich Razzleberry flowers on it. The Royal Peacock Rhinestones really dress up the already pretty butterflies.

Cutting Dimensions

Full list of supplies needed, listed below.
Card Base: Poppy Parade 6 1/2 h” x 5 1/2″ w scored and folded to 4 1/4″ w x 5 1/2″ h. The 2 1/4 piece is the front.
Inside Layer: Whisper White cardstock 5 1/4″ h x 4″ w
Decorative Layer: Peaceful Poppies Designer Series Paper 5 1/4″ h x 2″ w
Vellum: Vellum Cardstock 4 3/4″ h x 3 3/4″ w
Sentiment Background: 4″ h x 3″ w
Sentiment Layer: 3 3/4″h x 2 3/4″ w

Instructions

  1. Affix all stamps to Acrylic Blocks
  2. Fold the Card Base in half using a Bone Folder to sharpen the crease
  3. Use Snail Adhesive to adhere the Inside Layer.
  4. Fold the front of the Card Base back on itself using a Bone Folder to sharpen the crease and Snail Adhesive to adhere the flap down.
  5. Use Snail Adhesive to adhere the Decorative Layer to the Front Flap.
  6. Apply Snail Adhesive to the Front Flap and affix Vellum to the Flap.
  7. Use Snail Adhesive to adhere the left side of the Sentiment Background to the Vellum.
  8. Stamp the Sentiment with Pool Party Ink to the bottom of the Sentiment Layer and use Snail Adhesive to adhere to the Sentiment Background.
  9. Use the Butterfly Duet Punch to make two Large Butterflies – one from Peaceful Poppies DSP and one from Vellum, and one Small Butterfly from coordinating piece of Peaceful Poppies DSP.
  10. Use Mini Glue Dots to stack the three Butterflies together.
  11. Affix Rhinestones to the body of the small butterfly and fluff all of the wing layers.
  12. Beautiful! Who will you send it to?

Product List


Recommended Stamper’s Tool Kit

Card design inspired by Ronda Wade.