Thank You For Your Kindness

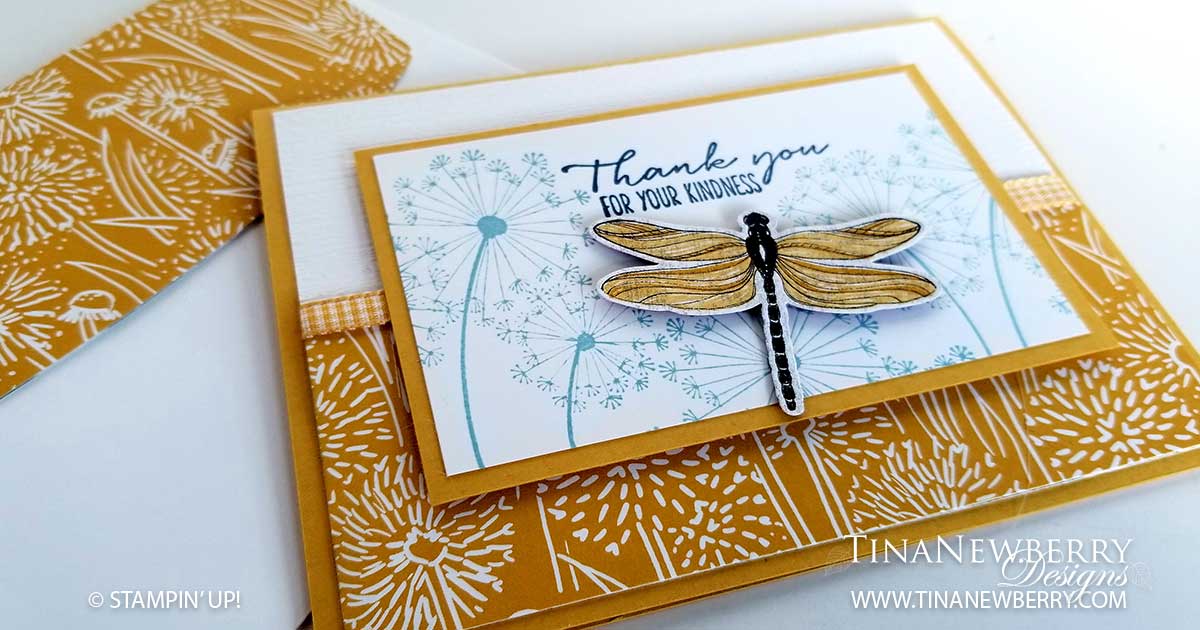
Bringing a little summer to my friends in the north who are enduring winter right now. Dandelions and Dragonflies. You’re welcome! The new Dandy Garden Suite brings us the best of summer with Dragonflies, lady bugs, and a rich color palette of Calypso Coral, Bumblebee, Mossy Meadow, Misty Moonlight, and Blackberry Bliss what’s not to love? I paired this card with my Dandelion Wishes stamp set and the pretty patterned paper with the Dandelions. My little Dragonfly was punched out of another piece of the patterned paper, but I could also have stamped and punched him using one of the two Dragonfly stamps in the set.

Full list of supplies needed, listed below. A Die Cutting Machine is optional for this project.
Card Base: Bumblebee Cardstock 8 1/2 h” x 5 1/2″ w folded to 4 1/4″ h x 5 1/2″ w.
Background: Whisper White Cardstock 4″ h x 5 1/4″ w with the Subtle Embossing Folder
Background Bottom: Dandy Garden DSP 2″ h x 5 1/4″ w
Sentiment Matte: Bumblebee Cardstock 2 3/4″ h x 4 1/4″ w
Sentiment Layer: 
Whisper White Cardstock 2 1/2″ h x 4″ w
Inside Layer: Whisper White Cardstock 4″h x 5 1/4″ w

  1. Affix all stamps to Acrylic Blocks.
  2. Fold the Card Base in half using a Bone Folder to sharpen the crease.
  3. Run the Background through the Stampin’ Emboss Machine with the Subtle Embossing Folder
  4. Add the Background Bottom to the Background with Stampin’ Seal+
  5. Add the Bumblebee Gingham Ribbon to the Background and attach with Stampin’ Seal+
  6. Stamp the Dandelions on the Sentiment Layer with Seaside Spray ink and the Sentiment with Misty Moonlight Ink.
  7. Attach Sentiment to Sentiment Matte with Stampin’ Seal and attach with Dimensionals.
  8. Punch the Dragonfly from the Dandy Garden DSP and attach with a Dimensional.
  9. Decorate the Inside Layer and attach.
  10. Decorate the envelope.
  11. So pretty! Now send it to a nothern friend Brrr.

Shopping List

Shopping List

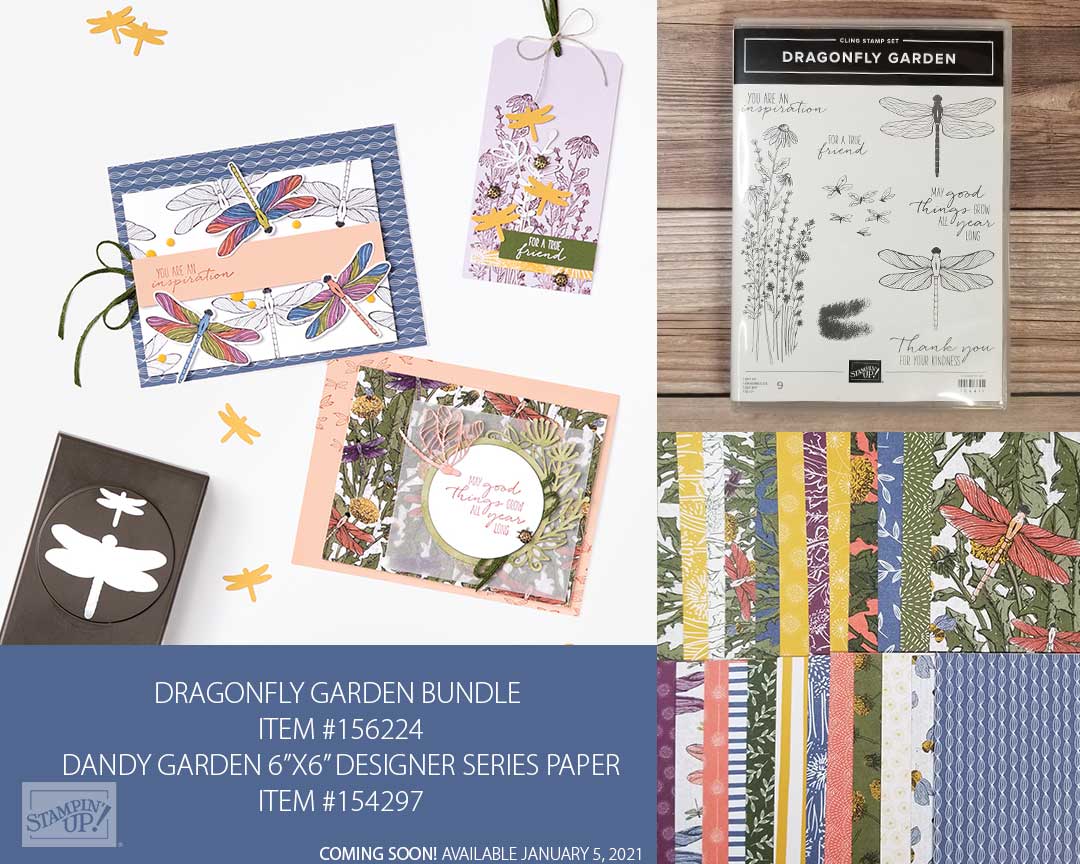
This project uses two products that will be available in the 2021 January to June Mini Catalog:
Dragonfly Garden Bundle – Stamp set and Punch
Dandy Garden 6×6 Designer Series Paper

Recommended Stamper’s Toolkit

Product List
Order online from the convenience of your own home or send me your order and I’ll take care of you. ❤ Either way, please use the host code ANTD9UHS. Order online AND, if your order is $50 or more using host code ANTD9UHS between now and the end of the month you’ll receive a free pack of embellishment as a THANK YOU gift from me. ❤ If your order is over $150, skip the host code, earn Stampin’ Rewards for free stuff yourself and I’ll still send you a free pack of embellishment as a THANK YOU gift from me. ❤

Design inspired by Gail Ellis.

May Your Season Be Filled with Magic

I really wanted to use this stocking stamp, but I was on the struggle bus with it. I looked and looked at ideas and didn’t like any of them. Then I noticed the little trees on it matched the little trees on the Trimming the Town patterned paper and that’s when it all started to come together. It reminds me of a cabin in the woods. Super cute!

Full list of supplies needed, listed below. A die cutting machine is needed for this card.
Card Base: Soft Suede Cardstock 8 1/2 h” x 5 1/2″ w folded to 5 1/2″ h x 4 1/4″ w.
Background-Top: Trimming the Town DSP 5 1/4″ h x 4″ w
Background-Bottom: Early Espresso Cardstock 2 1/2″ h x 4″ w with the Pinewood Planks Embossing Folder
Background Strip: Pear Pizzaz Cardstock 1/2″ h x 4″ w
Ribbon: 1/4″ Early Espresso Faux Suede Trim 5″
Stocking Matte: Pear Pizzaz Cardstock 3 7/8″ h x 1 7/8″ w
Stocking Layer: Whisper White Cardstock 3 5/8″ h x 1 5/8″ w (optional) trimmed with the Stitched Rectangle Dies
Sentiment Layer: 
Old Olive Cardstock 1 3/4″ h x 1 1/4″ w (optional) trimmed with the Stitched Rectangle Dies

  1. Affix all stamps to Acrylic Blocks.
  2. Fold the Card Base in half using a Bone Folder to sharpen the crease.
  3. Attach the Background-Bottom to the Background-Top with Stampin’ Seal.
  4. Add the Background Strip with Stampin’ Seal.
  5. Use Tear & Tape to add the Ribbon across the Background Strip
  6. Attach the Background with Stampin’ Dimensionals.
  7. Stamp the Stocking in Early Espresso, the Toe and Heal with Pear Pizzaz and the Pine Trees in Old Olive ink.
  8. On the Stocking Layer, stamp the Stocking Top in Early Espresso ink, trim with Paper Snips and attach to the Stocking Layer with Stampin’ Seal.
  9. Attach the Stocking Layer to the Stocking Matte with Stampin’ Seal and attach the Stocking Layer with Stampin’ Dimensionals.
  10. Stamp the Sentiment in Versamark Ink and Heat Emboss with White Embossing Powder. Attach the Sentiment with Stampin’ Dimensionals.
  11. Decorate the Inside Layer and attach.
  12. Decorate the envelope.
  13. Love it! Who will you send it to?

Shopping List

Recommended Stamper’s Toolkit

Product List
Order online from the convenience of your own home or send me your order and I’ll take care of you. ❤ Either way, please use the host code ANTD9UHS. Order online AND, if your order is $50 or more using host code ANTD9UHS between now and the end of the month you’ll receive a free pack of embellishment as a THANK YOU gift from me. ❤ If your order is over $150, skip the host code, earn Stampin’ Rewards for free stuff yourself and I’ll still send you a free pack of embellishment as a THANK YOU gift from me. ❤

It’s the Best Time of the Year

A Merry Hello Two-Step hostess stamp and set brings holiday cheer to this quick and easy fun card using only three colors, one sheet of patterned Designer Series Paper and white cardstock. Two-Step stamp sets use coordinating stamps to layer on ink to make a complete image. For this card, the stockings are one stamp and the stocking patterns are another. Images can be stamped in the same color, stamped off to create a lighter version of the same color using two different colors as seen on this card. So cute and versatile!

Full list of supplies needed, listed below. A die cutting machine is optional for this card.
Card Base: Whisper White Thick Cardstock 8 1/2 h” x 5 1/2″ w folded to 4 1/4″ h x 5 1/2″ w.
Background: 2020-2022 In-Color DSP 4″ h x 5 1/4″ w
Sentiment Matte: 2 3/4″ h x 3 3/4″ w Whisper White Cardstock (optional) run through with the Wrapped In Texture Embossing Folder
Sentiment Layer: 
Whisper White Cardstock 2 1/4″ h x 3 1/4″ w

  1. Affix all stamps to Acrylic Blocks.
  2. Fold the Card Base in half using a Bone Folder to sharpen the crease.
  3. Attach the Background using Stampin’ Seal.
  4. Run the Sentiment Matte though the Stampin’ Cut & Emboss Machine with the Wrapped in Texture Embossing Folder and attach using Stampin’ Seal.
  5. Stamp the Stockings and Sentiment in Tuxedo Black Memento Ink on the Sentiment Layer and then add the Stocking Patterns and repeating Boughs in Just Jade ink.
  6. Attach the Sentiment Layer with Stampin’ Dimensionals.
  7. Add some 2020–2022 In Color Enamel Dots.
  8. Decorate the inside..
  9. Decorate the envelope.
  10. So cute! Now send it to someone special.

Shopping List

Recommended Stamper’s Toolkit

Product List
Order online from the convenience of your own home or send me your order and I’ll take care of you. ❤ Either way, please use the host code ANTD9UHS. Order online AND, if your order is $50 or more using host code ANTD9UHS between now and the end of the month you’ll receive a free pack of embellishment as a THANK YOU gift from me. ❤ If your order is over $150, skip the host code, earn Stampin’ Rewards for free stuff yourself and I’ll still send you a free pack of embellishment as a THANK YOU gift from me. ❤

Design inspired by Sally McFadden.