Curvy Hello

The Quite Curvy Bundle, hit the market in the fall and made a big bang through the holiday season, but we haven’t seen the last of this pretty Bundle. It translates quite nicely to All-Occasion cards as well. I thought we could all use some bright spring colors this winter. Enjoy!

Full list of supplies needed, listed below. A die cutting machine is needed for this card.
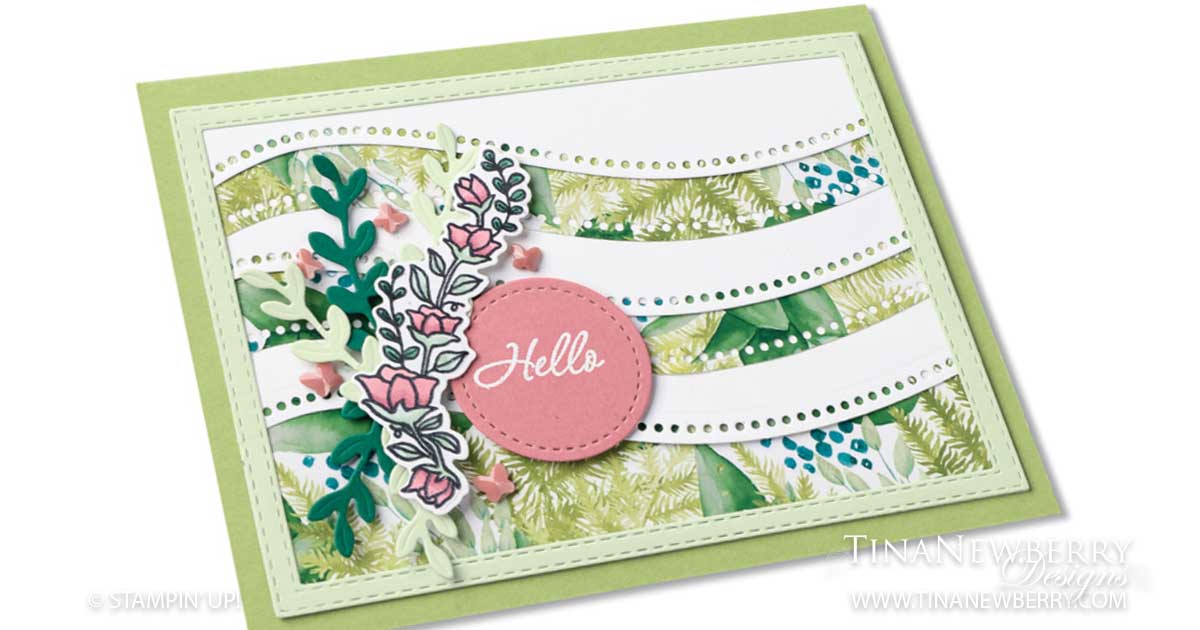
Card Base: Granny Apple Green Cardstock 8 1/2 h” x 5 1/2″ 4 1/4″ h folded to h x 5 1/2″ h.
Background: Forever Greenery DSP 3-7/8″ h x 5 1/4″ w
Decorative Frame: Soft Seafoam Cardstock trimmed with the two largest Stitched Rectangles Dies
Decorative Curves: Whisper White Cardstock trimmed with the Quite Curvy Dies
Sentiment Layer: Rococo Rose Cardstock – Stamp first (see below) then trim with the Stitched Shapes Dies
Inside Layer: Whisper White Cardstock 4″ h x 5 1/4″ w

  1. Affix all stamps to Acrylic Blocks.
  2. Fold the Card Base in half using a Bone Folder to sharpen the crease.
  3. Attach the Decorative Curves to the Background Layer using Stampin’ Seal and Fine-Tip Glue.
  4. Attach the Decorative Frame with Stampin’ Seal.
  5. Die cut Sprigs out out Shaded Spruce and Soft Seafoam Cardstock.
  6. Stamp the Floral Image on Whisper White Cardstock and color with Rococo Rose and Soft Seafoam Stampin’ Blends markers. Then die cut the image.
  7. Use Mini Glue Dots to attach the sprigs to the Floral Image. Set aside.
  8. Stamp the Sentiment on Rococo Rose Cardstock with Versamark ink and heat emboss with white embossing powder. Die cute with the Stitched Shapes Circle Die.
  9. Attach the Sentiment and Floral Image using Stampin’ Dimensionals.
  10. Add Butterfly Gems
  11. Decorate the Inside Layer and attach.
  12. Decorate the envelope.
  13. Beautiful! Put it in the mail!

Shopping List

Recommended Stamper’s Toolkit

Product List
Order online from the convenience of your own home or send me your order and I’ll take care of you. ❤ Either way, please use the host code ANTD9UHS. Order online AND, if your order is $50 or more using host code ANTD9UHS between now and the end of the month you’ll receive a free pack of embellishment as a THANK YOU gift from me. ❤ If your order is over $150, skip the host code, earn Stampin’ Rewards for free stuff yourself and I’ll still send you a free pack of embellishment as a THANK YOU gift from me. ❤

Design by Stampin’ Up!

Stand Tall & Stand Out

Stand tall & stand out! I love this sentiment! Such a fun color combination for these beautiful birds! The flamingo dies make is so easy to build a flamingo – or 3- in any color(s) you like. For this one I knew I wanted one to stand out in Flirty Flamingo, so I made the other two out of Petal Pink. This is another #simplestamping project using just stamps, ink and paper.

Full list of supplies needed, listed below. A die cutting machine is needed for this card.
Card Base: Shimmery White Cardstock 8 1/2 h” x 5 1/2″ w folded to 4 1/4″ h x 5 1/2″ w.
Sentiment Layer: 
Basic Black Cardstock 1/2″ h x 2 1/2″ w
Inside Background: Petal Pink Cardstock 3 3/4″ h x 5″ w
Inside Layer: 3 1/2″ h x 4 3/4″ w

  1. Affix all stamps to Acrylic Blocks.
  2. Fold the Card Base in half using a Bone Folder to sharpen the crease.
  3. To make the water:
    1. Place a piece of scrap cardstock along the horizon line.
    2. Press an acrylic block onto the Balmy Blue Ink Pad to lift some color off.
    3. Fill a Water Painter with water and then squeeze the barrel over the block to add a few drops of water to the ink.
    4. Dip the brush tip of the Water Painter Painter into the water and swirl to combine with the ink.
    5. Apply watercolor to the Background below the horizon line.
    6. Allow to dry
  4. Die Cut and assemble one Flirty Flamingo and two Petal Pink Flamingoes.
  5. Stamp the Foliage in Granny Apple Green on scrap Basic White Cardstock and color with the Granny Apple Green and Melon Mambo Stampin’ Blend markers and die cut.
  6. Stamp two flowers in Melon Mambo ink and color with the Melon Mambo Stampin’ Blend markers and die cut.
  7. Attach the Flirty Flamingo with Stampin’ Dimensionals – I trimmed her feet b/c she’s standing in the water.
  8. Attach one Petal Pink Flamingo with Stampin’ Seal and the other with Stampin’ Dimensionals. I trimmed their feet too so they would be shorter.
  9. Attach the Foliage and Flowers with Stampin’ Dimensionals.
  10. Stamp the Sentiment on the Sentiment Layer with Versamark ink, sprinkle with White Stampin’ Emboss Powder and Heat Emboss to set. Then attach with Stampin’ Dimensionals.
  11. Decorate the Inside Layer and attach.
  12. Decorate the envelope.
  13. So cute! Now send it to someone special.

Shopping List

Stamper’s Toolkit

You will also need adhesive, acrylic blocks, scissors and other basic PaperCrafting items from the Stamper’s Toolkit