3 Simple Techniques for Stamping with Blocks

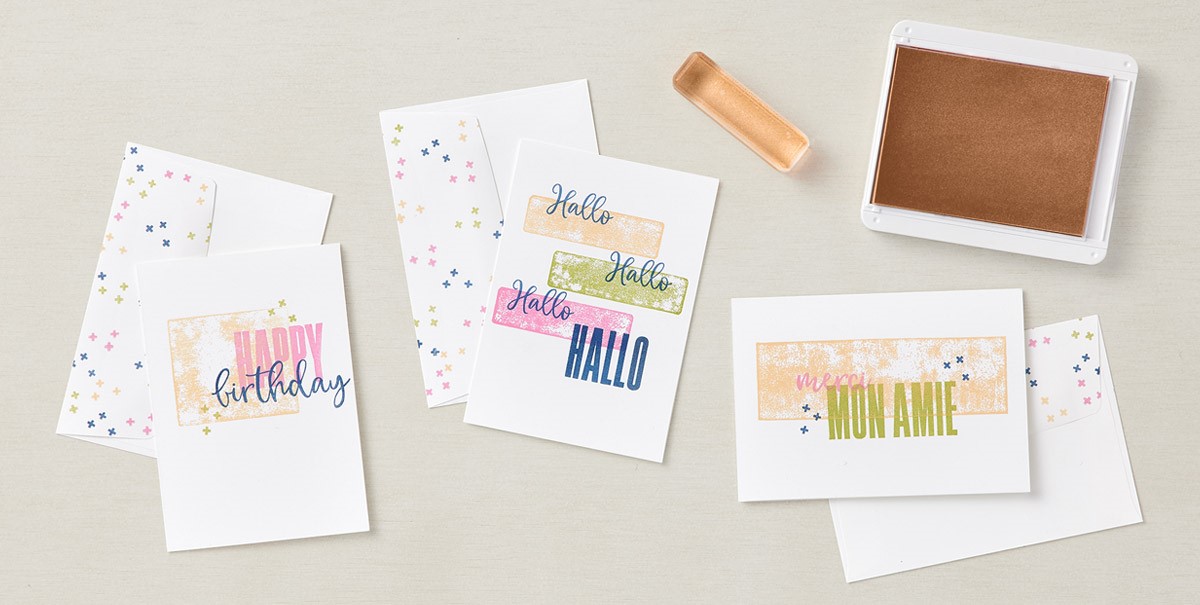
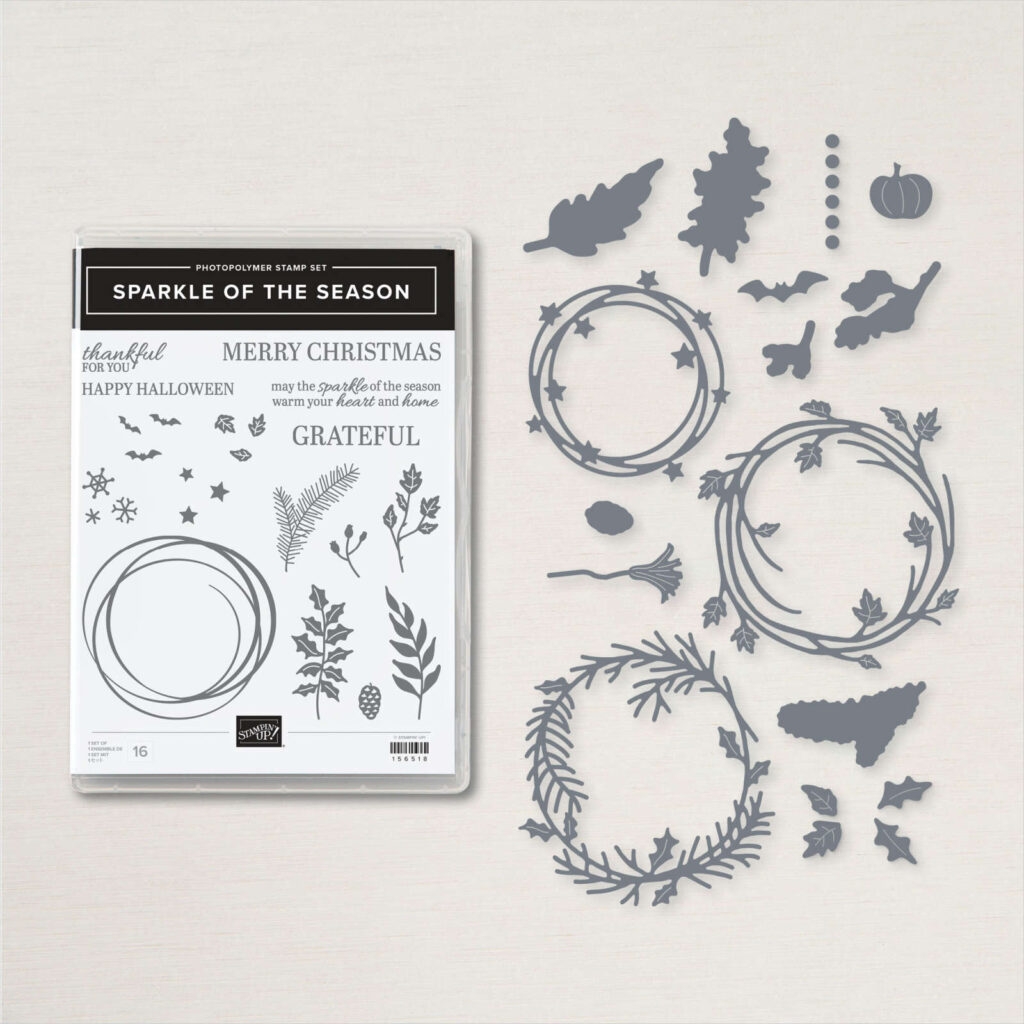
Reusable acrylic blocks go hand-in-hand with photopolymer and red rubber cling stamps. Crafters mount the stamps on the blocks, ink their stamp and then stamp their image. But that’s not all blocks are good for! Did you know you can use Stampin’ Up!’s clear blocks as stamps? You sure can! Stamping with acrylic blocks is a fun way to add some simple color to each project and great way to get started if you’re new to stamping and are building your stash of supplies

The designers used differently sized blocks, but the same four ink colors on all three cards: Pale Papaya, Pear Pizzazz, Polished Pink, and Night of Navy.

  1. For the Happy Birthday card, the artist dabbed Clear Block C on a Pale Papaya ink pad and used it as a stamp to create a textured background on the card.
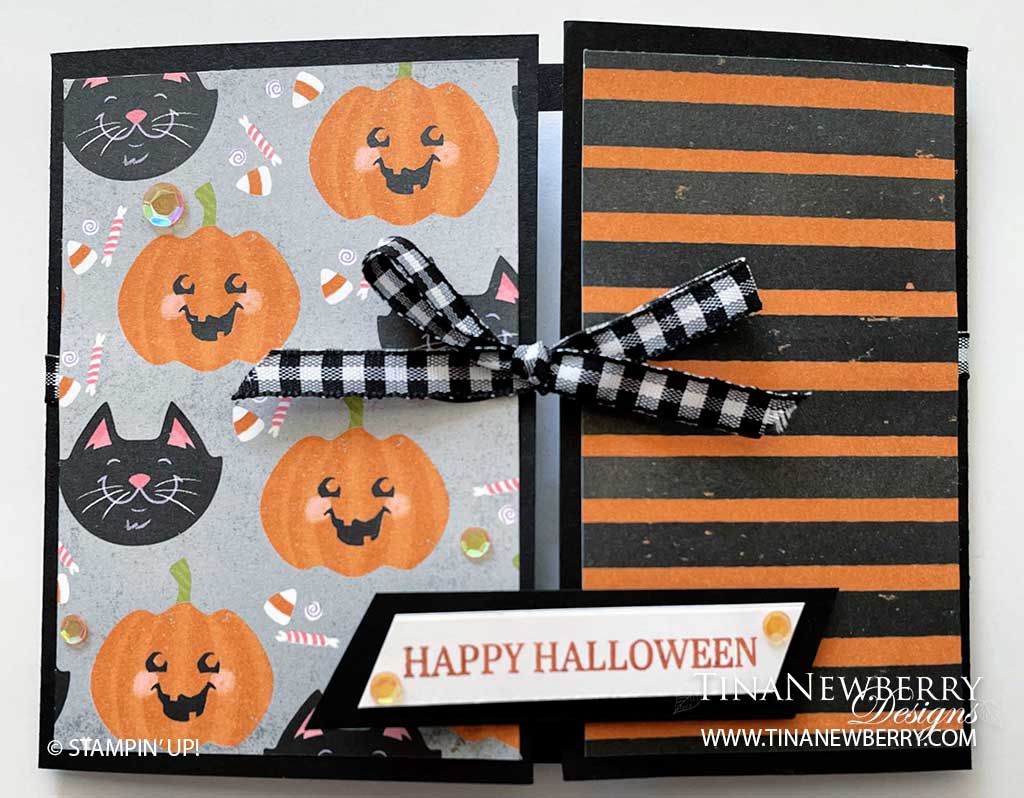
  2. You can also use clear blocks to create a pattern, like on the Hallo card, stamped multiple times with Clear Block G.
  3. Or copy the Merci Mon Amie card’s large background, made using Clear Block H.

Take just 5 minutes to play with these techniques and I think you’ll love creating unique effects with all sorts of products!

How have you used a Stampin’ Up! product unconventionally? Share all your fun creations on my FaceBook Group PaperCrafty Time with Tina Newberry or Tina Newberry Designs, my FaceBook Business Page!

Thankful for You

Thank you for your interest in this project. Some projects are exclusive to subscribers who will receive passwords by email.

Are you a subscriber? Awesome! Check your email for the password and enter it here to view this project.

Not yet subscribed?  We’d love for you to join us.  Subscribe to my email list and receive news, information and inspiration by email.

Grateful

I cannot get enough of this Blackberry Beauty Designer Series Paper. Colors I didn’t really like before – like Cinnamon Cider are suddenly gorgeous in this paper! Add the block font GRATEFUL sentiment and two starry swirls from the Sparkle of the Season Bundle and this card comes together in about 10 minutes.

Measurements

Full list of supplies needed, listed below. A die cutting machine is needed for this card.
Card Base: Blackberry Bliss Cardstock to 4 1/4” h x 11” w. Scored and folded on the long side at 5 1/2″
Background Matte: Cinnamon Cider Cardstock to 4” h x 5 1/4″ w
Background: Blackberry Beauty Designer Series Paper 3 3/4″ h x 5” w
Wreaths (1): Gold Foil 3″x 3″ scrap
Sentiment Layer: Cinnamon Cider Cardstock 1/2” h x 2 1/2″ w
Inside Layer: Basic White Cardstock 4″ h x 5 1/4″ w

Let’s Create

  1. Affix all stamps to Acrylic Blocks.
  2. Fold the Card Base in half using a Bone Folder to sharpen the crease.
  3. On one side of the 4” h x 5 1/4″ w Cinnamon Cider Background Matte, adhere a 3” x 3” piece of Adhesive Sheet in the center. Die Cut a Starry Swirl from the Cinnamon Cider layer so that the Adhesive sheet will be on the backside of the die cut swirl.
  4. Attach a 3” x 3” piece of Foam Adhesive on the back side of a 3” x 3” piece of Gold Foil.
  5. Die cut a starry swirl from the Gold Foil with Foam Adhesive, roll it 4-5 times in the die cut machine to get the cut through all of the thick foam.
  6. Adhere the Blackberry Beauty DSP Background layer to the Cinnamon Cider layer (covering the die cut hole with the DSP).
  7. Wrap the Gold Shimmer Ribbon across the center of the DSP and use Tear N’ Tape or Stampin’ Seal+ to adhere to the back side.
  8. Attach the ribbon wrapped Background Matte using Stampin’ Dimensionals.
  9. Peel the backing off of the Adhesive Sheet on the Cinnamon Cider starry swirl and adhere onto the center of the card front.
  10. Peel the backing off of the Foam Adhesive backed Starry Swirl Gold Foil, press on top of the Cinnamon Cider Starry Swirl. 
  11. Stamp with Blackberry Bliss Stampin’ Pad onto a 1/2” x 2 1/2” Cinnamon Cider Sentiment. Trim an angle at each end close to the sentiment.
  12. Use Dimensionals to adhere the sentiment onto the card front.
  13. Decorate and stamp the inside layer and attach using Stampin’ Seal.
  14. Decorate your envelope.
  15. It’s beautiful!! Who are are you grateful for? Let them know with this card!

Shopping List

Stamper’s Toolkit

You will also need adhesive, acrylic blocks, scissors and other basic PaperCrafting items from the Stamper’s Toolkit

Happy Halloween Sparkle

Aren’t the little faces on these pumpkins and cats SO CUTE!!!! They make me happy paired with the fun pumpkin and black striped paper from the Cute Halloween Suite. Eek adorable, but it’s the Happy Halloween sentiment I adore from the Sparkle of the Season Bundle. This Bundle is versatile holiday season Bundle covering Halloween, Thanksgiving AND Christmas all in one! Make this Quick & Easy card – with a fun fold in a jiffy when you combine the Cute Halloween Designer Series Paper with the Sparkle of the Season Bundle.

Measurements

Full list of supplies needed, listed below.
Card Base: Basic Black Cardstock to 4 ¼” h x 11” w. Score and fold on the long side at 3” and 8 ½” to make a barn door card.
Background Pieces (5):
Cute Halloween Designer Series Paper (4)
Front: 4″ h x 2 ¾” and 4″ h x 2 ¼” h
Inside: 4″ h x 1 ¼” w and 4″ h x 1 ½” w
Basic White Cardstock (1)
Inside: 4″ h x 2 1/4″ w
Sentiment Matte: Basic Black Cardstock 3/4″ h x 3″ w
Sentiment Layer: Basic White 1/2″ h x 2 3/4″ w
Inside Layer: Basic White Cardstock 4″ h x 5 1/4″ w

Let’s Create

  1. Affix all stamps to Acrylic Blocks.
  2. Fold the Card Base in half using a Bone Folder to sharpen the crease.
  3. Wrap the Black & White Gingham Ribbon around the card and tie a bow at the front, center of the card.
  4. Adhere the 2 Cute Halloween DSP Background pieces to the card front panels, right over the ribbon using Stampin’ Seal+.
  5. Adhere two Cute Halloween DSP inside Background pieces to the left side interior flap using Stampin’ Seal.
  6. Use Memento stamp pad to stamp bats all over the 2 ¼” x 4” Basic White Background piece. Adhere this to the interior right side flap using Stampin’ Seal.
  7. Stamp and decorate the inside 4″ h x 5 1/4″ w Basic White Background layer and use Stampin’ Seal attach to the interior center panel..
  8. Stamp the sentiment with Pumpkin Pie Stampin’ Pad onto the ½” x 2 ¾” Basic White cardstock Sentiment Layer. Use Paper Snips to cut angles on each end of the sentiment.
  9. Adhere the sentiment layer onto the Basic Black ¾” x 3” Sentiment Matte piece with Stampin’ Dimensionals and use Paper Snips to cut angles at each end of Sentiment Matte.
  10. Adhere the layered sentiment with Dimensionals to the right side panel card front, so that it overlaps the center of the card but is only adhered to the right side panel.
  11. Sprinkle on some Artistry Blooms sequins.
  12. Decorate your envelope.
  13. Adorbs!! Who will you send it to?

Shopping List

Stamper’s Toolkit

You will also need adhesive, acrylic blocks, scissors and other basic PaperCrafting items from the Stamper’s Toolkit