UR Cute Valentine Treat Box

Thank you for your interest in this project. Some projects are exclusive to subscribers who will receive passwords by email.

Are you a subscriber? Awesome! Check your email for the password and enter it here to view this project.

Not yet subscribed?  We’d love for you to join us.  Subscribe to my email list and receive news, information and inspiration by email.

Luv U

Customize conversation hearts with the versatile Sweet Talk designer series paper and heart dies found in the Sweet Conversations Bundle. Talk about versatile, the dies include a tag, a banner flag and an envelope! Let create together. I’ll show you how.

Measurements

Full list of supplies needed, listed below. A die cutting machine is needed for this card.

Basic White Thick Cardstock

  • 8 ½” x 5 ½” (score at 4 ¼”) Cad Base

Basic White Cardstock

  • 4 ⅜” x 3”
  • 1 ¼” x 1 ¼” (cut 2) (for stamping and die cutting hearts)

Real Red Cardstock

  • 5 ⅜” x 4 ⅛”
  • 2 ¼” x 2” (for die cutting tag)

Highland Heather Cadstock 4 ¼” x 2 ¾”

DSP Sweet Talk

  • (Petal Pink print) 2 ¼” x 2” (for die cutting tag)
  • (Highland Heather stripe)1 ¼” x 1 ¼” (for die cutting heart)
  • (rows of hearts print) 3 ½” x ⅝” (for flag)
  • (Petal Pink print) 3 ¾” x ⅝” (for flag)

Let’s Create

  1. Affix all stamps to Acrylic Blocks.
  2. Fold the Card Base in half using a Bone Folder to sharpen the crease.
  3. Using the Gingham Embossing Folder, emboss the Real Red background layer.
  4. Using the Dotty Hearts Embossing Folder, emboss the Highland Heather layer.
  5. Using Real Red ink, stamp the “Luv U” outline heart onto Basic White Cardstock and die cut using the coordinating die from the Sweet Hearts Die set. 
  6. Using Real Red ink stamp the largest heart onto Basic White cardstock. Using the largest heart Die from the Sweet Hearts Die set cut this one and one from the Highland Heather Stripe DSP.  
  7. Use Stampin’ Seal to adhere the Real Red background layer to the Basic White card base.  
  8. Stampin’ Seal to attach the Basic White layer toward the left side of the card centering it up and down.  Use Stampin’ Seal+ to attach the embossed Highland Heather layer onto the Basic White layer, turning just a bit to make it skewed. 
  9. Die cut a Real Red and Petal Pink tag labels. Attach the 2 labels together with the Real Red one behind the Petal Pink. Attach these to the card using Stampin’ Dimensionals. 
  10. Die cut three hearts. Attach the 3 die cut hearts to the Petal Pink tag.  The Real Red and Striped hearts are taped flat, the “Luv U” heart is attached with Stampin’ Dimensionals.  
  11. Using a pair of scissors, flag the ends of both the Petal Pink and the DSP strips and attach these to the card towards the lower part of the Highland Heather panel.
  12. Cut a piece of the Real Red Faux Linen Ribbon in half lengthwise (to make it narrower) and tie a small bow, attach at the top of the tag with a glue dot.
  13. Sprinkle with 3 Iridescent Rhinestone Jewels, decorate the inside & send off to someone you love!
  14. Stamp and decorate the inside and attach with Stampin’ Seal.
  15. Decorate your envelope.
  16. So cute! Now send it to someone special.

Shopping List

Stamper’s Toolkit

You will also need adhesive, acrylic blocks, scissors and other basic PaperCrafting items from the Stamper’s Toolkit

Happy Valentine’s Slimline

Come along as we CASE (copy and share everything) the January – June Mini Catalog (pg 10)! Conversation hearts are so fun at every age, but who says they have to be candy? An adult version of conversataion hearts right here on this super cute slimline card complete with instructions for making your own custom matching envelope.

Measurements

Full list of supplies needed, listed below. A die cutting machine is needed for this card.
Basic White

  • 6 ¾” x 5 ½”, score at 3 ⅜” for Card Base
  • 5 ½” x 1 ¼” for stamping and die cutting hearts 
  • 2 ¾” x ½”

Highland Heather Cardstock  5 ⅜” x 3 ¼” Background

Real Red – 3 ⅞” x 2 ⅛”

Sweet Talk Designer Series Paper 

  • 4 ⅜” x 1 ½”
  • 7 ½” x 7 ½” for envelope

Real Red Cardstock 2 ⅞” x ⅝” 

Slimline Card with Custom Envelope

Let’s Create

  1. Affix all stamps to Acrylic Blocks.
  2. CARD
    1. Cut Basic White Card Base at 6 ¾” x 5 ½”, and score at 3 ⅜”.
    2. Using the Dotty Hearts Embossing Folder, emboss the Highland Heather background layer and attach this to the Basic White card base.
    3. On Basic White cardstock, stamp the heart once each using the following color inks – Blushing Bride, Pool Party, So Saffron, Granny Apple Green and Highland Heather. (The sample uses the heart that fits with the “Luv U” outline stamp)  Die cut these hearts using the Sweet Hearts Die.
    4. Tape the hearts along the top edge of the DSP starting at the left edge.  Hearts are touching, but not overlapping. 
    5. Using Real Red ink stamp the “Happy Valentine’s Day” onto the small Basic White Strip and adhere this to the Real Red layer.
    6. Tie Real Red organdy ribbon into a bow around the DSP.
    7. Tape the DSP to the Real Red layer, and tape this to the card, leaving enough space at the bottom for the greeting.
    8. Adhere the layered sentiment to the lower part of the card using Stampin’ Dimensionals. 
    9. Using a 2” circle punch, punch out a Granny Apple Green circle.
    10. Decorate the inside of the card.
  3. ENVELOPE
    1. Score on one side at ½” and 7”
    2. Turn and score along the other side at 2½” and 6”
    3. Cut off all 4 corners at the score marks. Fold Along the length of the envelope at the score marks and tape closed.  Fold up the ½” at the bottom and tape closed.  Corner round each of the corners on the 1½” flap.  This is the opening of your envelope.
    4. *NOTE:  You can also use a heavier weight (32#) printer paper for the envelope if you wish. 
  4. So cute! Now send it to someone special.

Shopping List

Stamper’s Toolkit

You will also need adhesive, acrylic blocks, scissors and other basic PaperCrafting items from the Stamper’s Toolkit

Keep It Simple

A quick Google search will yield hundreds of thousands of results on how to make adorable Christmas, birthday, or greeting cards. With all this information, it’s easy to get overwhelmed. But there’s no need to be stressed—sometimes simple is best!

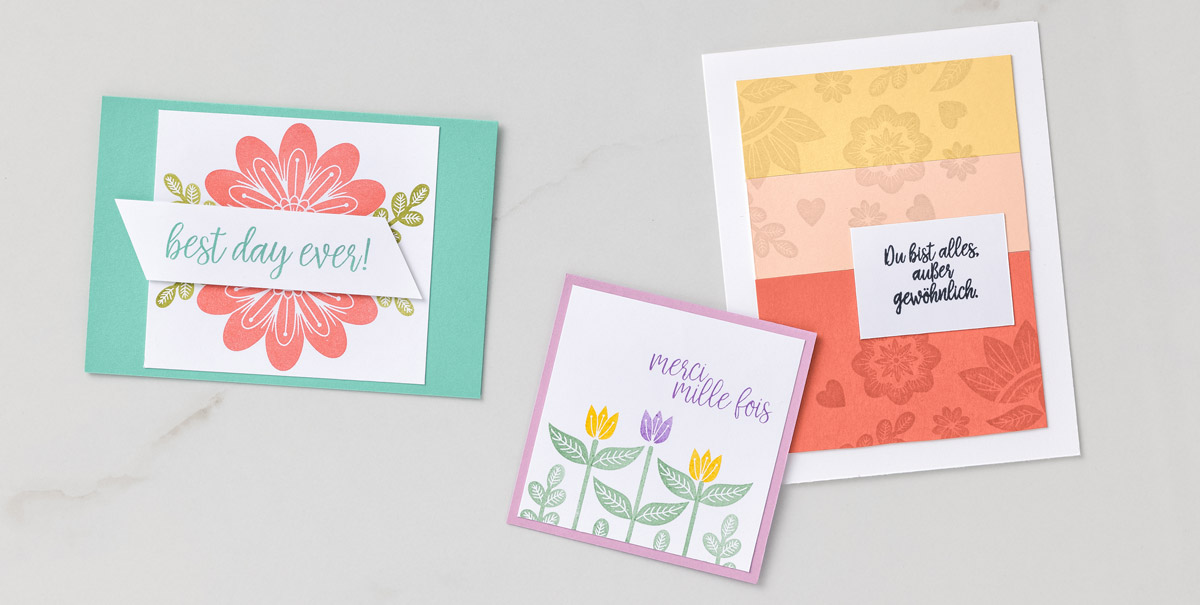
Our Best Day Ever card is simple but sweet. We used Basic White and Costal Cabana cardstock for the base, then stamped with the In Symmetry Stamp Set to create a mirrored effect with Flirty Flamingo and Pear Pizzazz ink. We finished off this lovely card with a simple sentiment in Coastal Cabana ink.

Our Merci mille fois card took no time at all but still left a great impression. We used Basic White and Fresh Freesia cardstock for the base and stamped out some multi-level flowers with Daffodil Delight, Highland Heather, and Pear Pizzazz ink.

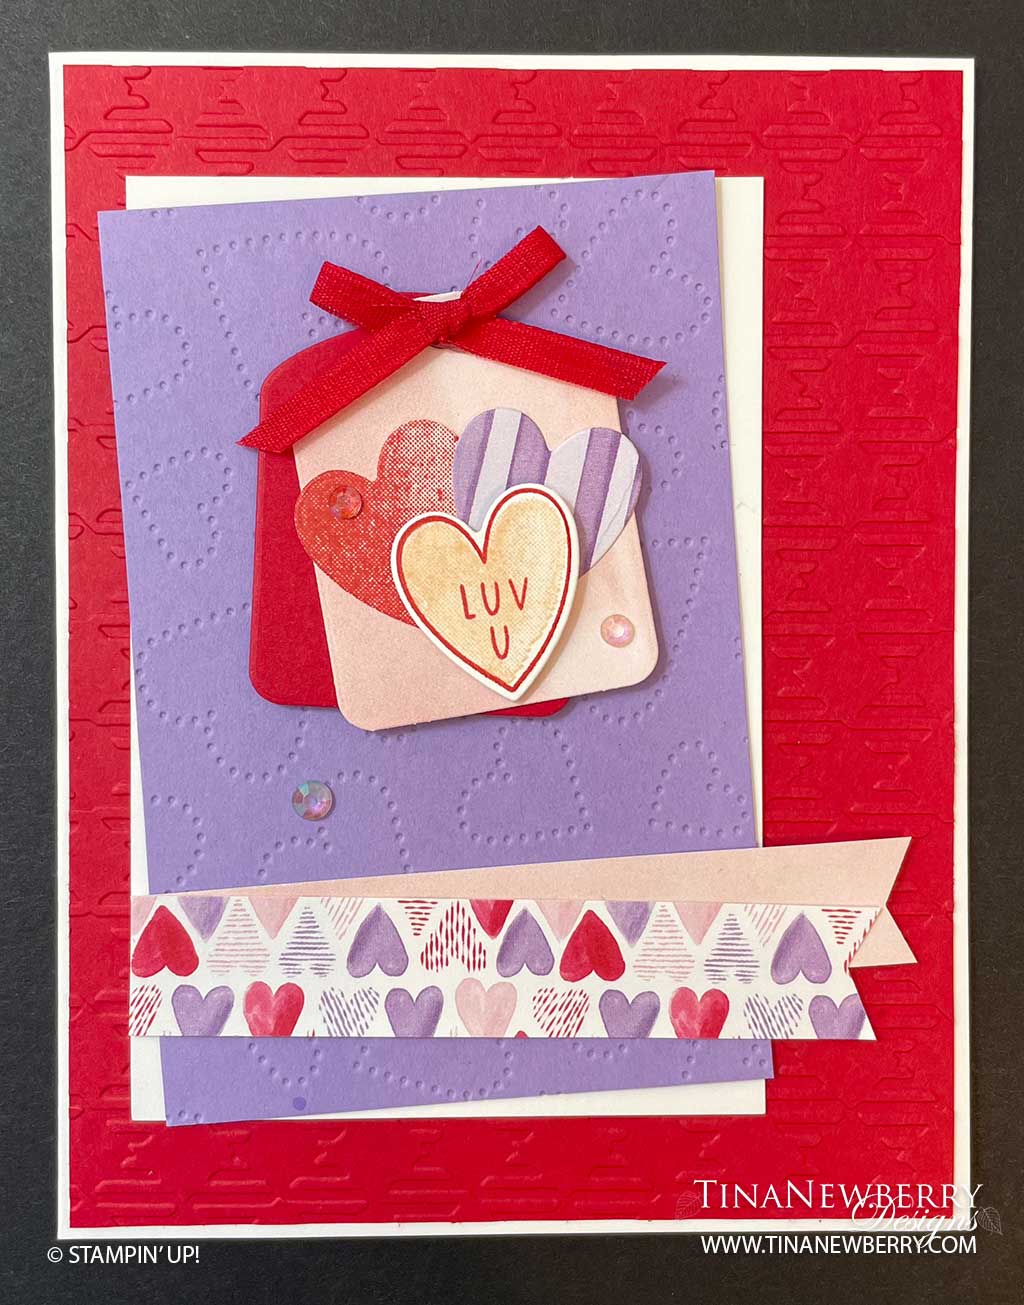
For our Du bist alles, außer gewöhnlich card, we used Subtles cardstock, cutting out 1-1/4″ x 3-1/2″ (3.2 x 8.9 cm) in Petal Pink and So Saffron and 2-1/4″ x 3-1/2″ (5.7 x 8.9 cm) in Calypso Coral. We adhered the strips to a 3-1/2″ x 4-3/4″ (8.9 x 12.1 cm) piece of Basic White cardstock with Stampin’ SEAL, then stamped out some cute images using VersaMark ink. We finished the card with an adorable sentiment stamped in Memento ink.

Shopping List