Parts & PIeces: Botanical Layers

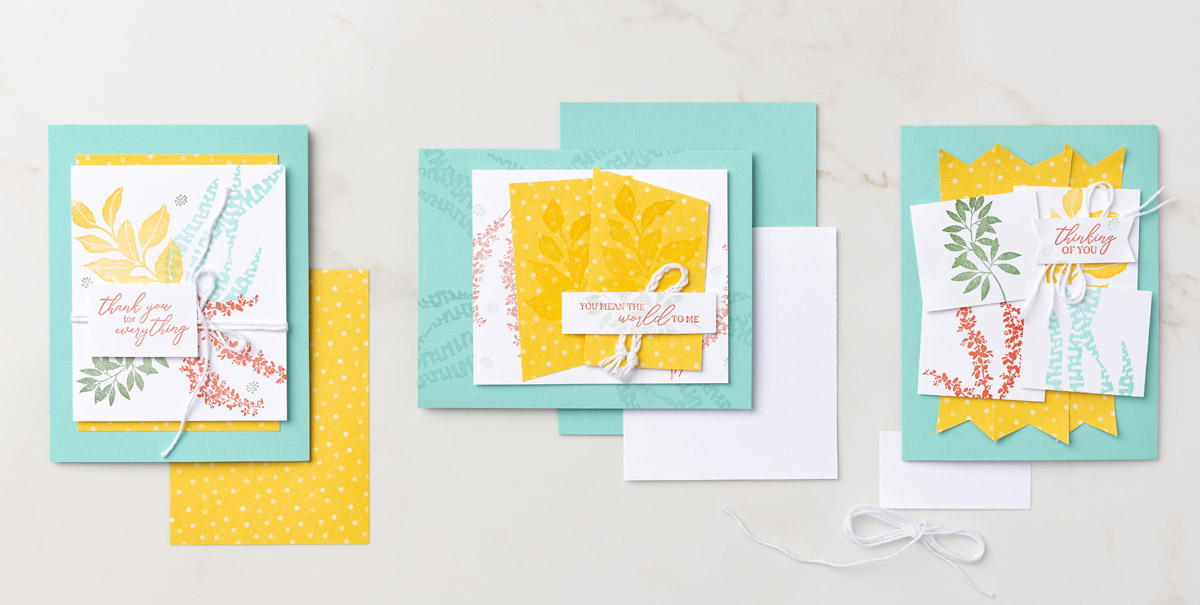
Sometimes it’s hard to say how you feel—what’s difficult to say face-to-face can sometimes be more easily written. Who knows how many profound, important conversations started with a beautiful card?

Today we have three card ideas for you—and because they all use the same color palette, elements, and the must-have Botanical Layers Stamp Set, you can easily imagine adding a delightful twist to make them your own. (Seeing someone else get creative can sometimes be freeing!)

For instance, notice how our concept artist showed off the versatility of our fabulous Baker’s Twine. For these cards we showed its range—tied it in a bow, looped it behind a stamped layer, and made a clever little braid for some old-fashioned charm.

The Thinking of You card features curled banner-cut ends and layers popped up with Stampin’ Dimensionals. Truly, you could spend hours mixing and matching elements to create a splendid card that someone will treasure. But as we all know—the thing your recipient will love most will be the message you write inside!

White Letters Pop on a Dark Tag

Create a tag that pops with white text on any dark cardstock. I’ll show you how.

Measurements

Full list of supplies needed, listed below. A die cutting machine is needed for this card.
Balmy Blue Cardstock 5 1/2″ h x 8 1/2″ w folded to 5 1/2″ h x 4 1/4″ w

Basic White Thick Cardstock: scraps for apple, leaves and flowers

Parakeet Party Cardstock: scrap for flower centers

Basic White Cardstock:

  • 5 1/4″ h x 4″ w
  • 4 3/4″ h x 3 1/4″ w

Basic Black Cardstock: scrap for sentiment tag

Let’s Create

  1. Affix all stamps to Acrylic Blocks.
  2. Fold the Card Base in half using a Bone Folder to sharpen the crease.
  3. Run the Card Base through the Stampin’ Cut & Emboss machine with the scalloped die from the Apple Dies to create the scalloped edge. Attach the small scalloped piece to the inside edge of the Card Base.
  4. Run the 4 1/2″ h x 3″ w Basic White Cardstock through the Stampin’ Cut & Emboss Machine with the Stitched Rectangle and then again with the Timeworn Typ Embossing Folder. Attach to Card Base with Stampin’ Seal.
  5. On the Basic White Thick Cardstock, stamp the apple and leaves in Sahara Sand ink. Then color with Stampin’ Blends:
    1. Apple: Real Red, Daffodil Delight, and a bit of Cherry Cobbler
    2. Apple Stem: Soft Suede
    3. Leaves: Old Olive
  6. Die cut the apple, leaves, the branch, two large flowers and one small flower from Basic White Thick and three flower centers from Parakeet Party Cardstock scraps.
  7. Use Stampin’ Blends to add some color to the:
    1. Flower Tips- Flirty Flamingo
    2. Branch- Crumb Cake
    3. Flower Centers- Black
  8. To create the tag:
    1. Remove static from the Basic Black Cardstock by rubbing the surface with an Embossing Buddy
    2. Stamp the sentiment in Versamark Ink
    3. Sprinkle with White Embossing Powder
    4. In slow deliberate circles, carefully heat the black cardstock with a Heat Tool to melt the embossing powder. Be careful not to burn your fingers, overheat your work surface or scorch your sentiment. You will see the embossing powder melt as it turns from a chalky dull color to a bright white.
    5. Run the sentiment through the Stampin’ Cut & Emboss Machine with the tag from the Apple Dies.
  9. Arrange the apple, flowers, branch, leaves and sentiment tag on the card front.
    1. Use Fine Tip Glue to attach the Parakeet Party flower centers to the flowers.
    2. Use Stampin’ Seal to attach the apple, branch and leaves.
    3. Use Mini Glue Dots to attach the flowers.
    4. Use Stampin’ Dimensionals to attach the Sentiment Tag.
  10. Tie a bow with Linen Thread and attach with a Mini Glue Dot.
  11. Sprinkle on the Fine Sparkle Adhesive Backed gems.
  12. Stamp and decorate the 5 1/4″ h x 4″ w Basic White Cardstock for the inside and attach with Stampin’ Seal.
  13. Decorate your envelope.
  14. So sweet! Now send it to someone special.

Shopping List

Recommended Stamper’s Toolkit

Product List
Order online from the convenience of your own home or send me your order and I’ll take care of you. ❤ Either way, please use the host code ANTD9UHS. Order online AND, if your order is $50 or more using host code ANTD9UHS between now and the end of the month you’ll receive a free pack of embellishment as a THANK YOU gift from me. ❤ If your order is over $150, skip the host code, earn Stampin’ Rewards for free stuff yourself and I’ll still send you a free pack of embellishment as a THANK YOU gift from me. ❤

Make a Torn Strip Peekaboo Card

Yvonne Spikmans, of the Stampin’ Up! 2022 Artisan Design Team was one of the many talented designers who inspired me to get the Apple Harvest Bundle with her original design of this card. She’s way more talented than I am, but I sure had fun trying out this torn strip peekaboo card.

Measurements

Full list of supplies needed, listed below. A die cutting machine is needed for this card.
Basic White Thick Cardstock:

  • 5 1/2″ w x 8 1/2″ h folded to 5 1/2″ w x 4 1/4″ h for the Card Base.
  • Scrap for apples and flowers

Basic White Cardstock:

  • 3 1/2″ h x 4 1/2″ w
  • 3/4″ h x 3 1/2″w

So Saffron Cardstock: scraps for center of flowers.

2022-2023 6″ x 6″ Brights Designer Series Paper (DSP):

  • 3 1/2″ h x 5″ w Poppy Parade Pattern 1
  • 3 1/4″ h x 3 1/2″ w Poppy Parade Pattern 2

Let’s Create

  1. Affix all stamps to Acrylic Blocks.
  2. Fold the Card Base in half using a Bone Folder to sharpen the crease.
  3. Protect your work surface and use Tuxedo Black ink to stamp the apples randomly along the edges of the card base front.
  4. Carefully create two small tears about 2″ apart in the short edge of the 3 1/2″ h x 4 1/2″ w Basic White Cardstock. Then slowly work the two tears until they are each about 3″ long. Next flatten the torn flap and carefully roll it back on itself and secure with a Mini Glue Dot.
  5. Use Stampin’ Seal to attach the DSP pattern 2 onto the left edge of DSP pattern 1 with Stampin’ Seal.
  6. Use Stampin’ Dimensionals to attach the torn Basic White panel to the left edge of the DSP layer. Pattern 2 should show through the torn area and Pattern 1 should show on the right edge.
  7. Use Stampin’ Dimensionals to attach the DSP and torn panel to the front of the Card Base.
  8. Stamp sentiment in Poppy Parade ink on the 3/4″ h x 3 1/2″w Basic White Cardstock layer and trim the ends with the Lovely Labels Pick A Punch. Attach to the torn layer with Stampin’ Dimensionals.
  9. Use Tuxedo Black ink to stamp the whole apple on Basic White Thick scrap. Then use Poppy Parade, Granny Apple Green and Light Soft Suede to color the apple. Die cut out and attach to the card with Stampin’ Dimensionals.
  10. Die cut three flowers from Basic White Thick scrap and three flower centers from So Saffron scrap cardstock.
  11. Use dark Petal Pink Stampin’ Blend to color the center of the flowers and then use Multipurpose Liquid Glue to attach the So Saffron flower centers. Attach using Mini Glue Dots.
  12. Tie a bow with Sweet Sorbet twine and attach with a Mini Glue Dot.
  13. Sprinkle on the Solid Faceted Gems
  14. Stamp and decorate the inside.
  15. Decorate your envelope.
  16. Squeal! Now send it to someone special.

Shopping List


Recommended Stamper’s Toolkit

Product List
Order online from the convenience of your own home or send me your order and I’ll take care of you. ❤ Either way, please use the host code ANTD9UHS. Order online AND, if your order is $50 or more using host code ANTD9UHS between now and the end of the month you’ll receive a free pack of embellishment as a THANK YOU gift from me. ❤ If your order is over $150, skip the host code, earn Stampin’ Rewards for free stuff yourself and I’ll still send you a free pack of embellishment as a THANK YOU gift from me. ❤