Sending You Sunshine

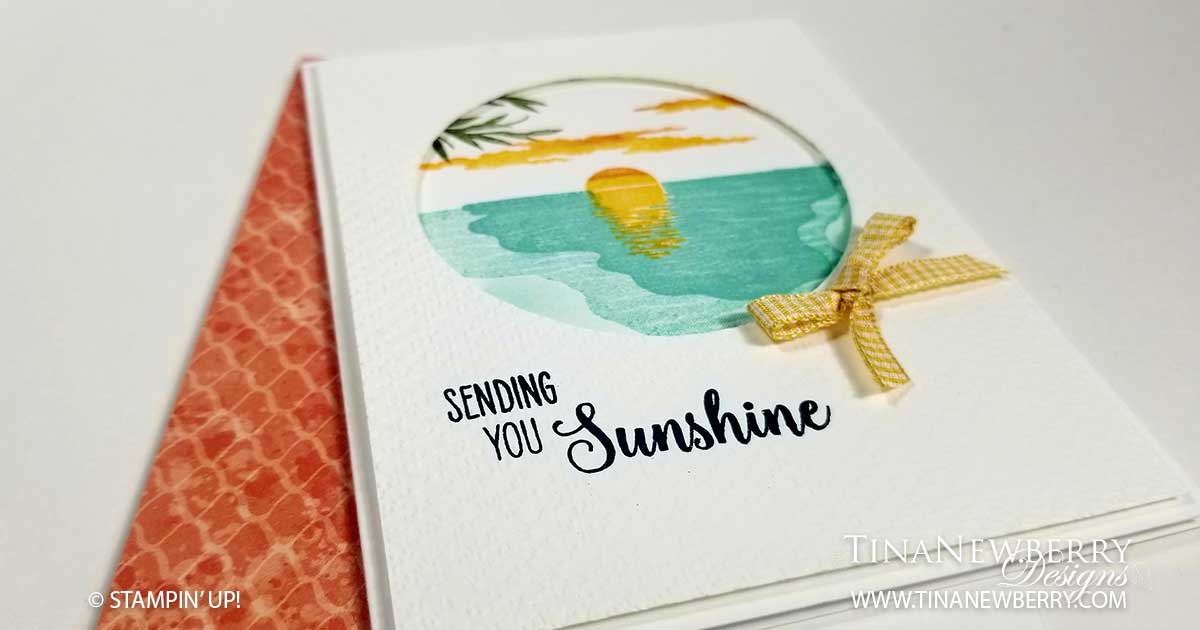
There’s something about watching the sunset over water that brings quiet peace and relaxation. Jo Anne Hewins captured that feeling perfectly in her version of this card. I had a good time recreating it myself. The Sending Sunshine stamp set makes it incredibly easy with overlapping stamps.

Full list of supplies needed, listed below. A die cutting machine is needed for this card.
Card Base: Basic White Thick Cardstock 8 1/2 h” x 5 1/2″ w folded to 5 1/2″ h x 4 1/4″ w.
Background: Basic White Cardstock 3 1/2″ h x 3 1/2″ w
Sentiment Layer: 
Basic White Cardstock 5 1/4″ h x 4″ w

  1. Affix all stamps to Acrylic Blocks.
  2. Fold the Card Base in half using a Bone Folder to sharpen the crease.
  3. Creating the Background Layer
    1. Lay the 3″ Circle Die from the Layering Circles Die set in the center of the Background Layer and mark the outside edge lightly with pencil.
    2. Stamp the smallest water stamp first in Coastal Cabana.
    3. Stamp the largest water stamp in Pool Party, overlapping the first layer.
    4. Next Stamp the Sun in Mango Melody and a smidge of Pumpkin Pie, overlapping the two water layers. To get the smidge of Pumpkin Pie, I first stamped the image in the Mango Melody, then pressed just the top edge of the sun onto the Pumpkin Pie ink pad. Practice on scrap paper first.
    5. Add the clouds, also in Mango Melody with a smidge of Pumpkin Pie.
    6. Lastly stamp the Palm Fronds with Mossy Meadow ink.
  4. Stamp the Sentiment in Tuxedo Black ink on the Sentiment Layer. Then die cut the 3″ circle and run the layer through the Tasteful Textiles Embossing Folder.
  5. Use Dimensionals to attach the Background behind the 3″ window.
  6. Use Dimensionals to attach the Sentiment Layer.
  7. Add a bow.
  8. Decorate the Inside Layer and attach.
  9. Decorate the envelope.
  10. So cute! Now send it to someone who needs some sunshine.

Shopping List

Stamper’s Toolkit

You will also need adhesive, acrylic blocks, scissors and other basic PaperCrafting items from the Stamper’s Toolkit

Design inspired by Jo Anne Hewins.

Hoping Your Day is Perfect

I was immediately drawn to the Sending Sunshine stamp set because well for one, I love sunrise and sunset and for two, I knew my northern peeps would be needing some sunshine right about now. Connie Babbert deserves all the credit for this card. I’m just a really good copier! This beauty is just Stamps, Ink & Paper.

Full list of supplies needed, listed below. A die cutting machine is needed for this card.
Card Base: Balmy Blue Cardstock 8 1/2 h” x 5 1/2″ w folded to 5 1/2″ h x 4 1/4″ w.
Background: Basic White Cardstock 5 1/4″ h x 4″ w
Decorative Strip: Pastels DSP 5 1/4″ h x 1 3/4″ w
Sentiment Layer: 
Balmy Blue Cardstock scrap trimmed with the 4″ x 3″ Stitched So Sweetly Die
Stamped Decorative Layer: Basic White Cardstock scrap trimmed with the Stitched So Sweetly Die

  1. Affix all stamps to Acrylic Blocks.
  2. Fold the Card Base in half using a Bone Folder to sharpen the crease.
  3. Run the Background through the Stampin’ Cut & Emboss machine with the Subtle Embossing Folder. Attach to card.
  4. Attach Decorative Strip.
  5. Stamp the Sentiment on the Sentiment Layer with Tuxedo Black Ink.
  6. Stamp the sunset scene on the Stamped Decorative Layer.
  7. Attach the Stamped Decorative Layer to the Sentiment Layer with Stampin’ Dimensionals.
  8. Attach the Sentiment Layer with Stampin’ Dimensionals.
  9. Decorate the Inside Layer and attach.
  10. Decorate the envelope.
  11. So cute! Now send it to someone special.
Product List

Stamper’s Toolkit

You will also need adhesive, acrylic blocks, scissors and other basic PaperCrafting items from the Stamper’s Toolkit

Design inspired by Connie Babbert.

This is Knot Good

Oh this poor little giraffe makes me smile. Look at the worry in his eye! We’re all felt this way before and this little guy just brings a little lighthearted humor to the situation. The simple ‘Hope things get better soon’ is the perfect inside sentiment to go with him. The soothing cool color palette and crisp white background are sure to brighten the day of someone you love.

Full list of supplies needed, listed below. A die cutting machine is needed for this card.
Card Base: Misty Moonlight Cardstock 5 1/2″ h x 8 1/2″ w folded to 5 1/2″ h x 4 1/4″ w.
Background: Basic White Cardstock 5″ h x 3 3/4″ w
Sentiment Layer: 
Misty Moonlight Cardstock trimmed to 1 1/2″ h x 1″ w with the Tasteful Labels Dies (stamp and emboss first)
Grass: Pear Pizzazz Cardstock trimmed with the Golf Club Dies (retired)
Inside Layer: Basic White Cardstock 5 1/4″ h x 4″ w

  1. Affix all stamps to Acrylic Blocks.
  2. Fold the Card Base in half using a Bone Folder to sharpen the crease.
  3. Run the Background through the Stampin’ Cut & Emboss Machine with the Tasteful Textures Embossing Folder.
  4. Wrap Misty Moonlight Ribbon around the Background and tie knot.
  5. Attach the Background with Stampin’ Dimensionals.
  6. Stamp the sentiment in Versamark ink on the Sentiment Layer and heat emboss with white embossing powder. Then die cut and attach with Stampin’ Dimensionals.
  7. Stamp the giraffe in Soft Suede ink on scrap Basic White Thick cardstock and color with Stampin’ Blends before adding to card with Stampin’ Dimensionals.
  8. Die cut the grass and attach with Mini Glue Dots.
  9. Decorate the Inside Layer and attach.
  10. Decorate the envelope.
  11. Oh! This poor little guy. Who will you send it to? Brighten someone’s day!

Shopping List

Stamper’s Toolkit

You will also need adhesive, acrylic blocks, scissors and other basic PaperCrafting items from the Stamper’s Toolkit

Hope You’re Back On Your Feet Soon

This little turtle and matching sentiment make me chuckle! Such a clever little pick-me-up card. We all need a little humor in our lives. I used Stampin’ Blend alcohol markers to color this little cutie and the new Blending Brushes to color the Stitched Circle he’s sitting on. Both bring super easy color to this simple card.

Measurements

Full list of supplies needed, listed below. A die cutting machine is needed for this card.
Card Base: Coastal Cabana Cardstock 5 1/2″ h x 8 1/2″ w folded to 5 1/2″ h x 4 1/4″ w.
Patterned Background: Neutrals DSP 5 1/4″ h x 4″ w
Embossed Background: Basic White Cardstock 4 3/4″ h x 3 1/2″ w with the Brick & Mortar Embossing Folder
Circle Layer: Basic White Cardstock trimmed with 3″ Stitched Circle Die (color first)
Sentiment Layer: Basic White Cardstock 3/4″ h trimmed with the Lovely Labels Pick a Punch (stamp first)
Inside Layer: Basic White Cardstock 5 1/4″ h x 4″ w

Let’s Create

  1. Affix all stamps to Acrylic Blocks.
  2. Fold the Card Base in half using a Bone Folder to sharpen the crease.
  3. Attach the Patterned Background with Stampin’ Seal.
  4. Run the Embossed Background through the Stampin’ Cut & Emboss Machine with the Brick & Mortar Embossing Folder.
  5. Using the Blending Brushes and ink pads, apply Costal Cabana and Granny Apple Green to a scrap of Basic White Cardstock and then die cut using the 3″ Stitched Circle Die. Stamp the Turtle in Soft Suede Ink. Attach Circle to Embossed Layer with Stampin’ Seal+ or Multipurpose Liquid Glue.
  6. Stamp the Turtle on scrap Basic White Thick Cardstock in Soft Suede Ink and color with Stampin’ Blends. Then use Paper Snips to cut out. Attach to the Stitched Circle with Stampin’ Dimensionals.
  7. Stamp the Sentiment in Coastal Cabana Ink on the Sentiment Layer and trim the ends with the Lovely Labels Pick a Punch. Attach with Stampin’ Dimensionals to the Embossed Layer.
  8. Wrap ribbon around the Embossed Layer and tie a bow. Secure with a Mini Glue Dot, if needed.
  9. Use Mini Glue Dots to add sequins.
  10. Decorate the Inside Layer and attach.
  11. Decorate the envelope.
  12. So cute!! Who needs a pick-me-up? Send them this card.

Shopping List

Stamper’s Toolkit

You will also need adhesive, acrylic blocks, scissors and other basic PaperCrafting items from the Stamper’s Toolkit

Design inspired by Alisa Tilsner.