Friend Like You

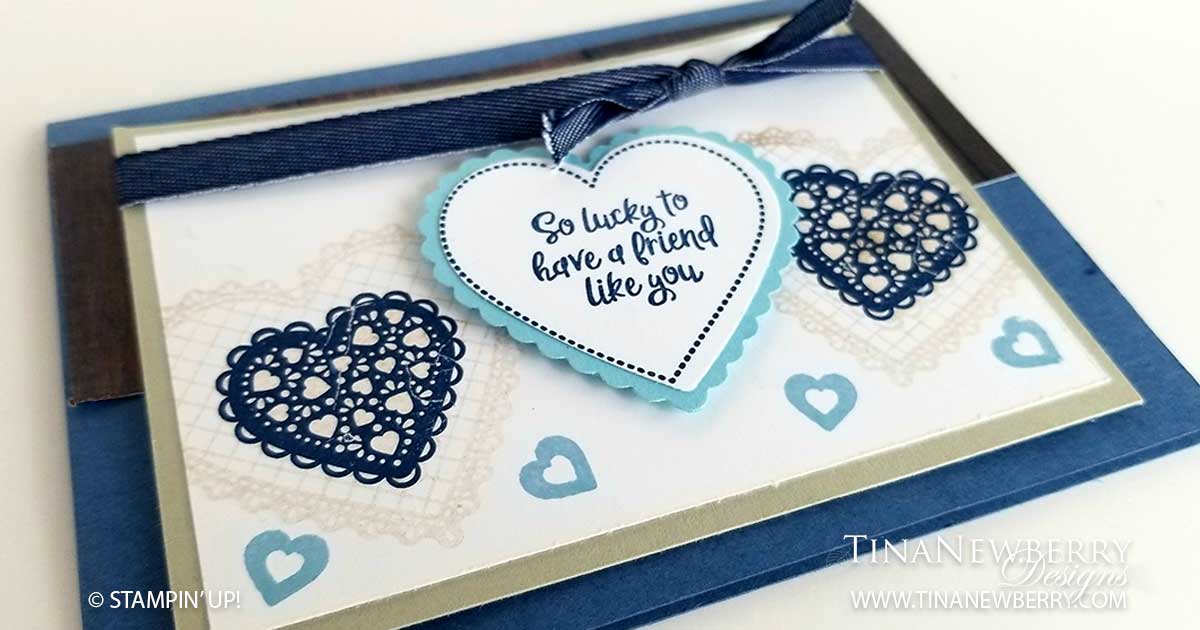
Hearts in non-traditional colors! Yay! Hearts for all seasons. Fun! Hmmm.. I should send this to a man. Any takers? The In Good Taste wood grain paper makes a nice contrast to the Sahara Sand and you guessed it, the new Misty Moonlight In-Color is making an appearance as the Card Base.

Cutting Dimensions

Full list of supplies needed are listed at the bottom of the page.
Card Base: Misty Moonlight Cardstock 8 1/2 h” x 5 1/2″ w folded to 4 1/4″ w x 5 1/2″ h
Background Strip: In Good Taste DSP 5 1/2″ h x 2″ w
Stamped Layer Matte: Sahara Sand Cardstock 4 3/4″ h x 3 1/2″ w
Stamped Layer: Whisper White Cardstock cut 4 1/2″ h x 3 1/4″ w
Ribbon: 6″ and 2″ Denim Ribbon
Scalloped Heart: Balmy Blue Cardstock with the Scalloped Heart Punch
Sentiment Heart: Whisper White Cardstock with the Plain Heart Punch

Instructions

  • Affix all stamps to Acrylic Blocks.
  • Fold the Card Base in half using a Bone Folder to sharpen the crease.
  • Use Stampin’ Seal Adhesive to adhere the Background Strip to the Card Base.
  • On the Stamped Layer, use Sahara Sand Ink to stamp the Large Scalloped Heart. Stamp off once for a lighter image.
  • Use Night of Navy ink to stamp the Small Scalloped Heart over the Large Scalloped Heart, the Dotted Heart Outline and the Sentiment.
  • Use Balmy Blue Ink to stamp the Tiny Hearts along the bottom.
  • Use Stampin’ Seal Adhesive to adhere the Sentiment Heart to the Scalloped Heart.
  • Use Stampin’ Seal Adhesive to adhere the Stamped Layer to the Stamped Layer Background.
  • Affix the 6″ piece of Ribbon to the Stamped Layer Background.
  • Use Dimensionals to Adhere the Scalloped Heart to the Stamped Layer.
  • Use Dimensionals to Adhere the Stamped Layer Background to the Card Base.
  • Tie the 2″ Ribbon in a knot.
  • You’re Done! Now send some sunshine. Put it in the mail!

Product List

Recommended Stamper’s Toolkit

Design inspired by Bonnie O’Neill.

Heartfelt Congratulations

This week I am using the Heartfelt Stamp Set and coordinating Hearts Punch Pack to convince myself that hearts are NOT just for February. Isn’t this design gorgeous (Don’t get too excited, I totally copied it)?! I mean I’m convinced already with this one design, but I did two more like I usually do and then even a bonus design for fun. My favorite parts of this design is the subtle embossed heart and the Thoughtful Blooms flowers! Plus you can never go wrong with white heat embossed anything. I hope you enjoy making this card as much as I did.

Cutting Dimensions

This project uses a Die Cutting Machine. Full list of supplies needed, listed below.
Card Base: Pool Party Cardstock 5 1/2″ h x 8 1/2″ w folded to 5 1/2″ h x 4 1/4″ w
Background: Whisper White 4 3/4″ h x 3 3/4″ w
Pattern Layer: In Good Taste Designer Series Paper Die Cut with Stitched So Sweetly Dies
Ribbon: 4″ of Whisper White Tulle Ribbon

Instructions

  1. Affix all stamps to Acrylic Blocks.
  2. Fold the Card Base in half using a Bone Folder to sharpen the crease.
  3. Emboss the Background with the Tin Tile Embossing Folder.
  4. Use Snail Adhesive to affix the Background.
  5. Use Snail Adhesive to affix the Pattern Layer.
  6. Punch the Scalloped Heart from the Flowers For Every Season DSP.
  7. Emboss a scrap piece of Pool Party Cardstock with the Subtles Embossing Folder and punch the Plain Heart out of it.
  8. Use Snail Adhesive to adhere the two Hearts together and also to adhere to the card.
  9. Stamp the Sentiment in Versamark ink on a scrap piece of Pool Party Cardstock.
  10. Heat emboss the Sentiment with White Stampin’ Powder and a Heat Tool.
  11. Cut Sentiment down to size and use the Paper Snips to create Banner ends.
  12. Use Tear & Tape to affix a piece of the Tulle Ribbon.
  13. Use Dimensionals to affix the Sentiment Banner.
  14. Punch 3 of the Small Bloom Punch flowers from scrap Whisper White Cardstock.
  15. Affix to flowers with Mini Glue Dots.
  16. Adhere Clear Epoxy Raindrops to the center of the Flowers.
  17. Punch two of the Sprig Punches from scrap Garden Green Cardstock.
  18. Use the Snips to cut the Springs into smaller pieces and affix with Snail Adhesive.
  19. That’s it! Who are you going to send it to?

Product List


Recommended Stamper’s Tool Kit


Design CASEd from Trisha Magnus.

Buy One, Get One

My Retired Used Products BOGO Starts Today!
All right here’s how this works… Here on my website I have posted all of my retired items, with new items added in the past week,  some are new most are used, read the descriptions carefully to be sure of what you are buying. All the items are marked 60% off. Put all the retired items you want in your cart, make note of the total and then check out use the coupon code 2020BOGO to reduce the price to $0. All you pay is shipping on those items. THEN within 48 hours, place an order from the NEW catalog for the total price of the retired items and I will ship the retired items to you. You can order items from the new catalog on my product website using the host code EXHRKQ62 or send your order directly to me and I’ll take care of it for you! BOGO ends June 10th.

Butterfly Congratulations

For this card I really wanted to play some more with the Vellum Butterflies and I knew I wanted to use some yellows because this card is going to celebrate a friend’s graduation from St. Leo University and gold is one of their colors. The new Bumble Bee In-Color is very pretty and the Bumble Bee Gingham Ribbon is adorable. Both are perfect for this card. I’m very pleased with how it came out.

Cutting Dimensions

Full list of supplies needed, listed below. You will need a Die Cutting Machine for this project.
Card Base: Whisper White Thick 5 1/2 w” x 8 1/2″ h folded to 4 1/4″ w x 5 1/2″ h
Background: Whisper White 4″ w x 5 1/4″ h Stitched Rectangle
Decorative Layer 1: Bumble Bee Designer Series Paper
Decorative Layer 2: Whisper White die cut with the 3″ w x 4″ h Stitched So Sweetly Rectangle
Sentiment Layer: Whisper White die cut with the 1 1/4″ h x 2 1/2″ w Stitched Rectangle

Instructions

  1. Affix all stamps to Acrylic Blocks
  2. Stamp the Butterflies on the Vellum in So Saffron Ink. Set aside to dry.
  3. Fold the Card Base in half using a Bone Folder to sharpen the crease
  4. Emboss the Background Layer with the Subtle 3D Embossing folder and use Snail Adhesive to adhere it to the Card Base.
  5. Use Snail Adhesive to adhere the Decorative Layer 2 to Decorative Layer 1.
  6. Tie the Bumble Bee Gingham Ribbon in a bow around the Decorative Layers
  7. Use Dimensionals to affix the Decorative Layers.
  8. Stamp the Sentiment in Crushed Curry Ink onto the Sentiment Layer.
  9. Use Dimensionals to affix the Sentiment Layer.
  10. Punch the Butterflies out and attach with Mini Glue Dots
  11. Add Basic Pearls to the butterfly bodies.
  12. You’re Done!! Who will you send it to? Mine is going to Madison Lynn!! Happy Graduation!

Product List

Recommended Stamper’s Tool Kit