Thinking of You

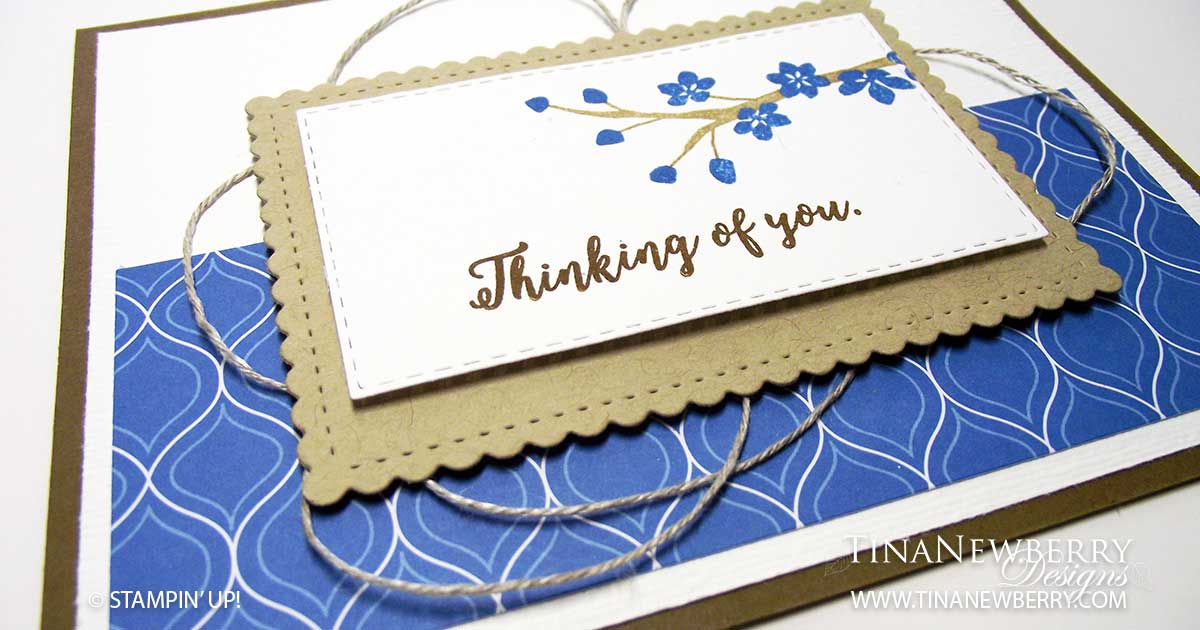
When I first started thinking about this card,I knew I wanted to use Pacific Point. I wasn’t sure the lighter Crumb Cake was enough so I cautiously added the Soft Suede and Early Espresso. I’m quite happy with the results! I’m not so good at adding lots of little repeating stamps. For some reason I can’t repeat ink consistently and all the images come out looking different. But with this stamp set, the flowers and buds are one stamp and the branch is another making it so easy to create a consistent image. And the branch stamp even has cut outs so you can fit the flowers in right where they go. No guess work! And the result is a beautifully put together flowering branch. I’m sad to see this set on the retiring list. I have used it here and there over the last few years and have really enjoyed the results. Look for this set and coordinating dies on sale in my retiring section after June 3rd.

Cutting Dimensions

This project uses a Die Cutting Machine. Full list of supplies needed, listed below.
Card Base: Soft Suede Cardstock 8 1/2 h” x 5 1/2″ w folded to 4 1/4″ h x 5 1/2″ w
Background: Whisper White 4″ h x 5 1/4″ w
Pattern Layer: Pacific Point Designer Series Paper 2″ h x 5″ w

Instructions

  1. Affix all stamps to Acrylic Blocks
  2. Fold the Card Base in half using a Bone Folder to sharpen the crease
  3. Emboss the Background with the Subtle Embossing Folder
  4. Use Snail Adhesive to affix the Background to the Card Base
  5. Use Snail Adhesive to affix the Pattern Layer to the bottom of the Background Layer
  6. Die cut the Stitched so Sweetly Rectangle from Crumb Cake Cardstock
  7. Die cut a coordinating Stitched Rectangle from Whisper White Cardstock
  8. On the Stitched Rectangle, stamp the sentiment in Early Espresso ink then stamp the branch in Crumb Cake Ink and the flowers in Pacific Point Ink
  9. Use Snail Adhesive to affix the Stitched Rectangle to the Stitched So Sweetly rectangle
  10. Use Mini Glue Dots to affix looped Linen Thread to the back of the Stitched So Sweetly Rectangle
  11. Use Dimensionals to affix the Stitched So Sweetly Rectangle to the Background and Pattern Layer as shown
  12. That’s it! Send it to someone today

Product List

Recommended Stamper’s Tool Kit

Design inspired by Ronda Wade.

You Make Me Smile

Colorful Seasons did not disappoint with this beautiful design by Sue Vine. Sadly this set and matching dies are on the retiring list and won’t be around after June 2nd. I have not used this set enough, but I sure did enjoy creating six cards of three designs recently on a relaxing Sunday morning. Of this design, aside from the gorgeous color palette Sue Vine chose, I love the shading on the flowers and leaves, made with a sponge dauber. Such a simple technique that makes a big difference.

Cutting Dimensions

Full list of supplies needed, listed below. You will need a Die Cutting Machine for this project.
Card Base: Petal Pink Cardstock 8 1/2 h” x 5 1/2″ w folded to 4 1/4″ w x 5 1/2″ h
Background Matte: Flirty Flamingo 4.5″ h x 3 1/4″ w
Background: Whisper White 4 1/4″ h x 3″ w

Instructions

  1. Affix all stamps to Acrylic Blocks
  2. Fold the Card Base in half using a Bone Folder to sharpen the crease
  3. Emboss the Background with the Subtles Embossing Folder
  4. Use Snail Adhesive to adhere the Background to the Background Matte layer
  5. Use Snail Adhesive to adhere the Background Matte layer to the Card Base
  6. On a scrap piece of Whisper White cardstock, stamp the flower 5 times in Petal Pink ink
  7. Use a sponge dauber with Flirty Flamingo ink to slightly shade the center of the flowers
  8. Die cut the flowers
  9. Stamp the leaf outline and veins using Pear Pizzaz ink of Soft Seafoam cardstock
  10. Fill in the leaf outline with Soft Seafoam ink using the fill stamp
  11. Use a sponge dauber with Pear Pizzaz ink to slightly shade the outer edges of the leaf
  12. Die cut the branch from Early Espresso cardstock and snip off the small branch
  13. Stamp the sentiment in Early Espresso ink on scrap Whisper White cardstock
  14. Punch the Sentiment out using the Pretty Label Punch
  15. Position all the pieces as shown, before adhering anything, to make sure everything fits
  16. Affix the branches first using Snail Adhesive
  17. Affix all other pieces using Dimensionals and Mini Dimensionals
  18. Finish by adhering Artisan Pearls
  19. Beautiful! Who will you send it to?

Product List

Recommended Stamper’s Tool Kit

Design by Sue Vine.

You Are Incredible

Royal Peacock was the first Suite to catch my eye in the 2019-2020 Annual Catalog. I think because well Peacock is of course in my favorite color family and we have some peacocks live in the wild here in my neighborhood. Where I’m from the only peacocks I know of live at Canobie Lake Park or York’s Wild Kingdom, so it was quite unusual to me that they roam the streets here. As far as the catalog goes, I am quite sure the shiny foil papers and my favorite Pretty Peacock color are to blame! I just love those gorgeous Rhinestone jewels too in all my favorite colors.

This entire Suite is retiring June 2, 2020 and is currently on while supplies last status. Get it while you can!

Cutting Dimensions

Full list of supplies needed, listed below.
Card Base: Pretty Peacock Cardstock 8 1/2 h” x 5 1/2″ w folded to 4 1/4″ w x 5 1/2″ h
Background: Vellum 5″ h x 3 1/8″ w
2 1/4″ Circle: Old Olive Foil
2″ Circle: Whisper White Cardstock
Ribbon: 6″ Old Olive/Pretty Peacock 3/8″ (1 Cm) Reversible Ribbon
Ribbon Knot: 2″ Old Olive/Pretty Peacock 3/8″ (1 Cm) Reversible Ribbon

Instructions

  1. Fold the Card Base in half using a bone folder to sharpen the crease.
  2. Emboss the Vellum Background with the Beads & Baubles embossing folder
  3. Use Snail Adhesive to adhere the 6″ piece of Ribbon to the right side of the Vellum.
  4. Apply Snail Adhesive strategically to the back of the Vellum to adhere it to the Card Base without the adhesive showing.
  5. Tie the 2″ piece of Ribbon onto the front as shown.
  6. Affix Sentiment Stamp to the Acrylic Block. Apply Pretty Peacock Ink to the Sentiment Stamp and stamp the Sentiment onto the 2″ Whisper White Circle. Clean Stamp.
  7. Affix Flower Stamp to the Acrylic Block. Apply Pretty Peacock Ink to the Flower Stamp and stamp the Flower onto the 2″ Whisper White Circle. Clean Stamp.
  8. Add Noble Peacock Rhinestones to the Flower Centers
  9. Use Snail Adhesive to adhere the 2″ Circle to the 2 1/4″ Circle.
  10. Use Dimensionals to adhere the 2 1/4″ Circle to the Vellum.
  11. Lay down a Watercolor Wash on the Watercolor paper using Pretty Peacock Ink and Old Olive Ink. Let dry.
  12. Die cut the Feather from the Watercolor Wash
  13. Use Fine Tip Glue to adhere the Feather to the 2″ Circle.
  14. You did it! Who will you send this beautiful card to?

How to Create a Watercolor Wash

Supplies Needed:

  1. Fluid 100 Watercolor paper
  2. Aqua Painters
  3. Selection of Ink Pads
  4. Acrylic Blocks
  5. Paper towels or napkins
  6. Scrap paper

Instructions

  1. Examine you Aqua Painters and notice they come in two different tips. Select the Aqua Painter(s) you wish to use.
  2. Fill the Aqua Painter reservoir(s) with water.
  3. Squeeze the Aqua Painter reservoir until a few drops of water run through.
  4. Open the Ink Pads and stamp one Acrylic Block over one ink, to transfer ink to the block. Set the block on the scrap paper ink side up.
  5. Use the Aqua Painter to lift the first color off the Block and apply the ink in a sweeping motion onto the Watercolor Paper. Repeat until you have the desired amount of that color.
  6. Between colors, squeeze water through the Aqua Painter and brush it on the paper towel or napkin until the water runs clear.
  7. Continue to wash more colors until you have the desired amount of color.
  8. Colors will run together. To limit the amount colors run together, allow time to dry between color applications.
  9. Set aside to dry.

Product List


Recommended Stamper’s Tool Kit

Design inspired by Lisa Curcio.

Happy Father’s Day!

I know right? Father’s Day will be here before we know it. Don’t worry. My Dad is not on Facebook so chances are good he will not see this. LOL. This card is one of the reasons I bought the Country Club Suite. Isn’t this card divine? Su Mohr is the talented artist who designed this card. I copied it 100%. No worries! At Stampin’ Up! We CASE (copy and share everything.) Look at the putters in silver foil paper! And the Argyle Embossing Folder! What? When I saw it I knew I had to make it for my Dad. Can’t wait to send it to him.

The entire Country Club Suite is retiring. Be sure to order yours before June 2, 2020.

Cutting Dimensions

Full list of supplies needed, listed below.
Card Base: Whisper White Thick Cardstock 8 1/2 h” x 5 1/2″ w folded to 4 1/4″ w x 5 1/2″ h
Background: Whisper White 5″ h x 3 3/4″ w
Small Rectangles: Balmy Blue 1/2″ h x 2 1/2″ w Stitched Rectangles (5)

Instructions

  1. Fold the Card Base in half using a bone folder to sharpen the crease.
  2. Die Cut five putters out of Silver Foil Sheet
  3. Use Fine Tip Glue to adhere one Putter to each Small Rectangle
  4. Emboss the Background with the Argyle Embossing Folder
  5. Use Snail Adhesive to adhere the Argyle Background layer to the Card Base
  6. Use Dimensionals to adhere the Putters on Balmy Blue Small Rectangles to the Argyle Background Layer, as shown.
  7. Affix the Father’s Day Stamp to the Acrylic Block
  8. Apply Garden Green Ink to the Stamp and stamp the Sentiment on Whisper White Cardstock.
  9. Die cut the Happy Father’s Day Badge.
  10. Die cut the Greenery die from Garden Green Cardstock
  11. Use Snail Adhesive to adhere the Sentiment Badge and the Greenery Die Cut to the Putters.
  12. That’s it. Time to send it to the important man in your life!

Product List

Recommended Stamper’s Tool Kit