You Are Loved Completely

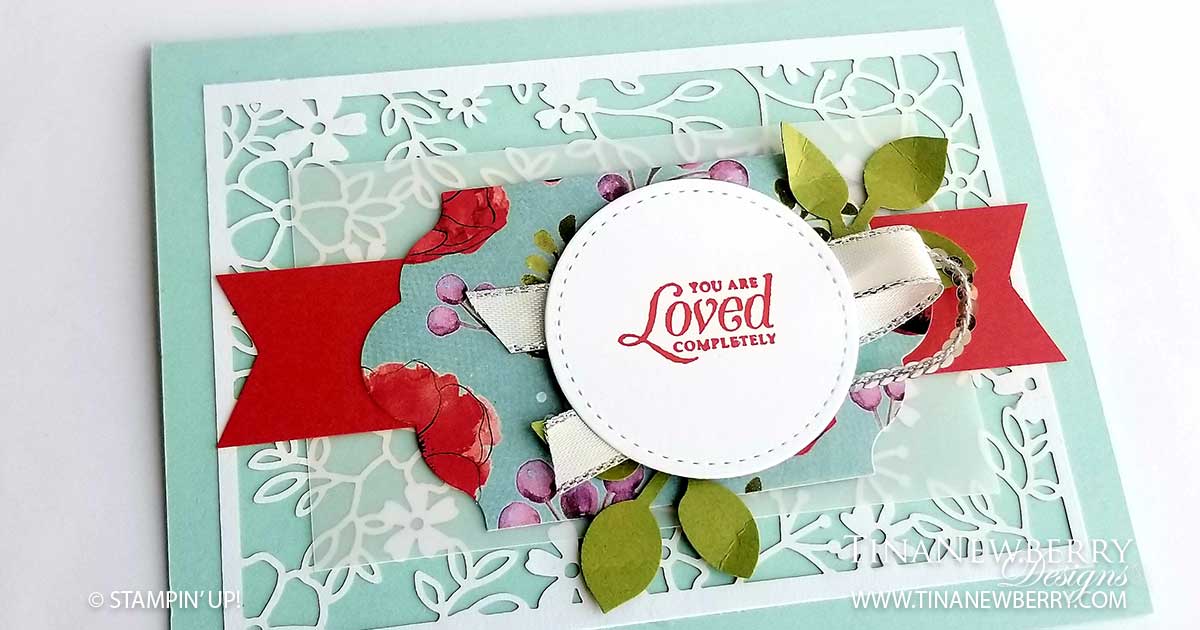
Pool Party is by far one of my favorites in the Stampin’ Up! line. The Pool Party paper with the Poppy Parade flowers popping off the page caught my attention immediately when I opened this beautiful Designer Series Paper. I had seen a card using detailed cut paper and knew I had to combine it with these layers. Your Are Loved Completely is one of three cards from the Strong & Beautiful Card Class previously scheduled for Sunday April 26. When I was designing the class I was thinking of all the strong amazing women I know. I was looking forward to offering this class in their honor. I’m sad this class was cancelled, but happy to share it with you! I hope you have as much fun making this as I did!

Cutting Dimensions

Card Base: Pool Party cardstock 8 1/2 h” x 5 1/2″ w folded to 4 1/4″ w x 5 1/2″ h
Lattice: Beautifully Detailed Laser Cut Specialty Paper
Vellum: Vellum 2 ½” h x 4” w
Banner: Poppy Parade 1” h x 5” w rectangle trimmed with triangle ends
Tag: Peaceful Poppies DSP with Every Day Label Punch
Circle: 2” Stitched Circle Die
Ribbon: 5 ½” Metallic Edge Ribbon
Trim: 5” Sequin Trim
Leaves: Old Olive with Leaf Punch (2)

Instructions

  1. Fold the card base using a bone folder to sharpen the crease.
  2. Stamp the sentiment in Poppy Parade Ink on the circle.
  3. Use Fine-Tip Glue Pen to adhere lattice to card base.
  4. Use Snail Adhesive to adhere vellum layer on top of lattice. Remember adhesive shows through vellum, so be strategic to use adhesive where it will be covered by other layers.
  5. Use Snail Adhesive to adhere Poppy Parade banner on top of vellum
  6. Use Snail Adhesive to adhere DSP tag on top of banner
  7. Use Snail Adhesive to adhere leaves, metallic ribbon and sequin trip
  8. Use Dimensionals to adhere sentiment circle.
  9. That’s it! Send it to someone.

Products List

You Are Like a Diamond

Rich colors and beautiful poppies create a striking backdrop for a thoughtful, powerful sentiment. One of three cards from the Strong & Beautiful Card Class previously scheduled for this Sunday April 26, You Are Like a Diamond is a tribute to the ladies in my life who get it all done day after day and endure no matter what. I’m sad this class was cancelled, but happy to share it with you! I hope you enjoy this little creative vacation to a field of poppies in Blackberry Bliss, Old Olive, Rich Razzleberry, and Whisper White.

Cutting Dimensions

Card Base: Old Olive Cardstock 8 1/2 h” x 5 1/2″ w folded to 4 1/4″ w x 5 1/2″ h
Background Layer: 1 piece Peaceful Poppies DSP 3 1/2” h x 4.25” w and 1 coordinating piece 2 1/2” h x 4.25” w
Tag: Whisper White Cardstock with stitched tag die
Lattice Strip: Whisper White Cardstock with Petals & More Thinlits Die (retired)
Ribbon: 7” and 4” pieces of Crinkle Ribbon

Instructions

  1. Fold the card base using a bone folder to sharpen the crease.
  2. Lay the DSP upside down on the card base and overlap them until together they are 5 ½” h. Adhere them to each other.
  3. To adhere the 7” Crinkle Ribbon, on the back of the new Peaceful Poppies DSP measure about ¾” from left edge and apply a small strip of Snail Adhesive on top and bottom edge. Affix one end of the ribbon to the back of the DSP, then run the ribbon across the front of the DSP and affix the remaining end to the Snail Adhesive on the backside of the far end.
  4. Use Snail Adhesive to adhere Peaceful Poppies DSP to card base
  5. Use the Blackberry Bliss Stampin’ Write Marker to color Resilient, Strong and Beautiful on the sentiment stamp and then finish coloring with the Rich Razzleberry Stampin’ Write Marker.  You may need to “huff” (breathe) on the stamp to re-wet the ink before you stamp the sentiment.
  6. Use Fine-Tip Glue to adhere the lattice just below the seam of the two DSP’s on the background.
  7. Use Dimensionals to adhere sentiment tag.
  8. Apply glue dots to three sequins and affix to the sentiment tag
  9. Tie the remaining 4” of Crinkle Ribbon in a bow on the 7” of Crinkle Ribbon.
  10. Awesome! You’re finished! Who are you going to send it to?

Make This Card

Ready to make this card? Awesome! You are going to LOVE it. Simply click on the products listed below to add them to your cart on my Stampin’ Up Website and check out using this month’s Host Code. OR give me a shout and I’ll place your order for you. You can reach me by email at tina@tinanewberry.com or through my social media accounts.

Sign up for my eNewsletter and you’ll receive instructions for two more card designs using many of these same products.

Products Used

NOTE: The Petals & More Thinlits Die used to make the white lattice on this card, is a retired die.

Recommended Stamper’s Tool Kit

Easter Blessings

May the spirit of the Lord fill your home this Easter and all the rest of your days. As we face new challenges through this pandemic, I’m wishing you a very Happy Easter that is filled with plenty of love and happiness, even as you may be separated from family and friends. Stay safe and healthy. God bless you and your family now and always.

“Praise be to the God and Father of our Lord Jesus Christ! In his great mercy he has given us new birth into a living hope through the resurrection of Jesus Christ from the dead.”

1 Peter 1:3:

The design for this beautiful Easter Blessings card has been forming in my mind for several weeks. I’ve seen many cards with the sweetest baby chicks, bunnies and lambs and I was tempted to make one of those, but this design kept leaning toward something more serene. Yet when I sat down to make it, I still wasn’t quite sure where it would end up. I’m quite happy with it.

The colors I used are Whisper White, Blushing Bride, Rococo Rose and Pear Pizzaz. I combined these with the retired Wood Textures Designer Series Paper and the Layered Leaves 3D Embossing Folder, with a little Linen Thread and some Basic Pearls to dress it up a bit. My trusty Silhouette die cutting machine provided the crosses, which I cut twice- once with the Wood Textures paper and another one on on some old brown cardstock and then adhered them together for a sturdier cross.

Cutting Dimensions

  • Cardbase: Whisper White Thick cardstock 8 1/2″ h x 5 1/2″ w folded to 5 1/2″ h x 4 1/4″ w
  • Embossed Layer: Whisper White cardstock 5 1/4″ h x 4″w embossed with the Layered Leaves 3D Embossing Folder
  • Cross: 2 1/2″ h x 2″ w cut with scissors or a die cutting machine from a brown or wood paper of your choice.
  • Flowers: The Small Bloom punch was used to make the Rococo Rose offset flowers. Two punches for each flower.

Instructions

  1. Fold the cardbase in half using a bone folder to sharpen the crease.
  2. Before embossing, use the Thoughtful Blooms (or a flower and leaves stamp set of your choice) to stamp a background on the Embossed Layer rectangle with Pear Pizzaz for the leaves and Blushing Bride for the small flowers.
  3. Run the Embossed Layer rectangle through your embossing machine using the Layered Leaves 3D Embossing Folder or another folder of your choice.
  4. Apply Snail Adhesive to the back of the Embossed Layer and adhere to the front of the card base.
  5. Using the Small Bloom Punch, punch two blooms for each flower out of Rococo Rose cardstock. Hold each individual punched bloom in the cupped palm of your hand and press the center with a rounded tip of a Sharpie. Rotate the Sharpie in a circular motion in the cup of your hand, until the bloom is concave. Adhere two offset blooms with a Glue Dot and use another Glue Dot to adhere the finished bloom to the Embossed Layer. Finish with a Basic Pearl embellishment.
  6. Adhere two cross layers together with liquid glue. Allow to dry and then affix to the Embossed Layer with Dimensionals.
  7. Tie two lengths of Linen Thread into a bow, pulling one loop on each side smaller than the other. Adhere to the cross with a squished Glue Dot.
  8. Affix the Easter Blessings sentiment from the Itty Bitty Greetings Clear-Mount Stamp Set to Clear Acrylic Block D, apply Rococo Rose Ink to the sentiment and stamp image on Whisper White cardstock.
  9. Punch sentiment out with the Classic Label Punch. Adhere to Embossed folder with Dimensionals. Do not put Dimensionals where the label overlaps the cross.
  10. Now you are ready to send to a friend!

Products Used

Recommended Stamper’s Tool Kit

Showered with Love

When I saw this card, I was looking forward to making it, mostly because it uses watercoloring and I thought that would be a fun technique and the pretty pinks are way girlie for me. Plus the Under My Umbrella bundle is just SO spring! I’m from New Hampshire, April Showers Bring May Flowers is something we’re used to saying. April is mud season, so compared to THAT this card is super cute. Boots and an umbrella are a must to survive mud season. Now that I live in Florida, it’s more about rainy season in June. Either way can you resist this adorable umbrella and girly flowers?

The design came straight from the Stampin’ Up! 2020 Jan – June Mini Catalog for this one. The only real change I made is the size of the card. Except as I was just uploading this picture, I noticed they used clear sequins! I missed those. Drat. They’re so cute!

Stampin’ Up! 2020 Jan – June Mini Catalog

Cutting Dimensions

  • Card base: 8.5″h x 5.5″w piece of Seaside Spray Cardstock folded to make a 4.25″w x 5.5″h. My project picture does not do SeasidecSpray justice. It is a really beautiful color that is retiring June 2021.
  • Watercolor Paper: 5.25″h x 3.75″w
  • Seafoam Green Tag: 1.5″ h x 1.5″ w use the Tailored Tag Punch to make the banner triangle.
  • Umbrella & Flowers: stamp the umbrella, flowers and umbrella handle with Stazon Ink on scrap watercolor paper. Use the Umbrella Builder Punch to pop out the Umbrella Handle and then use your scissors to fussy cut the rest. I recommend painting before cutting.

How to Watercolor

There are four main tools needed for successful watercoloring:

  • Stampin’ Up! Watercolor Paper (and yes, it’s better than just any old watercolor paper)
  • Stazon Ink Pad – this prevents the outline from bleeding while you paint
  • Aqua Painters – these are a paint brush- like tool with a water reservoir built right in!
  • and then the Ink Pad(s) of your choice. What colors do you want to use?
  1. Affix your Stamp to an acrylic block,
  2. Apply some Stazon Ink and stamp your image on the watercolor paper.
  3. Next, dab a little ink from the Stampin’ Ink Pad onto an acrylic block and
  4. Use the wet Aqua Painter to dilute the ink. Then paint.

I usually start with the area I want darkest first and work outward for some shading. Be careful not to add too much water!

Putting it All Together

Cut the paper as indicated. Using Stazon ink, stamp the umbrella and flowers on Watercolor Paper and stamp the umbrella handle on Basic Grey Cardstock. Watercolor the umbrella with the Rococo Rose ink. Watercolor the background using Seaside Spray and Basic Grey Ink. Watercolor the flowers using Grapefruit Grove, Petal Pink and Rococo Rose and the leaves in Garden Green. With the Umbrella Builder Punch punch out the umbrella and handle. Then use the Paper Snips or other scissors to fussy cut out the flowers.

Once the background is dry, add some Seaside Spray water drops from the Stamp Set and adhere it to the Seaside Spray cardbase. Then adhere the Umbrella handle using Snail Adhesive and the Umbrella using Dimensionals. Next arrange the flowers to your liking and affix to card. Swipe the Wink of Stella over the flowers to add a little sparkle.

Lastly, stamp the sentiment to the Soft Seafoam tag with Garden Green ink and affix the tag to the card with Stampin’ Dimensionals. And that’s it!

Products Used

So Sentimental

I am one of those people who says it better in a card. I dunno. I just do. That’s why the So Sentimental stamp set from Stampin’ Up! is perfect for me. This set is pretty much all sentiments with 9 of the 11 covering a variety of occasions. There’s one for thank you, friendship, celebration, yummy treats, baby, to/from, for you, healing hugs and happy wishes.

For this card, the I Can’t Thank You Enough was exactly what I wanted. Three blue hues – Balmy Blue, Blueberry Bushel and Night of Navy are gorgeous blended will with the Flowering Foils papers.  I used the brayers to layer on the color. The beautiful foil pattern resists the ink and shines through coupling nicely with the silver-edged ribbon. This was so much fun and pretty quick to make! I have never used the brayers before, so I watched some YouTube videos to learn some techniques.

I’m thankful for Linda Dalke, Stampin’ Up Independent Demonstrator from Australia for sharing her idea. It was perfection to me, so I copied it straight up. I will do this card again varying the colors and digging into another of those Flowering Foil papers and So Sentimental sayings.  So many designs to choose from and they are all gorgeous!

The So Sentimental Stamp Set and Stitched So Sweetly Dies are from the January – June Mini Catalog, while the Flowering Foils are available for free thru March 31 with a qualifying purchase. View these products thru my Stampin’ Up! website and sign up for my eNewsetter for tips, recipes and ideas delivered straight to your inbox.