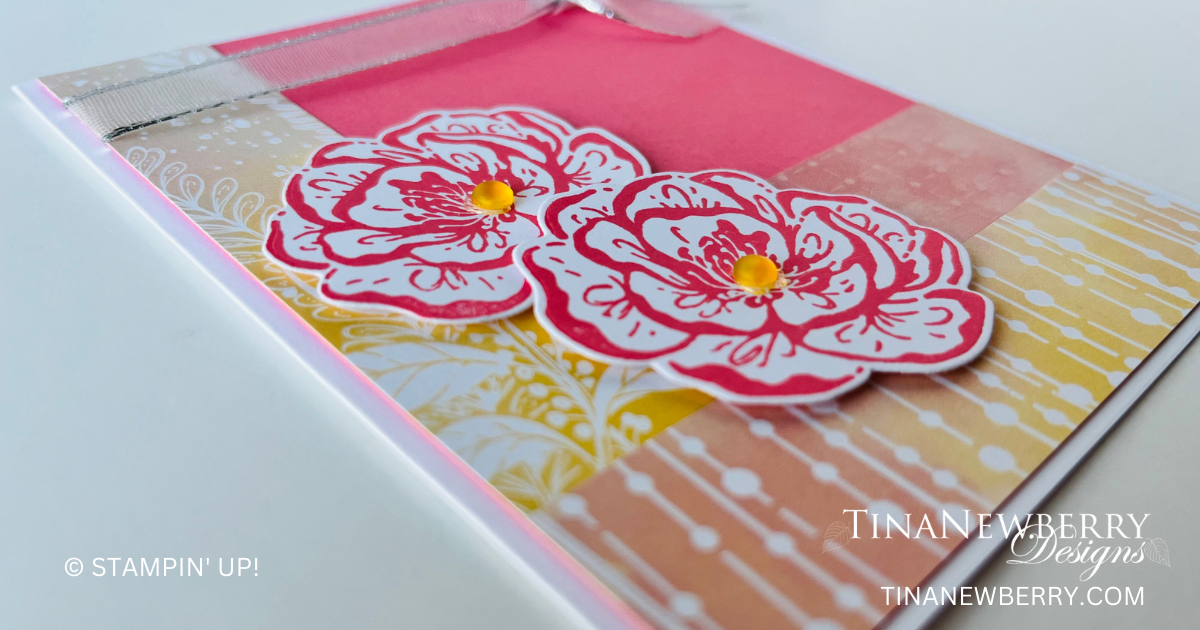
Custom colored big blooms steal the show on this pretty card. What color combo will you choose?
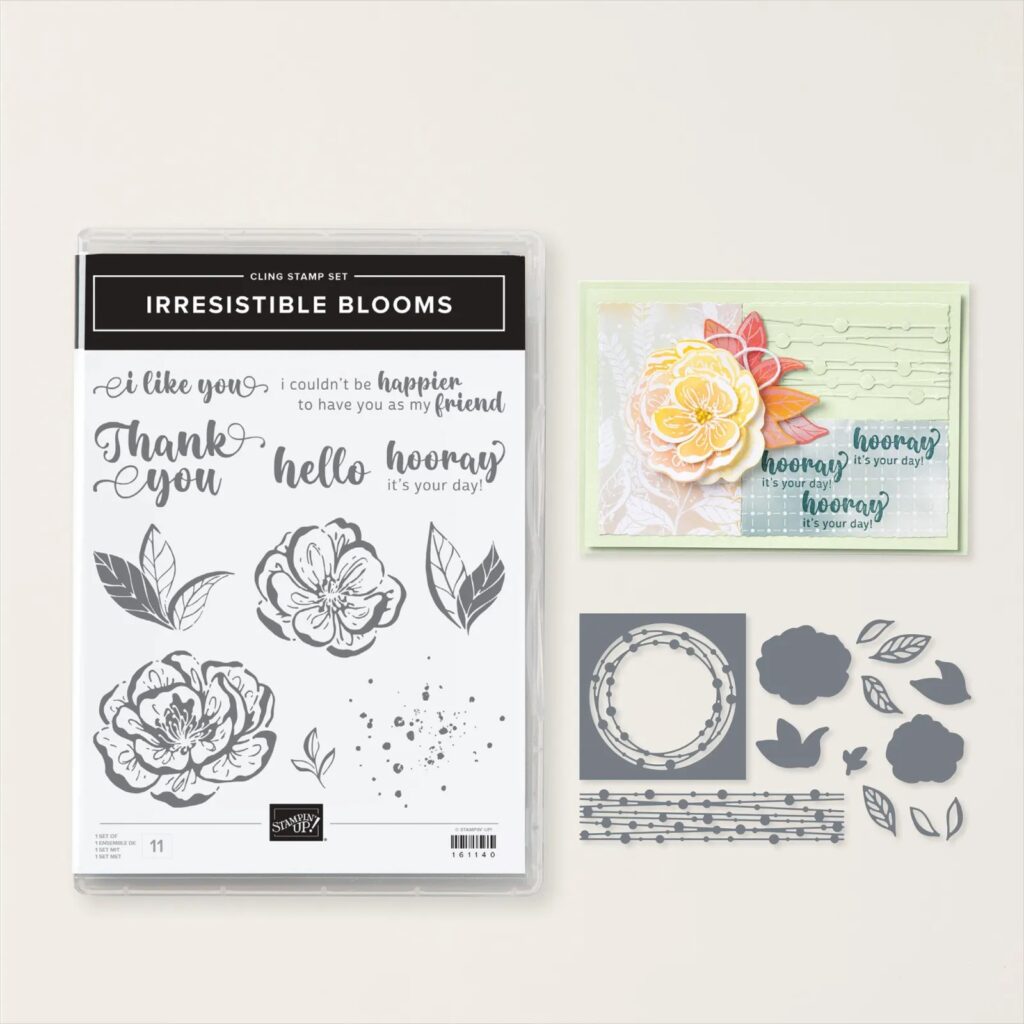
Meet the Irresistible Blooms Bundle– an online exclusive product. It’s time to make smiles bloom and create gorgeous all-occasion cards friends and family are sure to find artistically captivating! Combine the flower and leaf images from the die and stamp set to create beautiful floral pieces. Add multiple layers to your projects using swirly cutout shapes for projects that pop, or create your own peek-through cards!
Measurements
Full list of supplies needed, listed below. A die cutting machine is needed for this card. Card base – White
5 ½” x 8 ½” scored at 4 ¼”
Scrap for stamping and die cutting
Pretty Peacock – 3 ¾” x 5”
¼” x 3 ¾”
Soft Sea Foam – 3 ½” x 4 ¾”
Hello Irresistible Designer Series Paper – Soft Sea Foam and Pretty Peacock with leaf pattern all over
½” x 6”
Soft Sea Foam with dots all over
½” x 6”
Let’s Create
Affix all stamps to acrylic blocks.
Fold and burnish card base at the score line using bone folder.
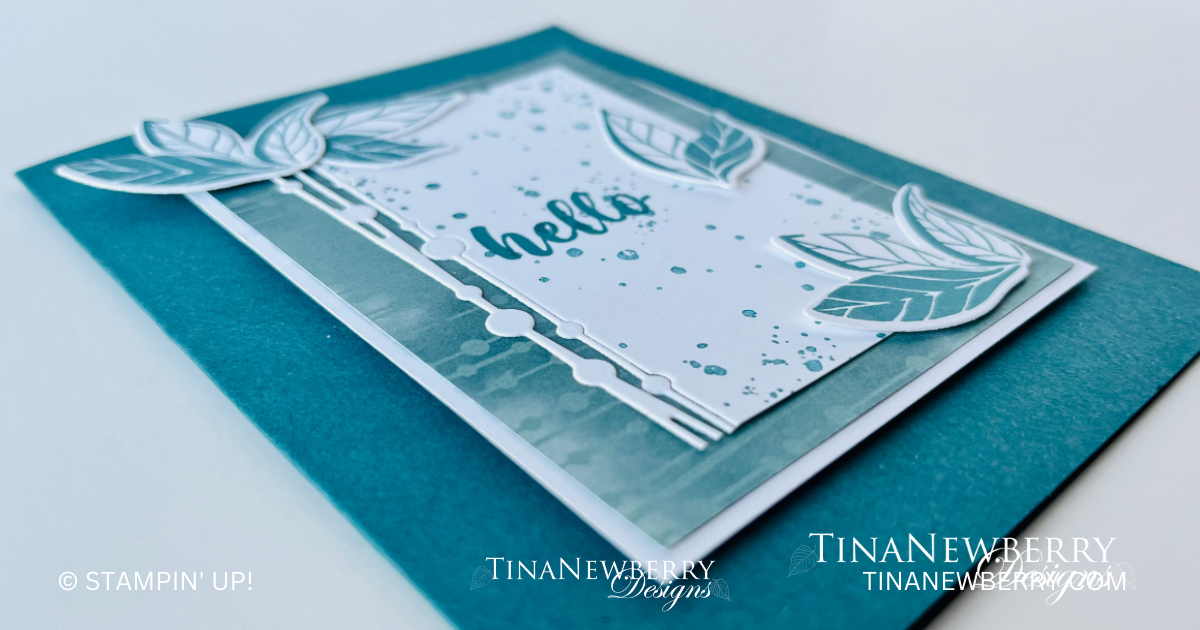
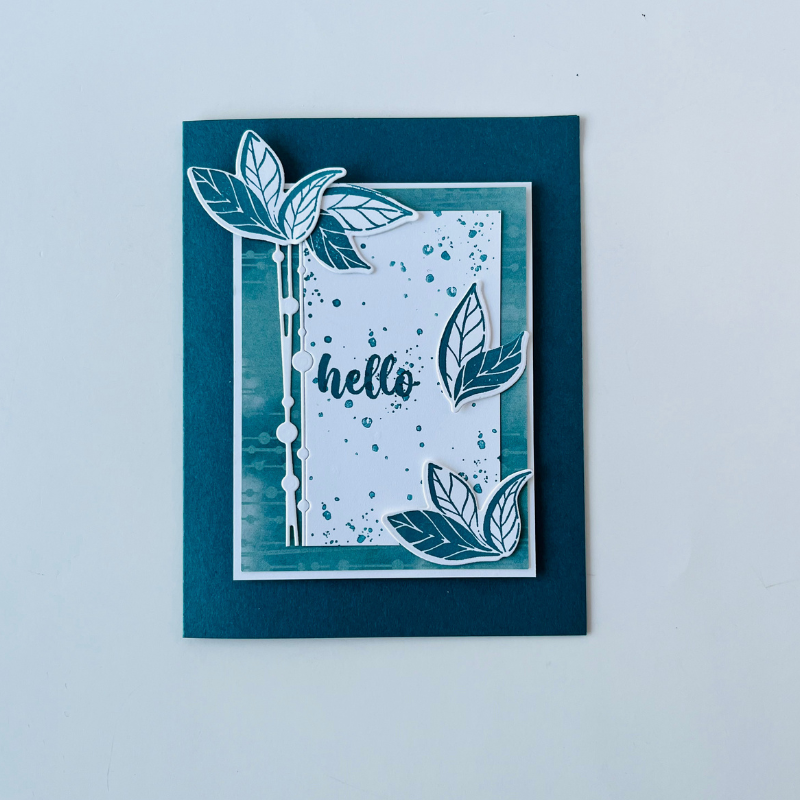
Using the Soft Sea Foam with dots all over dsp, glue it from the upper left corner of the Soft Sea Foam panel to the lower right hand corner. Make sure the tip of the Soft Sea Foam panel is in the center of the dsp at the top and bottom. See photo above.
Add 1 of the Soft Sea Foam and Pretty Peacock with leaf pattern all over strips to one side of the strip added in Step 3. See photo above.
Glue the other Soft Sea Foam and Pretty Peacock with leaf pattern all over strips to the other side of the strip added in Step 3. The Soft Sea Foam with dots all over dsp will be sandwiched between the 2 Soft Sea Foam and Pretty Peacock with leaf pattern all over strips. See photo above.
Trim the excess dsp from the Soft Sea Foam panel so you get the rectangle shape again.
Glue the ¼” x 3 ¾” piece of Pretty Peacock across the lower portion of the Soft Sea Foam panel just slightly below center. See photo above.
Add the panel from Step 7 to the Pretty Peacock panel. Then attach to the card front centering on all sides.
Stamp 1 large and 1 small flower and 1 of each of the leaves by inking the stamps with Soft Sea Foam and sponging the edges and centers with Pretty Peacock.
Use the coordinating dies to cut out the stamped images.
Add the large flower to bottom of the Soft Sea Foam panel with dimensionals so it is on top of the diagonal strips. Repeat with the small flower so it is above the large flower. See photo above.
Use glue dots to add the triple leaf to the large flower and the double leaf to the small flower. See photo above.
Add some of the Pretty Peacock loose frosted dots to the card front
Use the small flower and double leaf to decorate the inside of the card.
Use the large flower and the triple leaf to decorate the envelope.
Order online from the convenience of your own home or send me your order and I’ll take care of you. ❤ Either way, please use the host code ANTD9UHS. Order online AND, if your order is $50 or more using host code ANTD9UHS between now and the end of the month you’ll receive a free pack of embellishment as a THANK YOU gift from me. ❤ If your order is over $150, skip the host code, earn Stampin’ Rewards for free stuff yourself and I’ll still send you a free pack of embellishment as a THANK YOU gift from me. ❤
Use the coordinating dies to create a focal image of dotted strands and leaves stamped in a matching color for this simple stamping quick & easy card.
Meet the Irresistible Blooms Bundle– an online exclusive product. It’s time to make smiles bloom and create gorgeous all-occasion cards friends and family are sure to find artistically captivating! Combine the flower and leaf images from the die and stamp set to create beautiful floral pieces. Add multiple layers to your projects using swirly cutout shapes for projects that pop, or create your own peek-through cards!
Measurements
Full list of supplies needed, listed below. A die cutting machine is needed for this card.
Card base – Pretty Peacock:
5 ½” x 8 ½” scored at 4 ¼”
Scraps for stamping and die cutting
Basic White Cardstock
3 ¼” x 4 ¼”
3 ½” x 3 ½”
5 1/4″ h x 4″ w (for inside)
Scraps for stamping and die cutting
Hello Irresistible Designer Series Paper- Lost Lagoon with dot lines: 3” x 4”
Let’s Create
Affix all stamps to acrylic blocks.
Fold and burnish card base at the score line using Bone Folder.
Attach the Designer Series Paper (DSP) to the 3 ¼” x 4 ¼” Basic White cardstock with Stampin’ Seal.
Use the dot strip die to die cut the side of the 3 ½” x 3 ½” piece of Basic White cardstock. Save both pieces.
Take the dot strip and cut it so there are 3 strips that match the piece of White you cut it from. See photo above.
Using the other piece of White that is solid, cut off the right side to the panel measures 2 1/8”.
With Pretty Peacock ink, use a the Stamp Off technique to add dots all over the panel. See photo above.
Stamp the sentiment in the center of the left side of the panel from Step 7. See photo above.
Use Stampin Seal to attach the panel from Step 8 to the DSP panel from Step 3 so it is about ¼” from the right side and centered top and bottom.
Add the dot strips from Step 5 using Mutlipurpose Glue so the dots fit into the spaces for the dots. See photo above.
Add the panel from Step 10 to the card front using Stampin’ Dimensionals centering it on all sides.
Use the 2 leaf stamps and Pretty Peacock ink to stamp 2 of each leaf on Basic White scrap. Use the coordinating die to cut them out.
Add 1 of the double leaf images at the top left corner so the leaves point to the right, using Multipurpose Glue. Use a Min Glue Dot to add 1 on the triple leaf images so it overlaps the double leaf and the leaves are pointing up. See photo above.
With a Mini Glue Dot add the other triple leaf images in the lower right hand corner for the White panel. See photo above.
Add the last double leaf image to the center of the right hand side of the White panel with a Mini Glue Dot. See photo above.
Use the dot stamp and triple leaf to stamp and decorate the 5 1/4″ h x 4″ w for the inside of the card and envelope.
Order online from the convenience of your own home or send me your order and I’ll take care of you. ❤ Either way, please use the host code ANTD9UHS. Order online AND, if your order is $50 or more using host code ANTD9UHS between now and the end of the month you’ll receive a free pack of embellishment as a THANK YOU gift from me. ❤ If your order is over $150, skip the host code, earn Stampin’ Rewards for free stuff yourself and I’ll still send you a free pack of embellishment as a THANK YOU gift from me. ❤
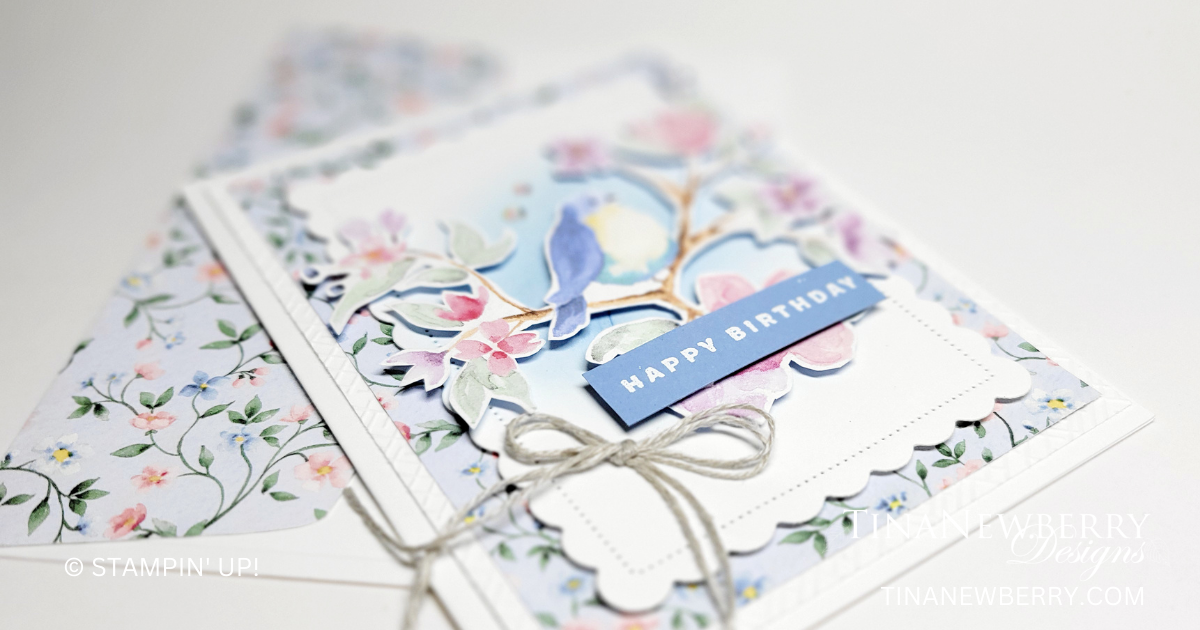
I’m finding it quite therapeutic to use my Paper Snips scissors to cut images out of Stampin’ Up!’s beautiful Designer Series Paper. And I couldn’t resist CASEing this stunning card by Kim McGillis, unsing the Flight & Airy free Sale-a-bration DSP, the Scalloped Contours Dies (retiring April 30), and the Something Fancy Stamp Set (NOT retiring! YAY).
Say everything you want to say with the Something Fancy Stamp Set. This stamp set has all the sentiments you never knew you needed! From classic well wishes to snarky celebratory statements, the Something Fancy Stamp Set says it all in a beautiful modern font combo. Also available in French.
Measurements
Full list of supplies needed, listed below. A die cutting machine is needed for this card. Basic White Thick Cardstock: 5 1/2″ h x 8 1/2″ w folded to 5 1/2″ h x 4 1/4″ w Basic White Cardstock:
5 1/4″ h x 4″ w
4 1/2″ x 3 1/2″ w
Boho Blue Cardstock: Scrap for sentiment
Flight & Airy Designer Series Paper (DSP):
5″ h x 3 3/4″ w
Scrap of bird on a branch
Let’s Create
Affix all stamps to Acrylic Blocks.
Fold the Card Base in half using a Bone Folder to sharpen the crease.
Run the 5 1/4″ h x 4″ w Basic White through the Stampin’ Cut & Emboss Machine with an embossing folder of your choice. Attach to the Card Base with Stampin’ Seal.
Attach the DSP Panel with Stampin’ Seal.
Run the 4 1/2″ x 3 1/2″ w Basic White through the Stampin’ Cut & Emboss Machine with the Scalloped Contour dies.
With a blending brush, apply Boho Blue ink to the scalloped panel.
Use Paper Snips to fussy cut the bird on the branch from the scrap DSP.
Attach the bird to the scalloped panel with Stampin’ Dimensionals.
Attach the scalloped panel with Stampin’ Dimensionals.
Make the Sentiment
Stamp the sentiment in Versamark Ink
Sprinkle on white Embossing Powder
Use a Heat Tool to heat set
Use Paper Trimmer or Paper Snips to trim the sentiment to size.
Attach the sentiment with Stampin’ Dimensionals.
Double over a stand of Linen Thread and tie a bow. Attach with a Mini Glue Dot.
Order online from the convenience of your own home or send me your order and I’ll take care of you. ❤ Either way, please use the host code ANTD9UHS. Order online AND, if your order is $50 or more using host code ANTD9UHS between now and the end of the month you’ll receive a free pack of embellishment as a THANK YOU gift from me. ❤ If your order is over $150, skip the host code, earn Stampin’ Rewards for free stuff yourself and I’ll still send you a free pack of embellishment as a THANK YOU gift from me. ❤
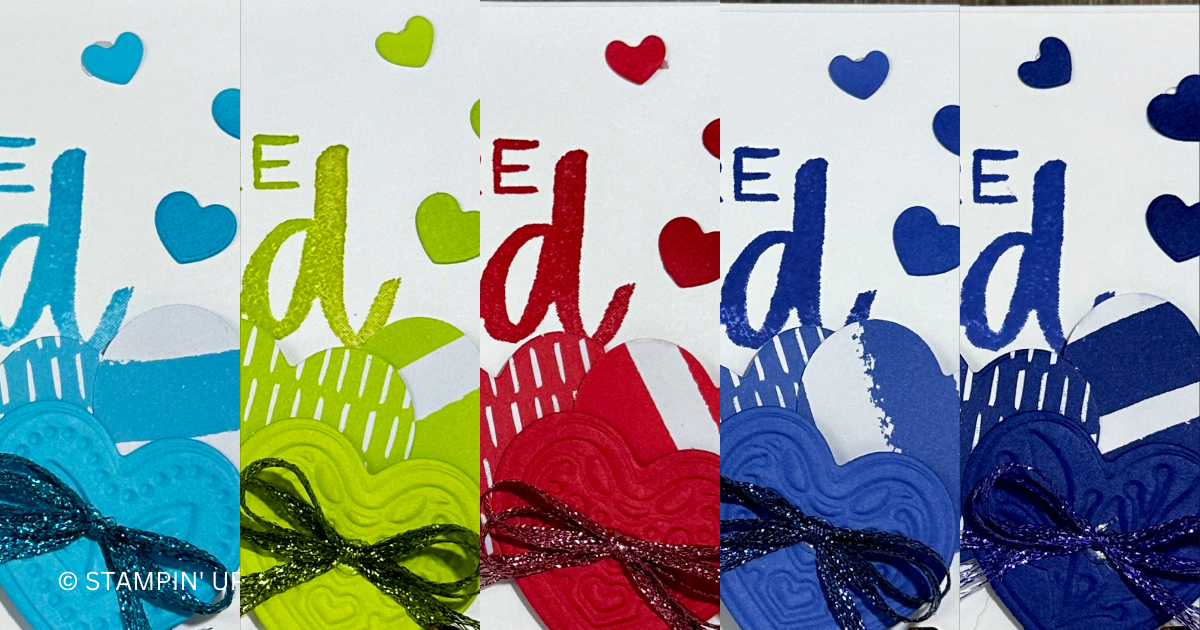
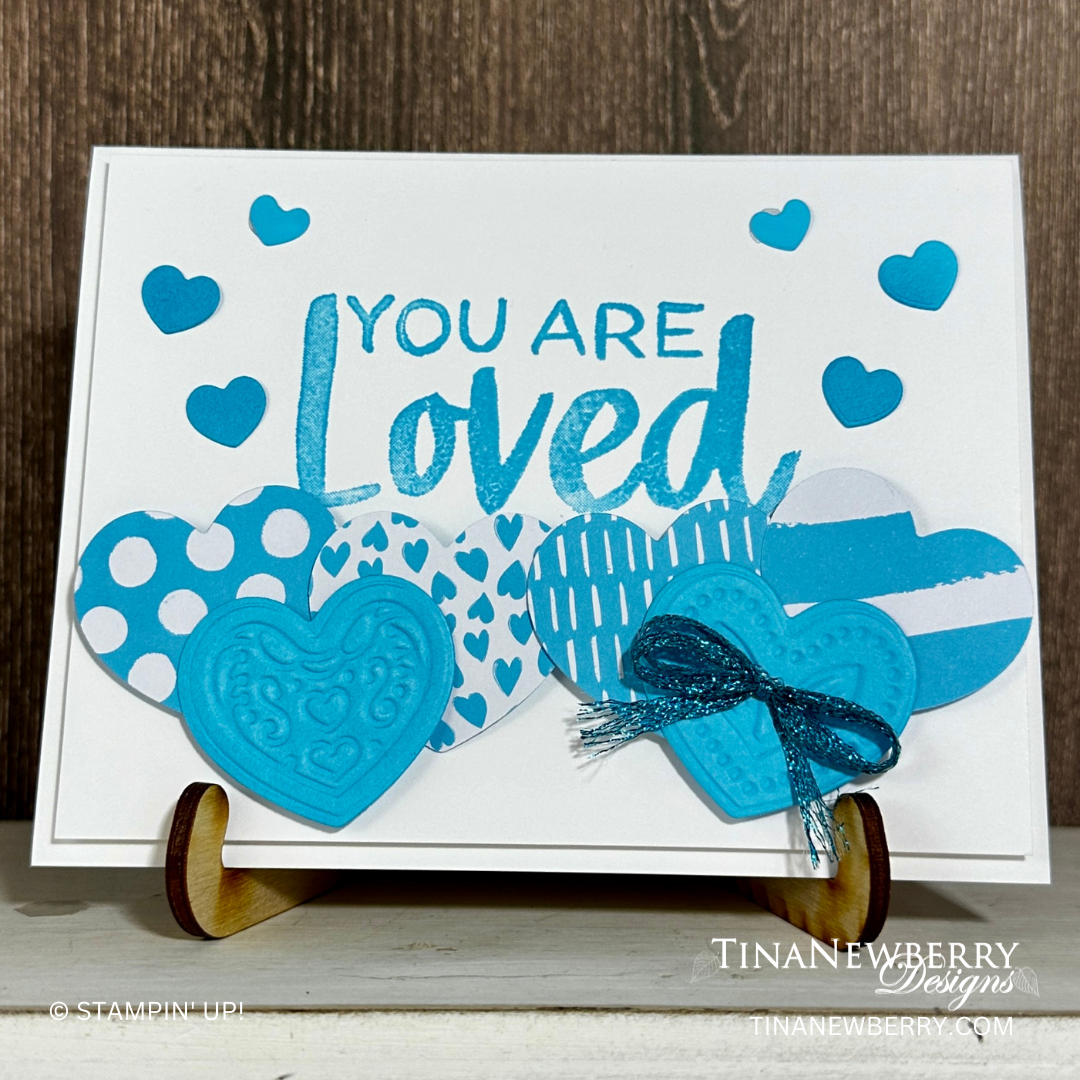
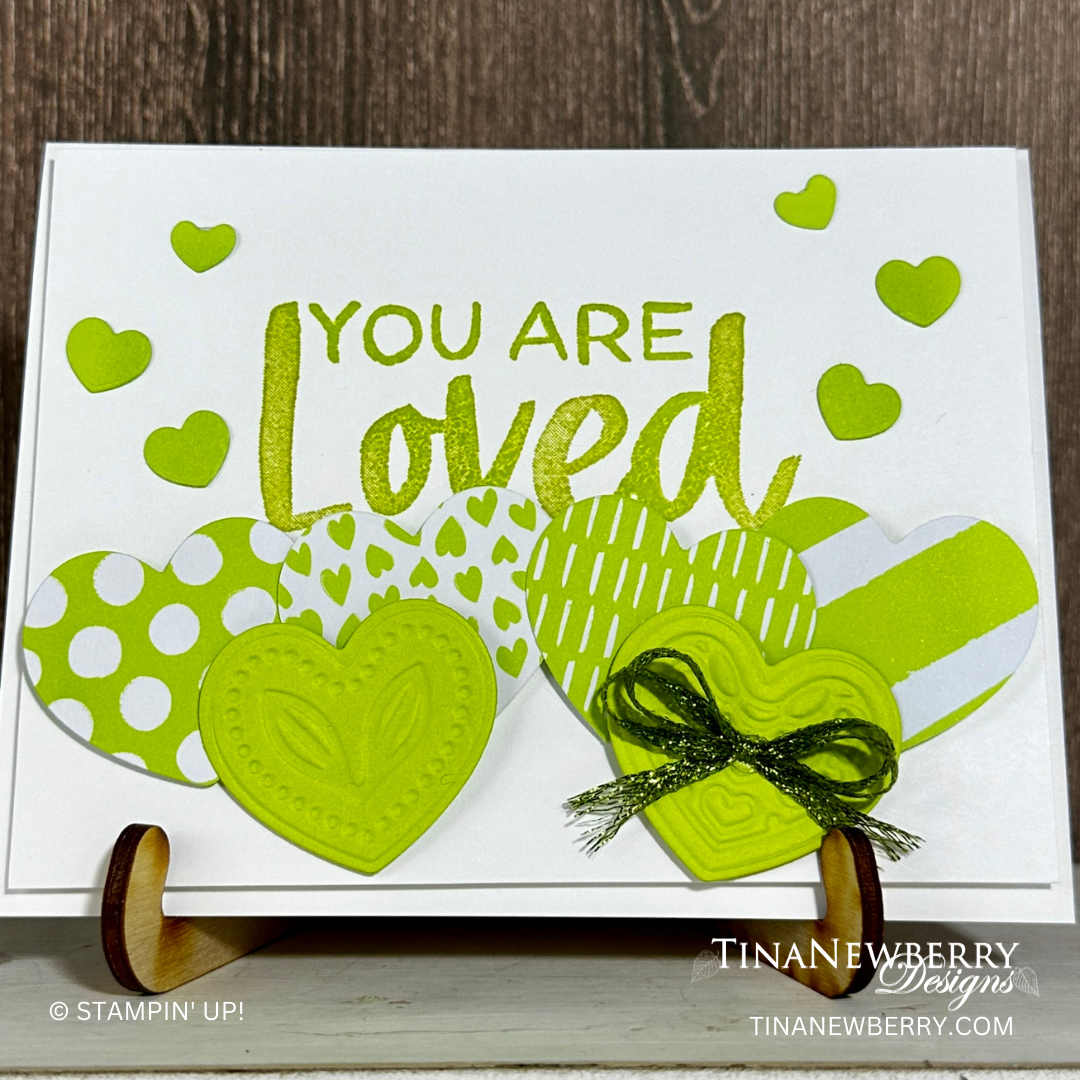
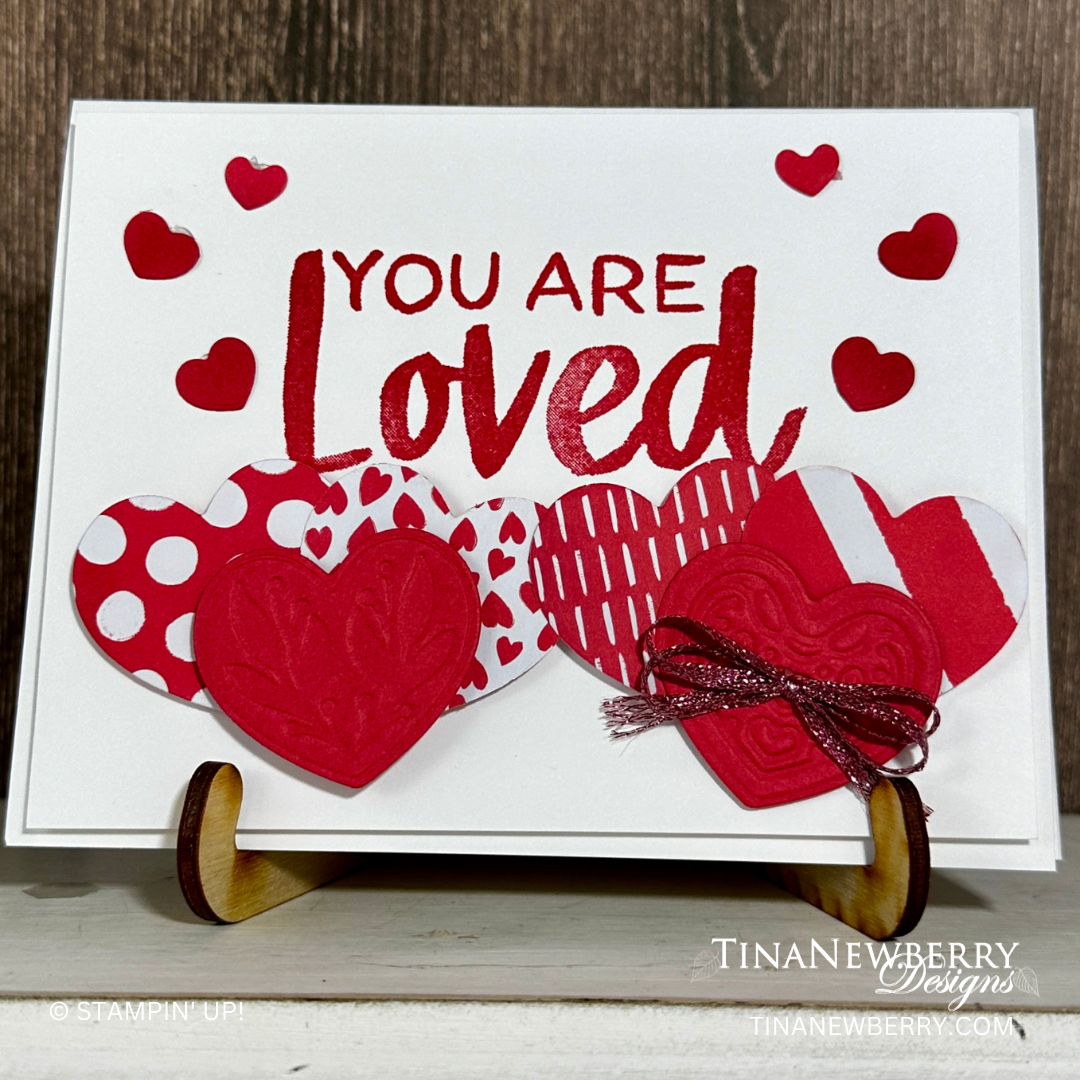
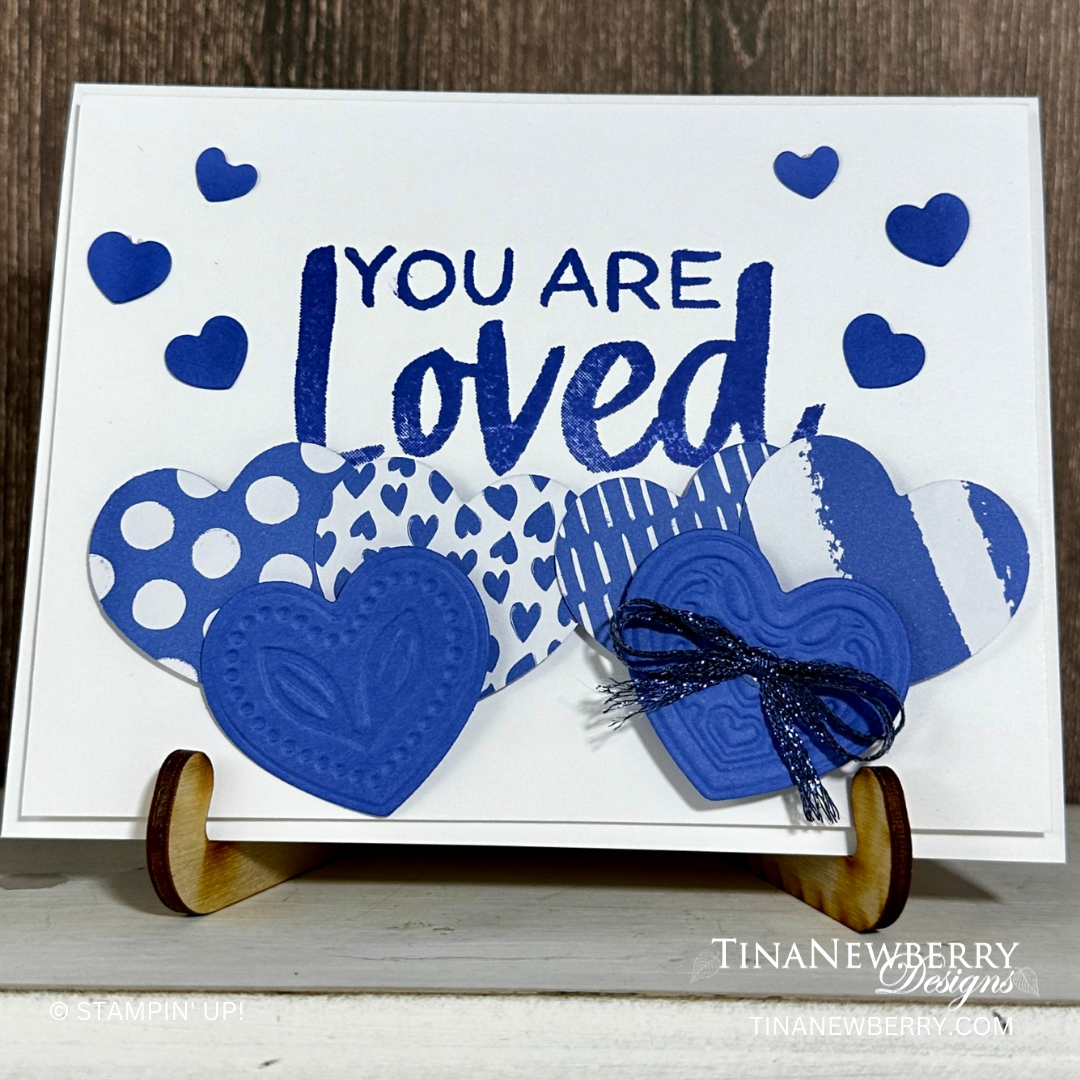
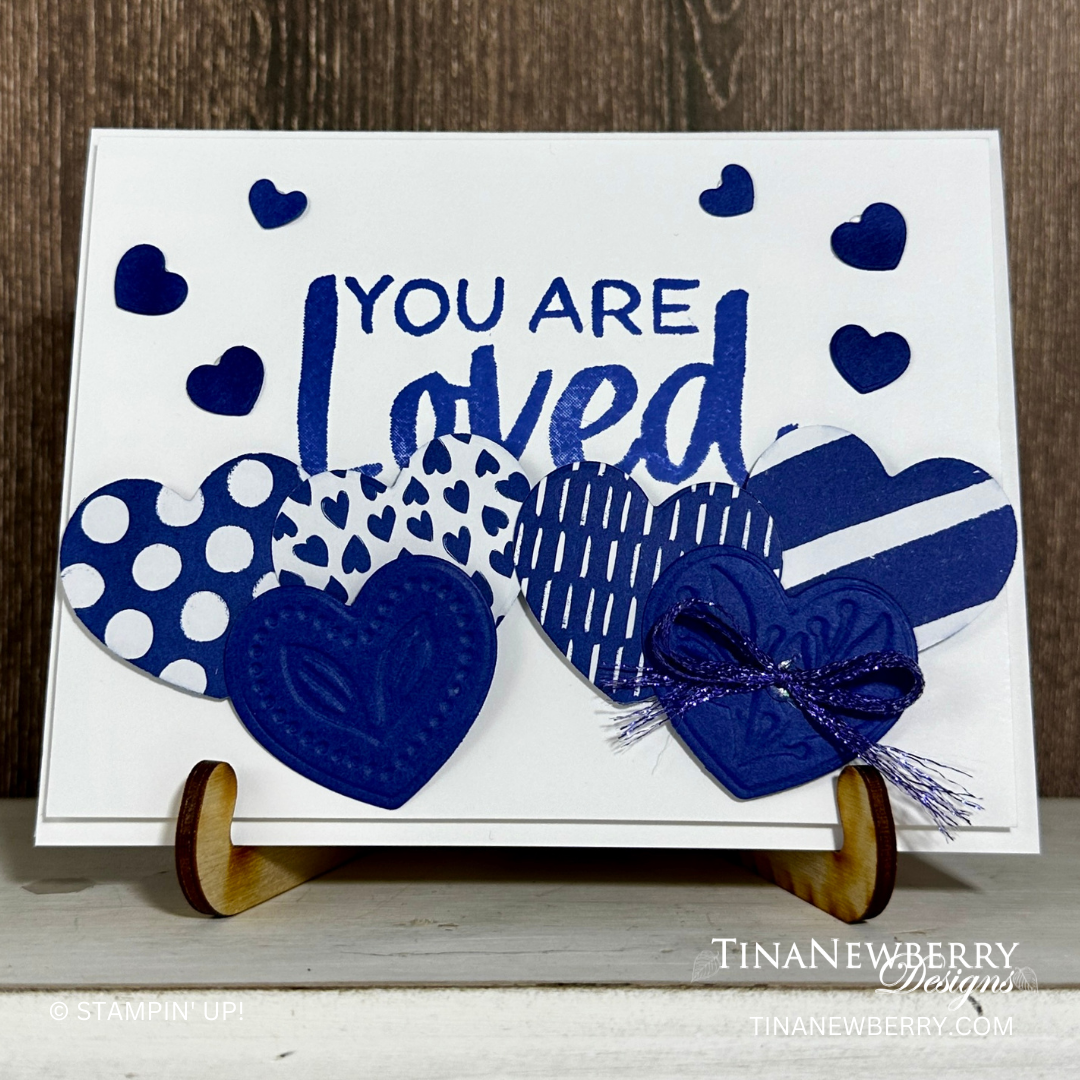
Alas all good things must come to an end. This has been my favorite palette of In Colors and I am sad to see them retiring the end of this month. Grab them before they’re gone.
Measurements
Full list of supplies needed, listed below. A die cutting machine is needed for this card.
Cut Basic White Card Base 8 ½” x 5 ½”, score at 4 ¼”
Cut Basic White 4” x 5 ¼”
DIe-cut Hearts from In-Color 6” x 6” Designer Series Paper using Adoring Hearts Bundle
Emboss and Die-cut hearts from coordinating Cardstock using Adoring Hearts Bundle
Let’s Create
Affix all stamps to Acrylic Blocks.
Fold the Card Base in half using a Bone Folder to sharpen the crease.
Die-cut hearts from In-Color 6” x 6” Designer Series Paper using Adoring Hearts Bundle
Emboss and Die-cut hearts from coordinating Cardstock using Adoring Hearts Bundle
Stamp sentiment in In-Color on Basic white layer
Arrange and adhere hearts from coordinating In-Color around sentiment
Adhere decorated layer to card front using Stampin’ Dimensionals
Order online from the convenience of your own home or send me your order and I’ll take care of you. ❤ Either way, please use the host code ANTD9UHS. Order online AND, if your order is $50 or more using host code ANTD9UHS between now and the end of the month you’ll receive a free pack of embellishment as a THANK YOU gift from me. ❤ If your order is over $150, skip the host code, earn Stampin’ Rewards for free stuff yourself and I’ll still send you a free pack of embellishment as a THANK YOU gift from me. ❤

")


 Designer Series Paper")


")


")


 Designer Series Paper")


")
")
 Designer Series Paper")

