I Love You THIS Much

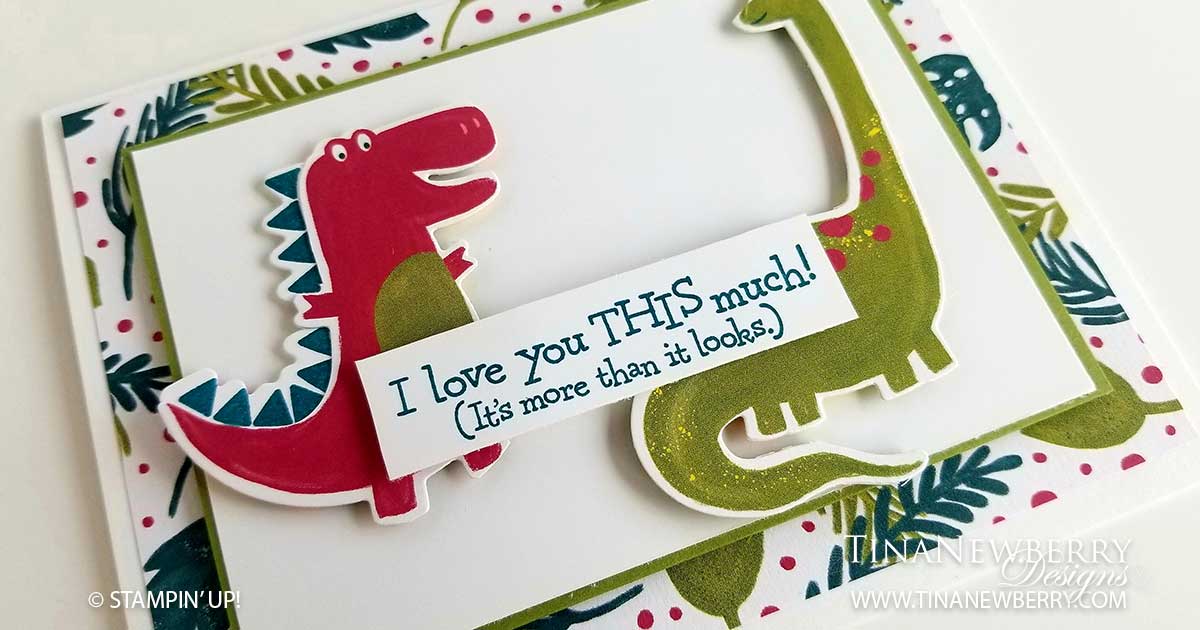
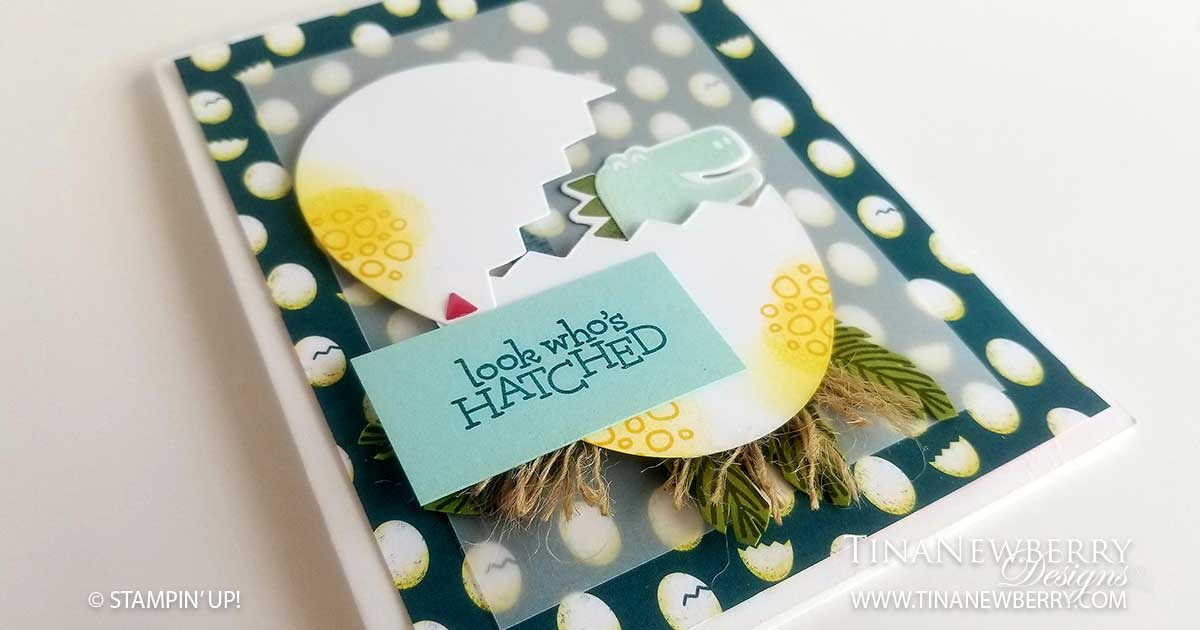
The third and final card in my DinoRoar series, CRACKS me up! You’ve heard the expression T-Rex Arms, well here it is. ROFL. Enjoy this one. Pretty quick and easy to make with a die cutting machine.

Cutting Dimensions

  • Cardbase: Whisper White Thick cardstock 8 1/2″ h x 5 1/2″ w folded to 5 1/2″ h x 4 1/4″ w
  • Pattern Layer: Dinoroar Designer Series Paper (DSP) 4″ h x 5 1/4″ w e
  • Large Rectangle: Old Olive Cardstock 3 1/8″ h x 4 1/2″ w
  • Small Rectangle: Whisper White Cardstock 3 1/16″ h x 4 5/8″ w
  • Sentiment Rectangle: Whisper White Cardstock 1/2″ h x 2 5/8″ w

Instructions

  1. Fold the Cardbase in half using a bone folder to sharpen the crease.
  2. Use Snail Adhesive to adhere the Pattern Layer to the Cardbase.
  3. Use Snail Adhesive to adhere the Small Rectangle to the Large Rectangle
  4. Use Dimensionals to adhere the Large Rectangle to the Pattern Layer
  5. Locate a two Dinosaurs from the large print in the Dinoroar DSP and use the coordinating die to die cut with a die cutting machine.
  6. Adhere the dinosaurs to the Small Rectangle Layer
  7. Affix the Sentiment Stamp to Acrylic Block D, apply Pretty Peacock Ink and stamp the Sentiment to the Sentiment Layer.
  8. Use Dimensionals to adhere the Sentiment to the two dinosaurs.
  9. Send to a friend!

Supplies Needed

Product List

Recommended Stamper’s Tool Kit

Design CASE’d from Stampin’ Pretty.

#ShareSunshine

Stampin’ Up! launched a COVID-19 Share Sunshine stamp set last week. The sentiments are totally relevant to the times talking about social distancing, sending hugs not germs, wearing face masks, staying home. This morning I used the Double Wonder Technique to create 11 Share Sunshine cards. I had a few more sentiments I wanted to use so I created 9 more cards following the sketches found in the Double Wonder. Take a look. I think you’ll get a chuckle out of these COVID-19 Sentiments.

The Share Sunshine stamp set is a downloadable stamp set, positioned as a Giveback COVID-19 fundraiser. The set is $12.00 and 100% of the proceeds go toward global charities. Read more about this fun fundraiser.

Double Wonder Technique

For these cards, I used Succulent Garden Designer Series paper (retired), Mint Macaron Cardstock, Old Olive Cardstock and Rich Razzleberry Cardstock. Sentiment colors are defined in the Share Sunshine downloadable. I printed them from my computer and then used various dies and punches to create the sentiment tags.

Extra Cards

For these cards, I also used the Succulent Garden Designer Series paper (retired), with Calypso Coral Cardstock, Coasstal Cabana Cardstock, Pretty Peacock Cardstock and Blackberry Bliss Cardstock. Sentiment colors are defined in the Share Sunshine downloadable. I printed them from my computer and then used various dies and punches to create the sentiment tags.

Double Wonder Technique

Make 11 cards with one 12×12 sheet of Designer Series Paper- half sheet of two designs and 5 1/2 pieces of cardstock, plus sentiments using the Double Wonder Technique. For more information about Shannon West’s Double Wonder Technique, check out this thorough explanation, video and downloadable instructions by Julie Davison.

Look Who’s Hatched!

Ok so truth be told… I have no kids to give this card to. But isn’t it SO CUTE? I just really wanted to make this card and a few others. So I used my resources and talked to my friend Jodi who actually has little kids. Turns out she wanted the Dinoroar Suite too! So we did what every red-blooded American would do. We got the paper for free and went halvsies on everything else! Here’s the first of three cards featuring the Dino Days Bundle and some of the other products in the Dinoroar Suite.

Cutting Dimensions

Card Base: 8 1/2″ h x 5 1/2″ w piece of Whisper White Thick Cardstock folded to make a 5 1/2″ h x 4 1/4″ w
Background: 5 1/4″ h x 4 ″ w Dinoroar Series Paper
Vellum: 4 1/3″ h x 3 1/4″ w Vellum Cardstock
Sentiment: 1″ h x 2″ w Pool Party Cardstock

Instructions

  1. Fold the card base using a Bone Folder to sharpen the crease.
  2. Using Snail Adhesive adhere the Designer Series Paper to the front of the Card Base.
  3. Using Snail Adhesive adhere the Vellum Cardstock to the DSP Background. Keep in mind adhesive shows through Vellum. Only apply adhesive in the places it will be covered by other layers.
  4. Using the Egg Die Cut, make two egg shapes.
  5. Apply the T-Rex Stamp to the Acrylic Block and apply Pool Party Ink to the Stamp
  6. Stamp the image on Whisper White Cardstock and cut out with the corresponding die cut.
  7. Apply the T-Rex Scales Stamp to the Acrylic Block and apply Pretty Peacock Ink to the Stamp.
  8. Stamp the image on Whisper White Cardstock and cut out with the corresponding die cut.
  9. Use Liquid Glue to adhere the Scales to the Dinosaur.
  10. Apply the Palm Frond Stamp to the Acrylic Block and apply Old Olive Ink to the Stamp.
  11. Stamp the image on Old Olive Cardstock, multiple (5) times. Use Paper Snips to cut out each Palm Frond.
  12. Apply the Sentiment stamp to the Acrylic Block and apply Pretty Peacock Ink.
  13. Stamp the image on Pool Party Cardstock Sentiment Rectangle.
  14. Apply the Egg Textures Stamp to the Acrylic Bock and Apply Mango Melody Ink.
  15. Stamp the images on the Egg shapes, as shown.
  16. Use a Sponge Dauber to shade the Egg Textures with Pineapple Punch Ink.
  17. Before you adhere, position the Dinosaur and Eggs as shown
  18. Remove the Dinosaur and Eggs. Using Glue Dots, adhere Palm Fronds to bottom of Vellum.
  19. Using the Take You Pick paper piercing tool, fray the Braided Burlap Trim. Adhere on top of Palm Fronds with Glue Dots.
  20. Use Snail Adhesive to attach the T-Rex.
  21. Use Dimensionals to adhere the Egg. Attach a Dinoroar Enamel Shape to the Egg hinge, as shown.
  22. Use Snail Adhesive to adhere the Sentiment to the bottom egg, as shown.
  23. That’s it! Who are you going to send it to?

Supplies Needed

Product List

Recommended Stamper’s Tool Kit

Design CASE’d from Sue Madex.