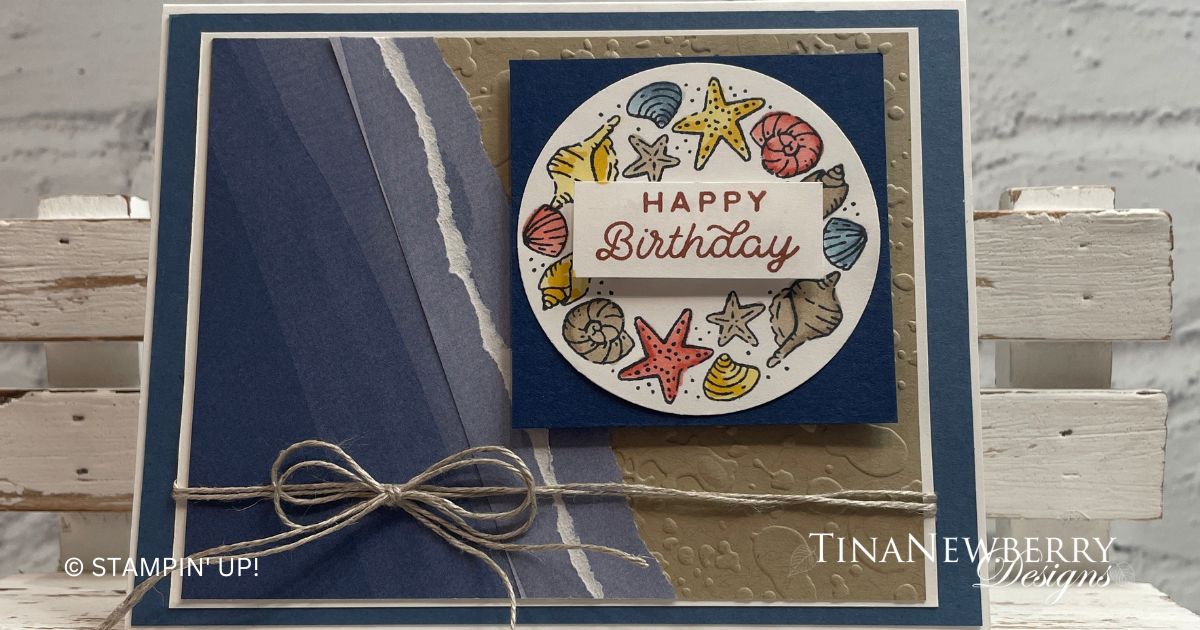
The Misty Moonlight paper from the Bright & Beautiful Designer Series Paper pack does all the work on this simple card featuring the Circled Sayings Bundle.

Measurements
Full list of supplies needed, listed below. A die cutting machine is needed for this card.
Basic White
- 5 ½” x 8 ½” scored and folded on the long-side at 4 ¼”
- 4 ⅞” x 3 ⅞”
- 2 ½” x 2 ½” (for stamping and punching Sea Shell Images)
- 1 ⅝” x ⅝” (for stamping sentiment)
Misty Moonlight
- 4 ⅛” x 5 ⅜”
Crumb Cake
- 4 ¾” x 3 ¾”
Night of Navy
- 2 ½” x 2 ½”
Bright & Beautiful Designer Series Paper
- 3 ¾” x 3 ½” – Misty Moonlight print
Let’s Create
- Affix all stamps to Acrylic Blocks.
- Fold the Card Base in half using a Bone Folder to sharpen the crease.
- Emboss the 4 ¾” x 3 ¾” Crumb Cake Cardstock just on the right half using the splatters Embossing Folder from the Stripes and Splatters bundle.
- Tear the Designer Series Paper at an angle so that the top edge measures approximately 1 ¼”. Use ⅜” – ½” of the torn edge with the to layer about ⅜” to ½” from the edge, this creates a layered, wave look.
- Tape this to the left side of the Crumb Cake cardstock layer.
- Adhere these layers to the Basic White 4 ⅞” x 3 ⅞” Basic White Cardstock.
- Using 2 strands of Linen Thread, wrap around these layers and tie into a bow towards the left of the card.
- Adhere these layers to the 5 ⅜” x 4 ⅛” Misty Moonlight Cardstock layer, then adhere to the folded card base.
- Using Black Memento Ink, stamp the seashell image to the 2 ½” x 2 ½” square of Basic White Cardstock – stamping it twice so the it forms a circle.
- Color the shells using Stampin’ Blends. I used Daffodil Delight, Crumb Cake, Calypso Coral, Balmy Blue and Night of Navy.
- Use the 2 ⅜” Circle Punch to punch the stamped image and adhere it to the 2 ½” x 2 ½” Night of Navy piece of Cardstock.
- Using Copper Clay ink pad, stamp the Happy Birthday onto the 1 ⅝” x ⅝” piece of cardstock.
- Adhere this to the center of the circle using Stampin’ Dimensionals.
- Decorate the inside of your card and your envelope and send it off to wish someone a Happy Beachy Birthday!
Shopping List
")


 Designer Series Paper")


$5.00


Recommended Stamper’s Toolkit ❤
Product List
$12.00

$7.00

$4.25

$5.75

$5.50

$11.00

$26.00

$7.00

$6.50

$11.00

$20.00

$11.00

$80.75

$128.00

$16.00

$13.00


