I have been helping small businesses, non-profits and institutions of higher education with a variety of print and digital solutions since 2000. From Save-the-Date postcards to eCommerce websites, I am prepared to help you grow your business without breaking the budget.
If you know me you know I love sunset (and sunrise). This project inspired by a friend of mine who frequently shares sunset pics despite being subjected to the “invisible vampires” (noseeums) we endure while enjoying Florida funshine.
There’s nothing like a day at the beach! Re-create that magic in your paper crafting projects with the Beach Day Stamp Set. Mix and match different beach-inspired images with Happy Birthday, Enjoy Today, Sending Sunshine, and Wishing You a Beautiful Day sentiments for happy cards and even happier recipients. Set up a beach chair under an umbrella, prop a surfboard next to a sandcastle, and so much more. The line art images are designed to be customized using your favorite coloring technique.
It’s a happy day at the beach when you’re crafting with these Beach Day Dies! Quickly and easily cut out beach umbrellas, surfboards, a lookout tower, sandcastle, water, and more. Pair the pieces to create a variety of playful beach-day scenes for your all card making and scrapbooking projects.
Measurements
Full list of supplies needed, listed below. A die cutting machine is needed for this card.
Petunia Pop Cardstock: 5 ½” h x 8 ½” w scored at 4 ¼”
Fresh Freesia Cardstock: ¾” h x 2 ¼” w
Basic White Cardstock: ½” h x 1 ⅞” w
Black Cardstock: scrap for trees, fence, grass and birds.
Meandering Meadows 6”x6” Designer Series Paper (DSP): 5” h x 3 ½” w
Let’s Create
Affix all stamps to Acrylic Blocks.
Use a Bone Folder to burnish the Card Base at the scoreline to create the card base.
Use Paper Snips to flag the bottom of the DSP and Attach with Stampin’ Dimensionals.
Attach Adhesive Sheets to the back of Basic Black Cardstock and die cut:
Birds (3)
Fence
Grass (2)
Palm tree trunks (2)
Palm fronds (2)
Die cut two more Palm fronds on Basic Black cardstock. Adhesive sheet not needed for these.
Arrange all of the die cuts with Adhesive Backing. Then remove backing from Adhesive sheets and press firmly in place.
Use Mini Glue Dots to attach the remaining Palm Fronds to each other. Then attach in place with Stampin’ Dimensionals.
Stamp the sentiment on Basic White with Fresh Freesia ink.
Use Stampin’ Seal to attach sentiment to Fresh Freesia panel. Attach with Stampin’ Dimensionals.
Tie a black Baker’s Twine bow and attach with Mini Glue Dots.
As soon as I saw it, I HAD to get the Hello Hollyhocks kit. The colors and flowers are gorgeous, but I also really love that everything I need to make 9 cards is in the box. That’s A LOT of fun for only $14. I veered away from the kit instructions and whipped up this cute alternative with just a few supplies from my stash. Grab a kit and Let’s Kit Together on the last Tuesday of the month on Zoom.
You’re sure to bright up someone’s day with the Hello Hollyhocks Kit! With colorful hollyhock designs, this kit’s all-occasion cards can help you send a friendly hello or a note of thanks to flower-loving friends and loved ones. Pair the desired sentiment, designed die cuts, and images from the kit to quickly create timeless cards. The printed sentiments are available in English, French, German, and Dutch.
Measurements
Full list of supplies needed, listed below. A die cutting machine is needed for this card. Card Base: Calypso Coral Cardstock : 11″ h x 4 ¼” w scored at 5 ½”
Petal Pink Cardstock: 2 ¾” h x 3” w
Helly Hollyhocks Kit:
Petal Pink dotted Cardbase: 5” h x 2 ½” w
Three flower die cut
Pretty Peacock die cut sprigs
Old Olive die cut sprigs
Sentiment
Let’s Create
Affix all stamps to Acrylic Blocks.
Use a Bone Folder to burnish the Card Base at the scoreline to create the card base.
Use Paper Snips to trim a banner tip in each end of the Petal Pink dotted panel and attach at an angle with Stampin’ Seal.
Run the Petal Pink cardstock panel through the Stampin’ Cut & Emboss machine with the Distressed Brick Embossing Folder and Attach with Stampin’ Seal.
Arrange the Three Flower die cut and two die cut sprigs. Attach with Mini Glue Dots.
Attach Sentiment with Stampin’ Dimensionals.
Tie a bow with Iridescent ½” Striped Trim and attach with Mini Glue Dot.
Sprinkle on some Adhesive-backed sparkle gems from the Hello Hollyhocks Kit.
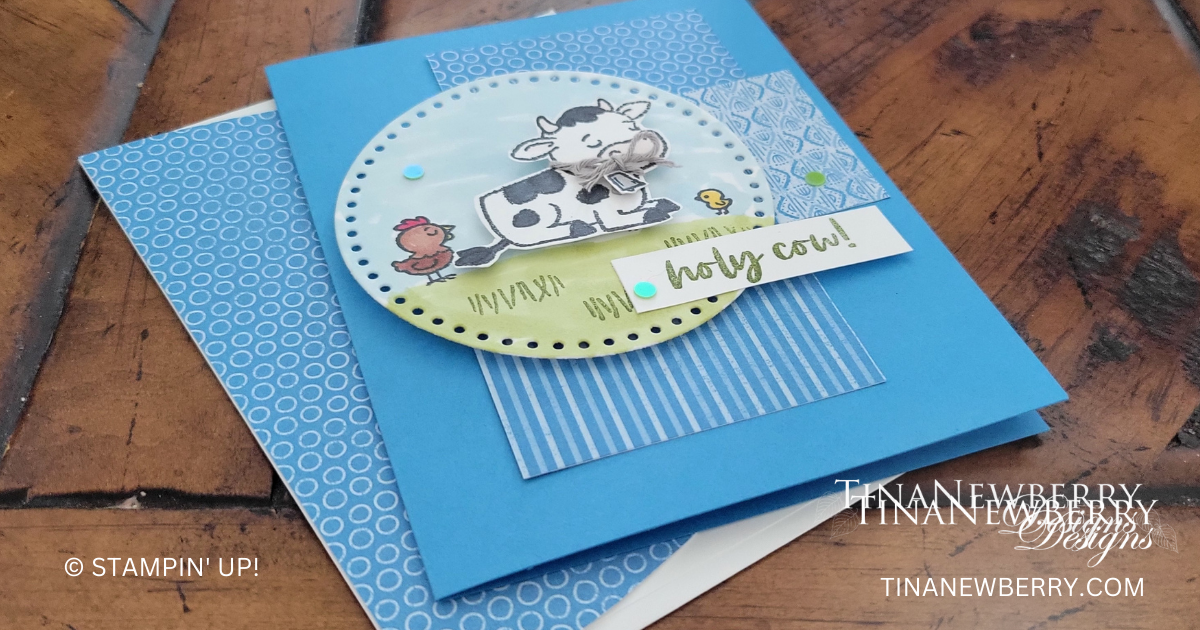
The “What’s Moo with You?” sentiment from the Cutest Cows stamp set cracks me up! I sat down to make create with this cute set and got so carried away with the cutness, I surfaced three cards later. LOL. I love when that happens. #papercrafttherapy for sure.
Holy cow! The playful bovines in this Cutest Cows Stamp Set will take your paper crafting projects to a whole new level of adorable. Mix and match the cow heads and bodies for multiple looks. The all-occasion sentiments pair perfectly with cute cows, flowers, and more for year-round card making. Try customizing the line-art images with your favorite Stampin’ Up coloring technique.
Build your own adorable paper cow with the Cutest Cows Builder Punch. One punch cuts out five different pieces: head, body, face detail, horns, and a piece that can be used as an udder or a cute little tuft of head hair. The separate pieces allow you to quickly cut pieces out of different colors of paper and customize your little bovine in any way you want.
Measurements
Full list of supplies needed, listed below. A die cutting machine is needed for this card.
Card Base: Azure Afternoon Cardstock : 5 1/2″ h x 8 1/2” w scored at 4 1/4”
Daffodil Delight: 5 ⅜” h x 4 ⅛” w
Basic White Cardstock:
5 ¼” h x 4” w
5 ¼” h x 4” w for inside
scrap for sentiment, circle and cow
Basic White Thick Cardstock
Scrap for 3 ¼” circle
Scrap for cow
Bright & Beautiful Designer Series Paper (DSP)
5” h x ⅞” w Design 1
2” h x ⅞” w Design 2
5” h x ⅞” w Design 2
Let’s Create
Use a Bone Folder to burnish the Card Base at the scoreline to create the card base.
Attach the two large cardstock panels with Stampin’ Seal.
Attach the two 5” h x ⅞” w DSP panels with Stampin’ Seal.
Flag the end of the 2” h x ⅞” w DSP panel and attach with Stampin’ Seal.
Die cut a 3 ¼” circle from the Everyday Details Dies.
Stamp flowers in Tuxedo Black ink and grass in coordinating green.
Color the flowers with Stampin’ Blends.
Attach circle with Stampin’ Dimensionals.
Stamp the cow body and cow face in Tuxedo Black ink, color with Stampin’ Blends, punch, assemble and attach with Stampin’ Dimensionals.


")


 Designer Series Paper")


 Striped Trim")


")


 Designer Series Paper")


