Cutting Dimensions
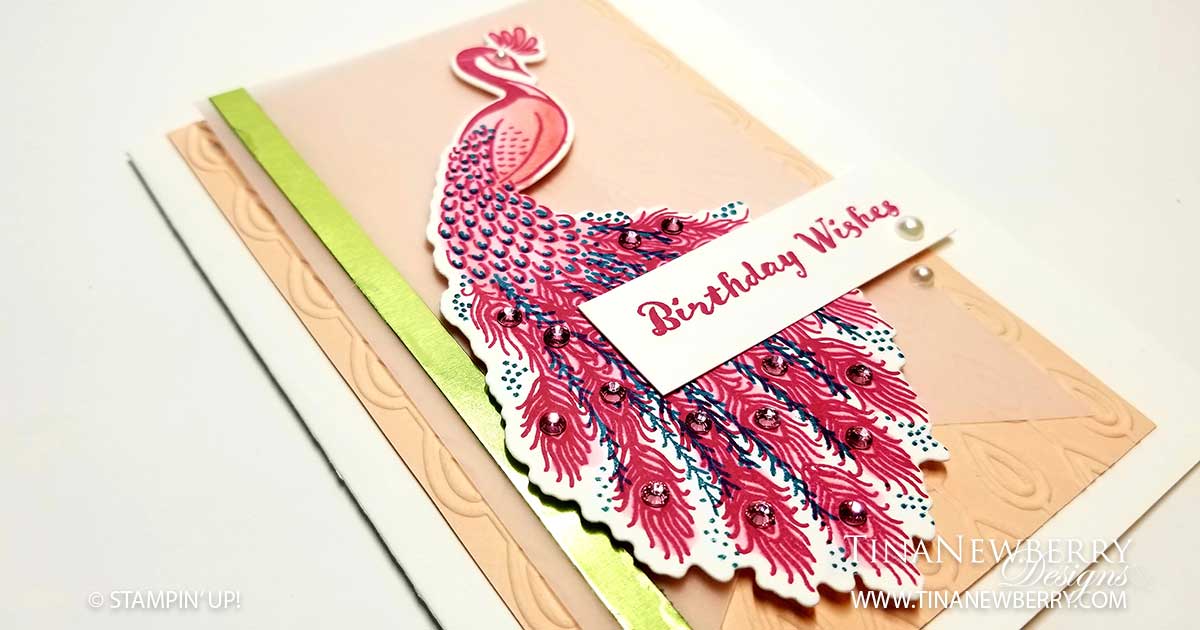
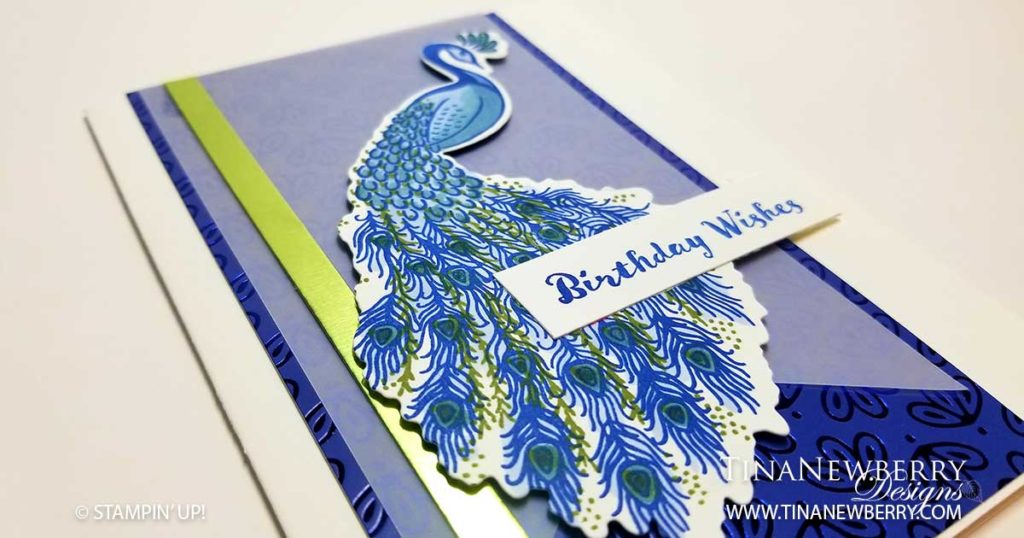
I really wanted to see what the Royal Peacock set looked like, especially this stamp with a different color palette. So I tried one in pink and one in royal blue. I’m not ashamed to tell you my first go at the pink Peacock did not go well. LOL. If at first you don’t succeed, try try again! I am pretty happy with the second go around and the Royal Blue card is great for those men in our lives. Both of these cards were shipped off to my Mum. Can’t wait to see who she sends these to!
Full list of supplies needed, listed below.
Card Base: Whisper White ThickCardstock 8 1/2 h” x 5 1/2″ w folded to 5 1/2″ h x 4 1/4″ w
Background: Petal Pink 5 1/2″ h x 3 1/4″ w
Banner: Vellum Cardstock 5” h x 2 1/2″ w
Decorative Strip: 5” h x 1/4″w
Instructions
- Fold the Card Base in half using a bone folder to sharpen the crease.
- Emboss the Background with the Beads & Baubles embossing folder.
- Use Snail Adhesive to adhere the Background to the Card Base.
- Strategically use Snail Adhesive to adhere the Banner to the Background. Remember adhesive shows through Vellum.
- Use Snail Adhesive to adhere the Decorative Strip to the left side of the Vellum.
- Affix the Peacock Stamp to the Acrylic Block, apply Melon Mambo Ink and stamp image on a scrap Whisper White Cardstock.
- Affix the Peacock Tail Feathers Stamp to the Acrylic Block, apply Pretty Peacock Ink and stamp onto Peacock.
- Color the Peacock using the Flirty Flamingo Combo Blender Pens.
- Die cut the Peacock and adhere to Banner using Dimensionals
- Affix any Sentiment of your choice Stamp to Acrylic Block, apply Melon Mambo Ink and stamp the Sentiment on scrap Whisper White Cardstock. Trim to size.
- Adhere Sentiment using Snail Adhesive and Dimensionals.
- Add Rhinestone Basic Jewels to the Peacock Tail Feathers and in other places, as desired.
- Gorgeous! Time to make someone’s birthday!
Product List


Recommended Stamper’s Tool Kit


Design inspired by Lisa Curcio