Step It Up: Thanks a Bunch

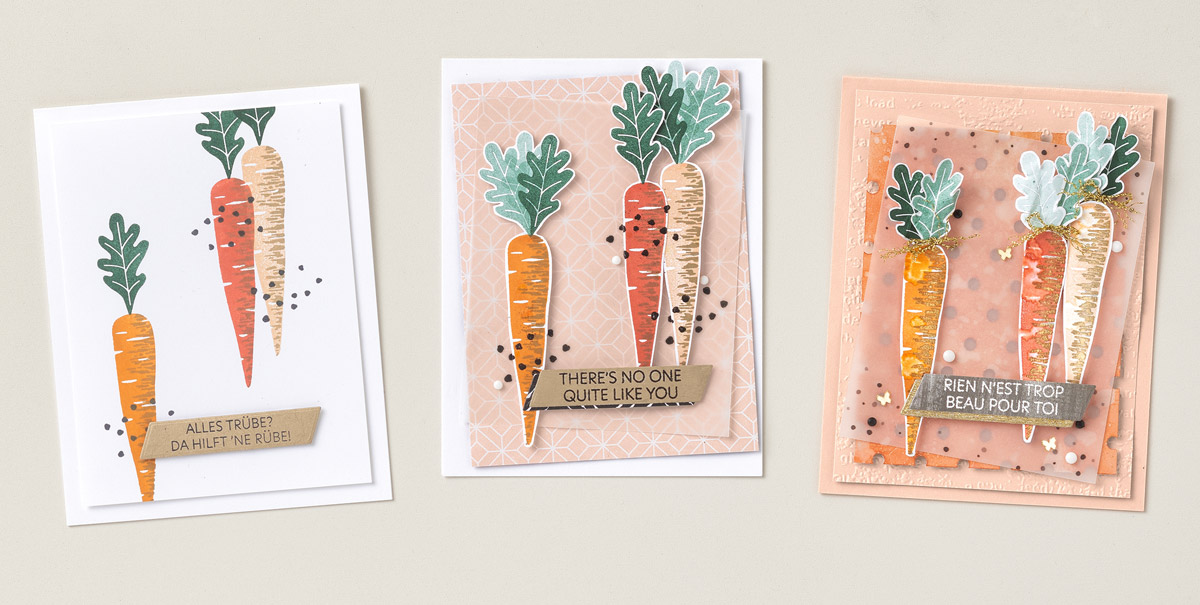
Now that it’s a new year, hopefully we can all spend a little more time doing what we love: stamping! Whether you want to keep your projects simple or step them up, these designs we made using the Sale-A-Bration Thanks a Bunch Stamp Set will help you get back into the stamping spirit.

CASUAL
We kept it casual with this card. All we did was stamp out the carrots and leaves, then add a few polka dot accents and a die-cut sentiment.

AVID
We took our second card to the next level. Once we fussy cut the carrots, we temporarily placed them on the card front, then stamped and heat embossed the dots over the top. We used Stampin’ Dimensionals to pop up the carrots, being sure to line them up with the dots. We finished with few Classic Matte Dots as a simple embellishment.

ARTFULLY AVID
We really stepped up our game with our third card. First, we blended the Dots & Spots panel with Calypso Coral ink and splattered that and the carrots with water to give them a watercolor look. Then instead of stamping out the accents on the carrots, we heat embossed them with gold Stampin’ Emboss Powder for an extra shine. Next, we stamped out the carrot leaves, and stamped off a few times to make a few leaves a bit lighter. We fussy cut the leaves and crumpled them a bit before attaching them to the carrots. We finished by untwisting gold Simply Elegant Trim, and using the frayed pieces to tie a few bows before adhering them to the tops of the carrots.

For every $50 US and $100 US you spend, you’ll earn an exclusive Sale-A-Bration item for free! Depending on the amount you spend, you’ll be able to mix and match the Sale-A-Bration items you earn. We have a stunning variety of stamp sets and Designer Series Paper for you to choose from—take a look! Now through 28 February.

Recommended Stamper’s Toolkit

Product List
Order online from the convenience of your own home or send me your order and I’ll take care of you. ❤ Either way, please use the host code ANTD9UHS. Order online AND, if your order is $50 or more using host code ANTD9UHS between now and the end of the month you’ll receive a free pack of embellishment as a THANK YOU gift from me. ❤ If your order is over $150, skip the host code, earn Stampin’ Rewards for free stuff yourself and I’ll still send you a free pack of embellishment as a THANK YOU gift from me. ❤

What’s Your Stampin’ Style?

Spruced Up Bundle: This Holiday Season Card (4-1/4″ x 5-1/2″) (10.8 x 14 cm)

Are you on a quest to make a flurry of festive, handmade cards and tags this Christmas season? If so, the Spruced Up Bundle could be your best friend with its boldly-imagined tree and ornament stamps and unique outline dies—ready to help you make merry with Christmas paper crafting before the season rush! We show you how to go from casual to fancy with our samples—but what can you do with this card to make it yours?

CASUAL

To create the casual card on the far left, stamp and die cut the ornaments. Cut the Gold 3/8″ (1 cm) Shimmer Ribbon and layer it behind the sentiment. Add the 3-1/4″ x 5-1/2″ (8.3 x 14 cm) Garden Green Cardstock layer with Stampin’ Dimensionals, and adhere a 1″ (2.5 cm) strip of Painted Christmas Designer Series Paper on the right side of the card. Die cut the pine bough from Garden Green Cardstock using the Decorated Pine Dies and adhere it to the card.

AVID

For this version (center), die cut the Decorated Pine piece in Garden Green Cardstock and use the same color ink with a Sponge Dauber to achieve a darker color. Stamp the sentiment and die cut with the Stylish Shape Dies banner. Cut the ribbon in half, make a bow, and layer it behind the sentiment label with Stampin’ SEAL.

ARTFULLY AVID

(far right) Emboss the 3-1/4″ x 5-1/2″ (8.3 x 14 cm) Garden Green Cardstock layer with the Wintry 3D Embossing Folder. Add Pearlized Enamel Effects Basics in white to the ends of the pine bough die cut (after adding Garden Green ink with a Sponge Dauber). Take the Gold 3/8″ (1 cm) Shimmer Ribbon apart to use the gold threads on it and add them with Stampin’ SEAL behind the sentiment label.

Shopping List

Creative Challenge: Non-Traditional Colors

Every month, we like to issue a new creative challenge to keep your minds sharp and your creative juices flowing. Since it’s so close to Christmas, we’ve decided to go with a festively inspired challenge: make a Christmas card using anything except traditional Christmas colors. Take a look at what we came up with!

For our Merry Christmas card, we started with a white card base and layered on a white panel embossed with the Brick & Mortar 3D Embossing Folder. Then we die cut a few snowflakes in Coastal Cabana, Granny Apple Green, Petal Pink, Polished Pink, Shaded Spruce, and Sweet Sorbet. We adhered a sentiment and finished the card with some Iridescent Rhinestone Basic Jewels, which added a touch of sparkle that we love at Christmas without competing with the colorful snowflakes.

For our Happy Hanukkah card, we chose a Basic White panel and die cut some “stars” into it. We backed that paper with Silver Foil, and then die cut a few candles in Starry Sky, adding some Crushed Curry flames. We made sure to arrange the candles with one slightly taller than the others, imitating the look of a menorah. We finished the card with a few Festive Pearls and a sentiment that we made with the Alphabest Stamp Set.

We loved this challenge because it really helped us think outside the box. What will you come up with this month? Don’t forget to share your creative projects on social media and remember to use #CreativeChallengeSU so everyone can see!

Shopping List

Technique Focus: Multicolor Images

A sweet Christmas can be yours with our July–December 2022 Mini Catalog Sweet Gingerbread Bundle, which includes the charming Sweet Gingerbread Stamp Set and Gingerbread House Dies. Use this bundle to create a festive Christmas cottage with gumdrops, lollipops, pine trees, and a cozy curl of smoke that doubles as an adorable speech bubble—where you can stamp loving sentiments for family and friends.

To duplicate this month’s “technique focus,” fold Thick Basic White Cardstock in half to create a 4-1/4″ x 5-1/2″ (10.8 x 14 cm) card, then add texture to the card front using the detailed border die pieces. Ink the stamps in a lighter color, stamp off once, then use Sponge Daubers to add shading in a darker color before stamping and die cutting. Heat emboss the sentiment on Basic Black Cardstock using white Basics Embossing Powder, cut a tag shape, then adhere the sentiment to the card front using Stampin’ Dimensionals.

What can you make with this super-fun bundle? Post your projects on social media and use the #SweetGingerbread hashtag so we can see your work!

Shopping List

CASE—Copy And Share Everything


It might be a little too early to celebrate Christmas, but it’s never too early to CASE a card! We CASEd the color scheme from a card in the July-December 2022 Mini Catalog—and we loved the way it turned out!

For this card we used the Kindest Gnomes Bundle from the July–December 2022 Mini Catalog and we focused on five main colors: Blushing Bride, Coastal Cabana, Crumb Cake, Granny Apple Green, and Sweet Sorbet. We started off by using some Sweet Sorbet In Color 6″ x 6″ (15.2 X 15.2 cm) Designer Series Paper Assortments as our background. We layered on some Basic White Cardstock, and we colored an additional panel with Coastal Cabana.

We loved the colors of our gingerbread house in our Have a Sweet Christmas card, and we wanted to copy those colors in our toadstool house. We colored the top of the mushroom with Blushing Bride and used the Blushing Bride Stampin’ Write Marker to make the dots. Then we colored the base of the mushroom and the gnome’s hair with Crumb Cake. We also colored her hat and little apron with Coastal Cabana. Then we die cut some leaves and we stamped out our sentiment in Granny Apple Green. Isn’t it cute?

If you’re looking for a way to shake things up, try your hand at copying and sharing everything!

Product List