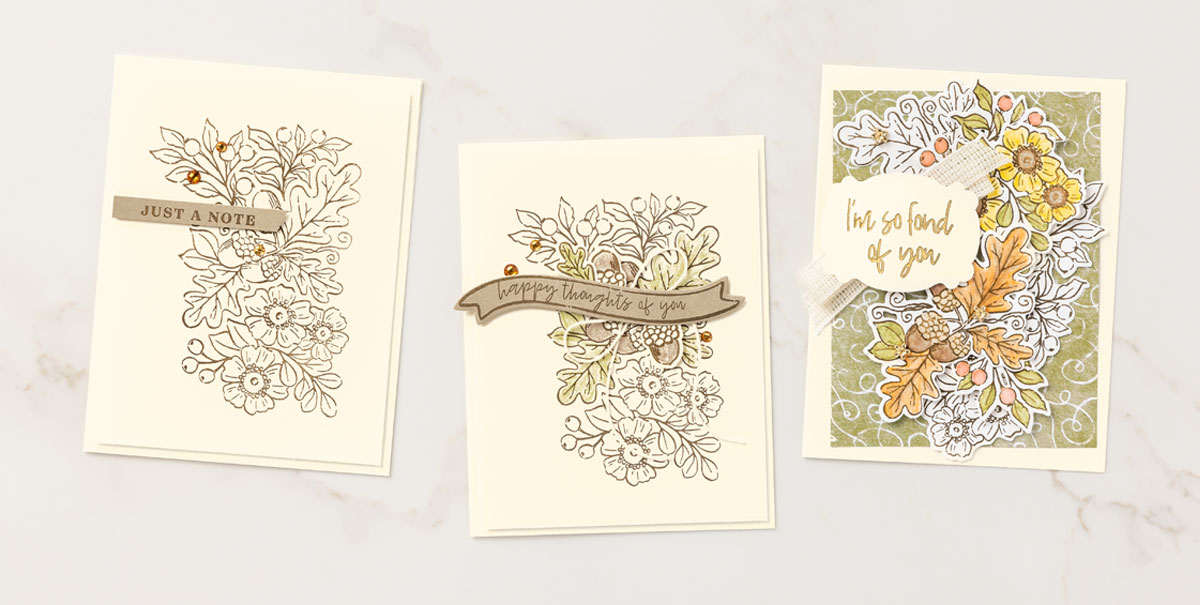
Fond of Autumn Step-by-Step

BEGINNER

Creating simple yet stunning note cards has never been easier than with our fabulous Fond of Autumn Bundle to inspire you. Send thanks and happy thoughts using the gorgeous images in the Fond of Autumn Stamp Set—or make a stack of stamped cards to give as gifts!

To create the beginner version of our Just a Note card, start by folding Very Vanilla Cardstock in half; stamp the floral, leaf, and acorn images in Soft Suede ink on another layer of Very Vanilla Cardstock, then adhere it to the card front. Add a simple sentiment plus a few pretty gems from the Leaf Label & Amber Gem Combo Pack to finish off this timeless card.

CASUAL

We stepped up our second card by coloring in the images with Watercolor Pencils (Old Olive and Early Espresso), then used the curvy banner die from the Autumn Bouquet to cut out our sentiment.

AVID

For our most detailed card, we colored our images as before using Watercolor Pencils, but this time applied water using our Water Painters for a beautiful watercolor affect. We then die cut the watercolored images and pieced them together to create a lovely collage for added dimension and texture.

Shopping List

CASE: Boughs of Jolly

We loved the look of our Boughs of Jolly card, so we decided to CASE the layout! If you’re looking for some new ideas, try your hand at copying and sharing everything!

For our Wishing You a Happy Retirement card, we used the textured stamp from the Brightest Beauty Bundle to stamp on three strips of Basic White Cardstock using three different inks. Then we used Paper Snips Scissors to distress the edges. We offset the three strips and adhered them to the card base with Multipurpose Liquid Glue.

Next we stamped and heat-embossed the floral image twice on vellum. After cutting both branches out, we layered one over the other to create a larger branch image. Fun fact: this floral image was designed after the golden wattle, which is Australia’s national floral emblem. Traditionally this plant has yellow flowers and green stems, but we decided that we loved the white coloring for this project. To finish off the card we used a few Adhesive-Backed Seasonal Sequins to give the card some shine. We colored the white sequins with a Soft Sea Foam Stampin’ Blend to tie in with the other card colors.

If you like what you see, don’t be afraid to CASE it! You could copy the layout, or you could mimic the colors or the techniques—the possibilities are endless!

Shopping List

October Creative Challenge

Join our monthly challenge and let your creativity shine! This month our challenge involves masking. Don’t worry, we aren’t challenging you to wear a mask—even though it’s almost Halloween! Instead, we challenge you to use Masking Paper in your next project. Don’t be afraid to get super creative in your projects—we love to see your unique style come through!

Masking Paper is tacky like a Sticky Note and easy to use for scene-building projects like this. To make our card, we stamped out the witches and the boiling cauldron on Masking Paper and cut out the shapes. We put a custom piece of Masking Paper on the bottom of a panel of Basic White Cardstock, then we stamped the first witch image on the card base. We added the coordinating mask directly on top. Then we stamped cauldron and the second witch, overlapping the first witch with the second witch. We added the mask for the second witch and the cauldron, making sure to align them just right so the Masking Paper covered the stamped images completely.

Next we made a night sky using Blending Brushes to blend four colors across the panel. Then we removed the Masking Paper and colored the stamped witch and cauldron images using Watercolor Pencils. With a few die-cut bats and some embellishments from the Sparkle & Shine Sequins Assortment, this card is sure to cast a spell on anyone!

This month, try and use Masking Paper in your projects. If you share your creations on social media, don’t forget to use #CreativeChallengeSU so we can follow along!

Product List

Parts & PIeces: Botanical Layers

Sometimes it’s hard to say how you feel—what’s difficult to say face-to-face can sometimes be more easily written. Who knows how many profound, important conversations started with a beautiful card?

Today we have three card ideas for you—and because they all use the same color palette, elements, and the must-have Botanical Layers Stamp Set, you can easily imagine adding a delightful twist to make them your own. (Seeing someone else get creative can sometimes be freeing!)

For instance, notice how our concept artist showed off the versatility of our fabulous Baker’s Twine. For these cards we showed its range—tied it in a bow, looped it behind a stamped layer, and made a clever little braid for some old-fashioned charm.

The Thinking of You card features curled banner-cut ends and layers popped up with Stampin’ Dimensionals. Truly, you could spend hours mixing and matching elements to create a splendid card that someone will treasure. But as we all know—the thing your recipient will love most will be the message you write inside!

Step It Up: Pretty Birds Bundle

They say birds of a feather flock together, and that’s true for this week’s cards we made with the Sending Smiles and Pretty Birds Bundles. Try stepping up your cards this week and if you’re not sure how, don’t be afraid to wing it!

CASUAL
We colored the bird image with Watercolor Pencils, then we created our own Designer Series Paper by stamping out the bird cage image on Basic White Cardstock, taking care to line up the chain of each bird cage with the base of the cage above it.

AVID
We stepped up our second card by adhering Mossy Meadow Cardstock to a Foam Adhesive Sheet, then used that to die cut the word “Sending.” We die cut the “Sending” word shadow in Vellum and adhered it behind the die-cut word and finished the card with some Brushed Metallic Dots.

ARTFULLY AVID
We used the Deckled Rectangles Dies to cut three rectangles from the Texture Chic Designer Series Paper, then we layered them on the card base, offsetting each layer. Next, we die cut the large bird cage three times from Crushed Curry Cardstock and once from Pearlescent Specialty Paper. We adhered all the die cuts together with the specialty paper on top, creating a thick die-cut piece. Finally, we created the “Sending” word shadow by blending Mossy Meadow and Soft Succulent ink on Basic White Thick Cardstock with Blending Brushes then adding a few water drops with a Stampin’ Spritzer.

Shopping List