No Matter the Weather We’re Friends Forever

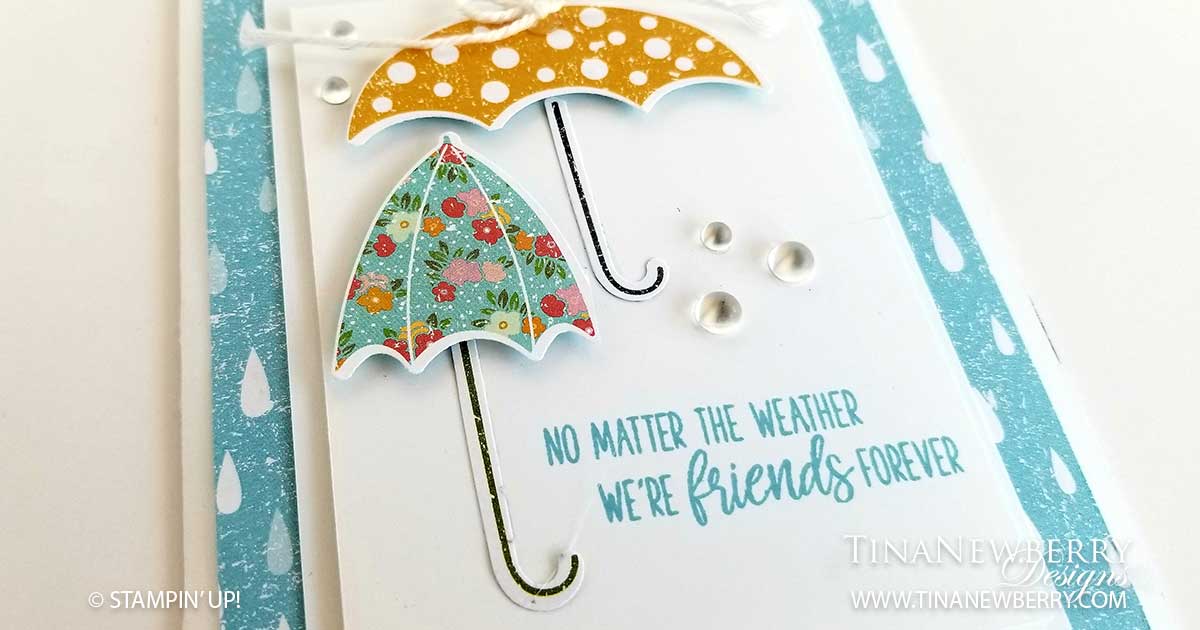
What is it about umbrellas? They’re just begging for some pretty patterned paper. And did you notice the background paper looks like rain drops? The Pleased As Punch Designer Series Paper was created around 4 punches – umbrella builder, hearts, tulips and small blooms punches! So basically you can use the punches to cut out the images in the paper for some fun and infinite possibilities for your cards!

The paper made this card super easy to make. The only stamps are the sentiment and umbrella handles. The rest is all punched or cut paper. I know right? So fun. I like how some of the umbrella lines are printed right on the paper and the prints are super fun. Unfortunately, the Pleased as Punch paper is no longer available, but any Designer Series Paper would work – especially the Best Dressed pack available through 5/31/20.

Cutting Dimensions

  • Card Base: Thick Whisper White cardstock 8.5 h” x 5.5″ w folded to 4.25″ w x 5.5″ h
  • Patterned Paper: Raindrop (or other pattern) Designer Series Paper 4″ w x 5.25″ h
  • Larger White Rectangle: Whisper White cardstock 3.25″ w x 4.5″ h
  • Smaller White Rectangle: Whisper White cardstock 3″ w x 4″ h

Instructions

  1. Fold the card base using a bone folder to sharpen the crease.
  2. Apply Snail Adhesive to the back of the Designer Series Paper and adhere to the front of the card base.
  3. Apply Snail Adhesive to the back of the larger white rectangle and adhere to the Designer Series Paper
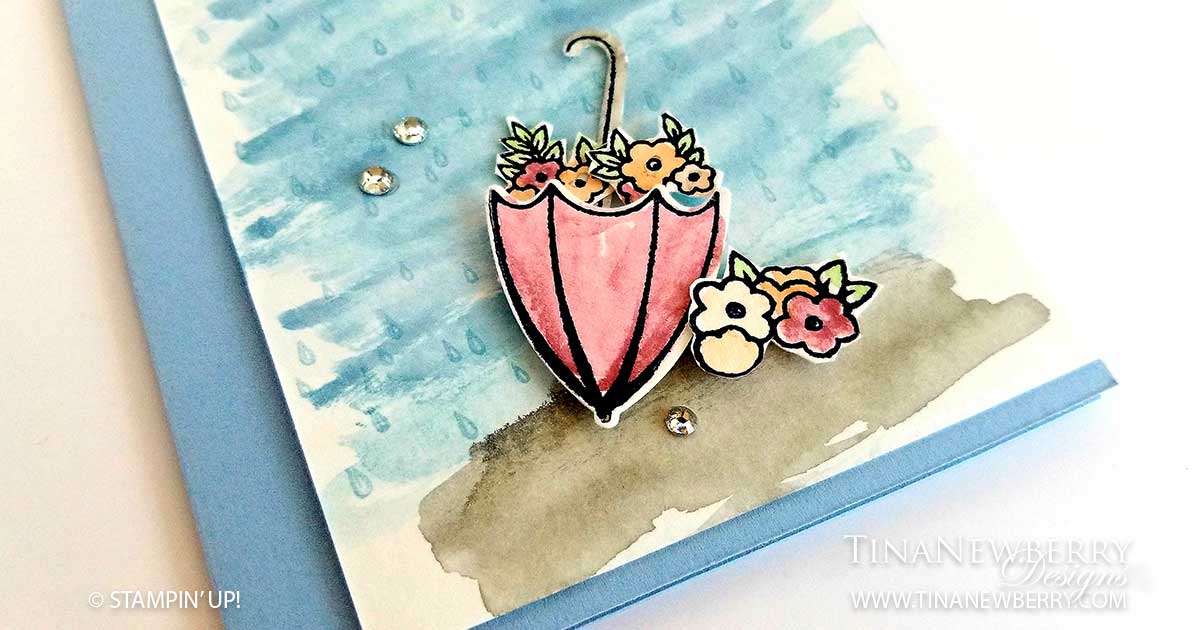
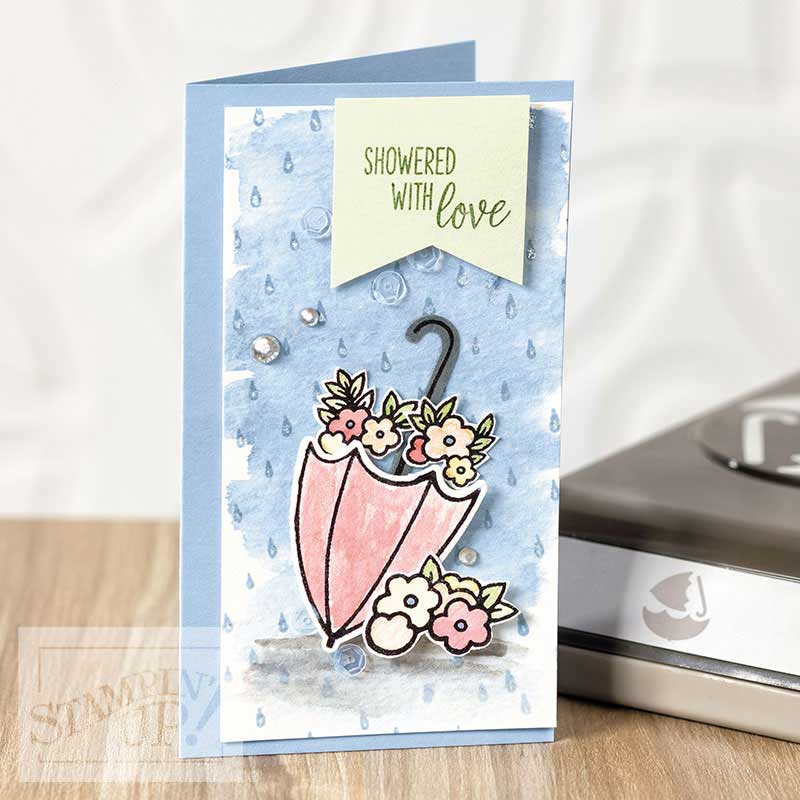
  4. Affix sentiment to the acrylic block, apply Ink to the sentiment and stamp image on the lower right corner of the smaller white rectangle, as shown
  5. Apply Dimensionals to the back of the smaller white rectangle and adhere to the larger white rectangle.
  6. Either punch the umbrella handles out of the designer series paper with the Umbrella Builder Punch or affix umbrella handle to the acrylic block, apply ink to the umbrella handle image and stamp two umbrella handles on scrap cardstock. Punch the handles out using the Umbrella Builder Punch.
  7. Punch two umbrellas from the designer Series Paper, apply Dimensionals and adhere to the smaller white rectangle.
  8. Apply adhesive to the two umbrella handles and adhere to the smaller white rectangle.
  9. Cut a 8″ piece of baker’s twine and create a bow. Adhere to the umbrella with a glue dot.
  10. Add Epoxy Droplets, as shown.
  11. That’s it!

Products Used

Recommended Stamper’s Tool Kit

Showered with Love

When I saw this card, I was looking forward to making it, mostly because it uses watercoloring and I thought that would be a fun technique and the pretty pinks are way girlie for me. Plus the Under My Umbrella bundle is just SO spring! I’m from New Hampshire, April Showers Bring May Flowers is something we’re used to saying. April is mud season, so compared to THAT this card is super cute. Boots and an umbrella are a must to survive mud season. Now that I live in Florida, it’s more about rainy season in June. Either way can you resist this adorable umbrella and girly flowers?

The design came straight from the Stampin’ Up! 2020 Jan – June Mini Catalog for this one. The only real change I made is the size of the card. Except as I was just uploading this picture, I noticed they used clear sequins! I missed those. Drat. They’re so cute!

Stampin’ Up! 2020 Jan – June Mini Catalog

Cutting Dimensions

  • Card base: 8.5″h x 5.5″w piece of Seaside Spray Cardstock folded to make a 4.25″w x 5.5″h. My project picture does not do SeasidecSpray justice. It is a really beautiful color that is retiring June 2021.
  • Watercolor Paper: 5.25″h x 3.75″w
  • Seafoam Green Tag: 1.5″ h x 1.5″ w use the Tailored Tag Punch to make the banner triangle.
  • Umbrella & Flowers: stamp the umbrella, flowers and umbrella handle with Stazon Ink on scrap watercolor paper. Use the Umbrella Builder Punch to pop out the Umbrella Handle and then use your scissors to fussy cut the rest. I recommend painting before cutting.

How to Watercolor

There are four main tools needed for successful watercoloring:

  • Stampin’ Up! Watercolor Paper (and yes, it’s better than just any old watercolor paper)
  • Stazon Ink Pad – this prevents the outline from bleeding while you paint
  • Aqua Painters – these are a paint brush- like tool with a water reservoir built right in!
  • and then the Ink Pad(s) of your choice. What colors do you want to use?
  1. Affix your Stamp to an acrylic block,
  2. Apply some Stazon Ink and stamp your image on the watercolor paper.
  3. Next, dab a little ink from the Stampin’ Ink Pad onto an acrylic block and
  4. Use the wet Aqua Painter to dilute the ink. Then paint.

I usually start with the area I want darkest first and work outward for some shading. Be careful not to add too much water!

Putting it All Together

Cut the paper as indicated. Using Stazon ink, stamp the umbrella and flowers on Watercolor Paper and stamp the umbrella handle on Basic Grey Cardstock. Watercolor the umbrella with the Rococo Rose ink. Watercolor the background using Seaside Spray and Basic Grey Ink. Watercolor the flowers using Grapefruit Grove, Petal Pink and Rococo Rose and the leaves in Garden Green. With the Umbrella Builder Punch punch out the umbrella and handle. Then use the Paper Snips or other scissors to fussy cut out the flowers.

Once the background is dry, add some Seaside Spray water drops from the Stamp Set and adhere it to the Seaside Spray cardbase. Then adhere the Umbrella handle using Snail Adhesive and the Umbrella using Dimensionals. Next arrange the flowers to your liking and affix to card. Swipe the Wink of Stella over the flowers to add a little sparkle.

Lastly, stamp the sentiment to the Soft Seafoam tag with Garden Green ink and affix the tag to the card with Stampin’ Dimensionals. And that’s it!

Products Used

Life is Better with a Friend Like You

Life is so much easier with a close friend to talk to, don’t ya think?  Another perfect greeting from the Peaceful Moments stamp set pulled this pretty card together. The Garden Lane Designer Series Paper adds a little pop of interest to a #simplestamping design. No fancy tricks or new techniques for this one.

I tell you I was a little turned off by the Garden Lane Designer Series Paper when I first received it. It was just, well A LOT of green. I mean just LOOK at all that green!!!

Garden Lane Designer Series Paper

I knew if I was ever going to like this paper, I was going to have to pair it with complimentary colors.This card was a little easier than some others I did. For this card, I pulled from the pattern itself when I chose coordinating Cardstock.

I used a Pretty Peacock Cardstock base, topped with a Whisper White Cardstock layer stamped with the sentiment in Pretty Peacock. After that it’s a square of that Garden Lane, a 3/4″ rectangle of Pool Party and a tie of Baker’s Twine popped up on some Dimensionals.

Cutting Dimensions

  • Pretty Peacock Cardstock 8 1/2″ h x 5 1/2″ w folded in half to 4 1/4″ w x 5 1/2″ h
  • Whisper White Cardstock 5 1/4″ h x 4″ w
  • Garden Lane DSP 3 3/4″ square
  • Pool Party Cardstock 3/4″h x 3 3/4″w rectangle
  • Baker’s Twine cut about 6″

Product List

Here’s a look at the products I used to make this card. Click the image and you will be taken to my online store.