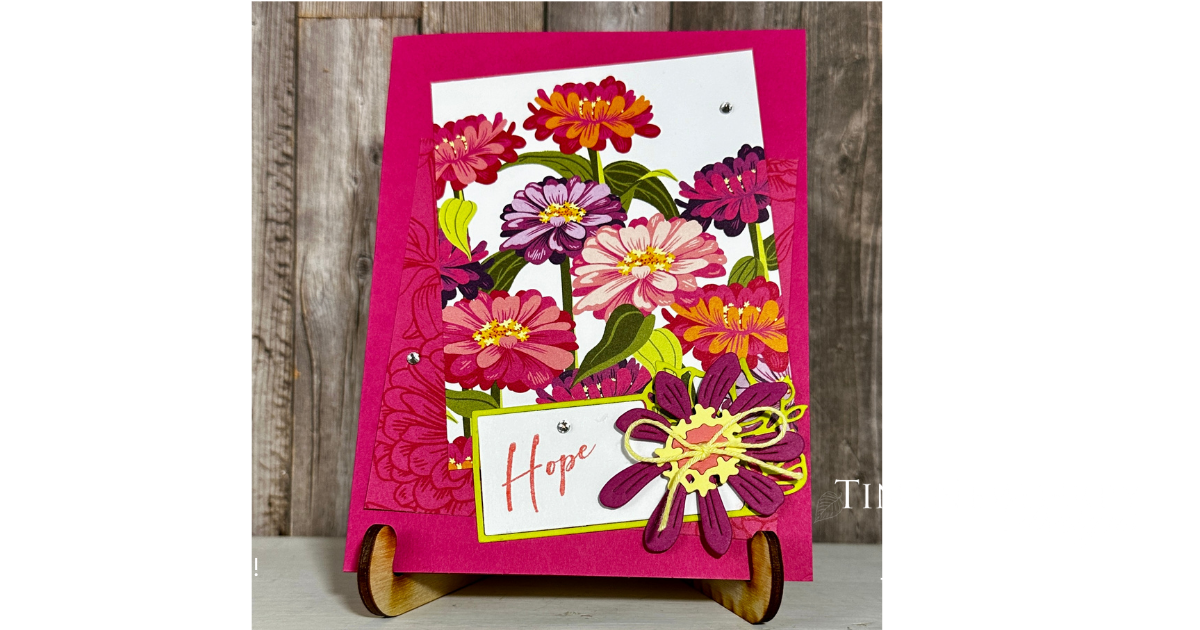
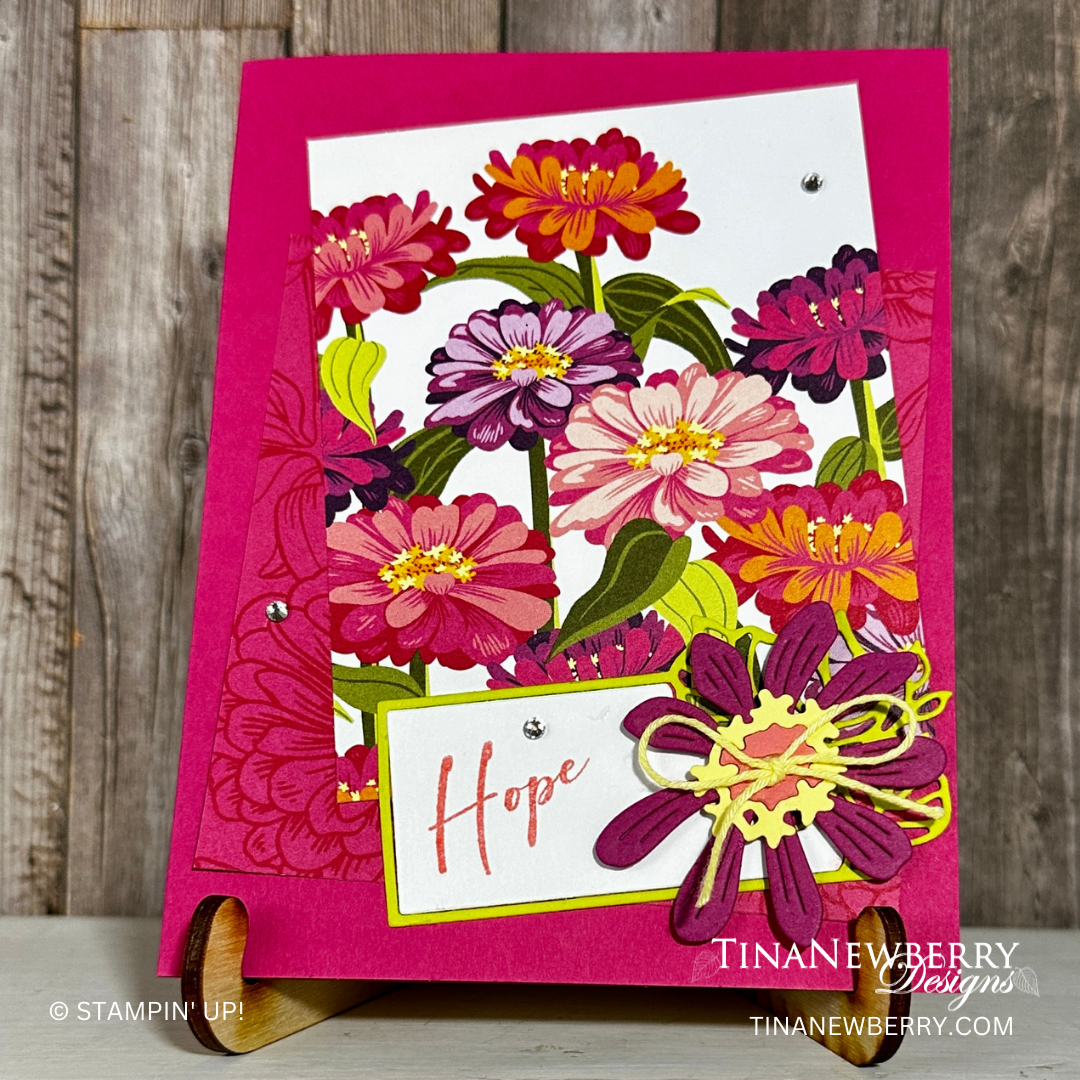
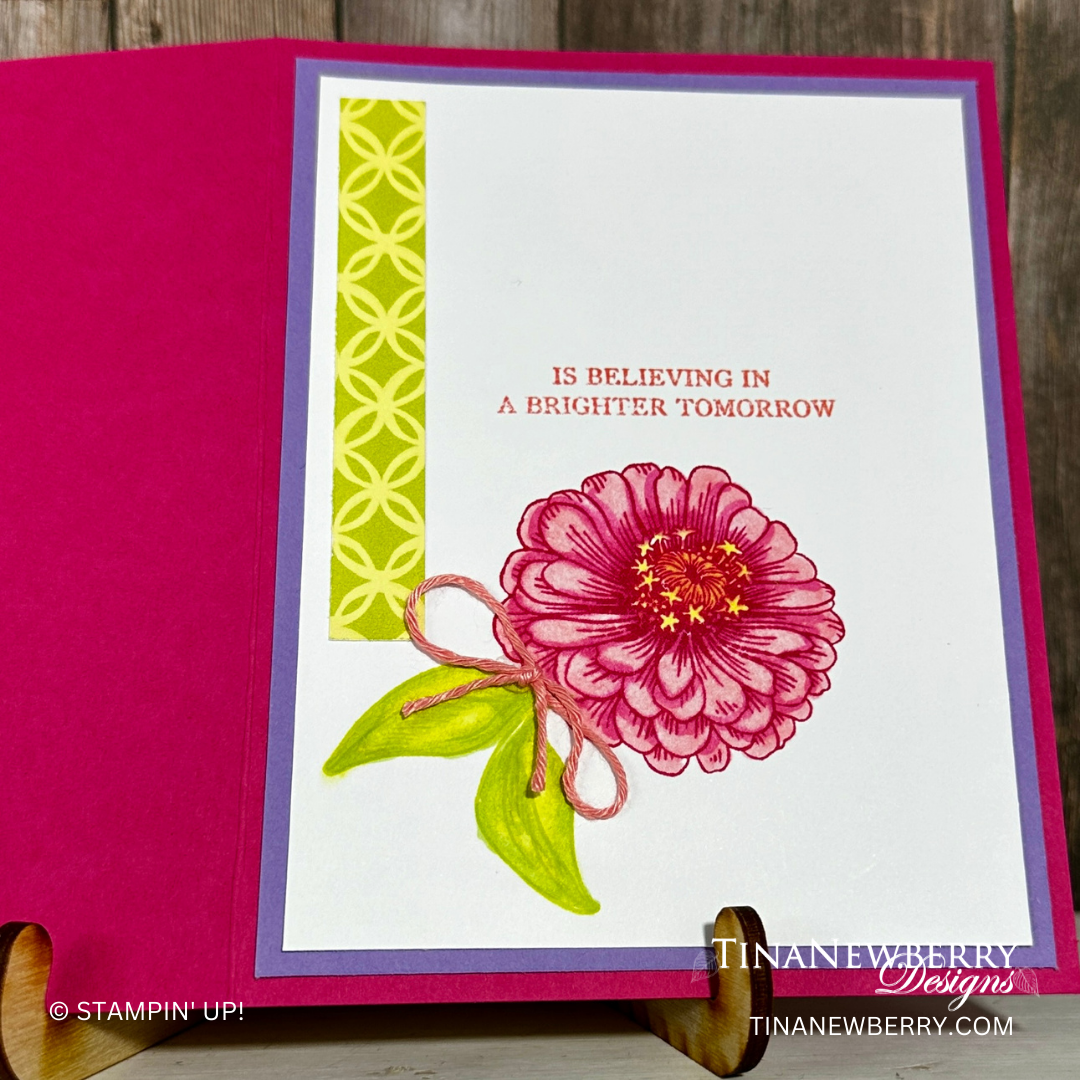
Sometimes you just need to get your hands on some paper and markers! Step up the Unbounded Love project from yesterday by adding a few more layers, die cuts and some creative coloring on the inside.
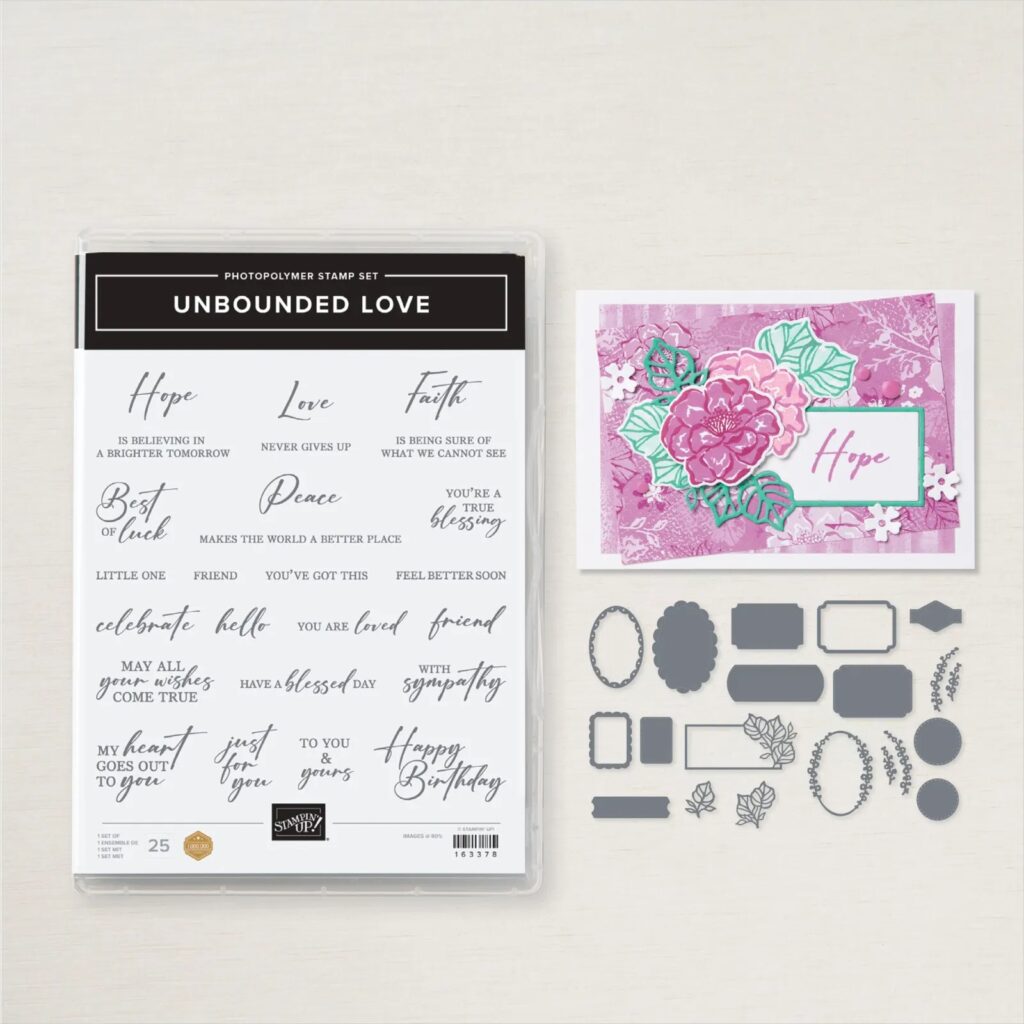
Few things in life are better than love and creativity. With the Unbounded Love Bundle (available May 1, 2024), you’ll get both. Enjoy the experience as you pair greetings for the perfect sentiment on any occasion. Then use the labels, frames, scallops, shapes, leaves, and floral dies to create layered combinations. Or enjoy a simple style by quickly cutting out stamped sentiments. No matter what you do, you’ll find just the right fit to show your boundless love, appreciation, support, celebration, sympathy, and care.
Measurements
Full list of supplies needed, listed below. A die cutting machine is needed for this card. Melon Mambo Cardstock: 8 ½” x 5 ½”, score at 4 ¼” Basic White:
4” x 5 ¼” (Inside)
Scrap for sentiment
Highland Heather Cardstock: 4 1/8” x 5 3/8” for inside
Lemon Lime Twist Cardstock: scrap for sentiment matte
Berry Burst Cardstock: scrap for flower
Pumpkin Pie Cardstock: scrap for flower
Lemon Lolly Cardstock: scrap for flower
Flowering Zinnias Designer Series Paper (DSP):
3 ¾” x 3 ¾”
3 ¼” x 4”
Scrap strip for inside
Let’s Create
Affix all stamps to Acrylic Blocks.
Fold the Melon Mambo Card Base in half using a Bone Folder to sharpen the crease.
Use Stampin’ Seal to adhere 3 ¾” x 3 ¾” DSP on an angle to card front.
Use Stampin’ Seal to adhere 3 ¼” x 4” DSP at an angle over bottom layer
Die Cut:
Stamp sentiment in Flirty Flamingo on the die cut label.
Attach to Lemon Lime Twist label matte
Attach to card front with Stampin’ Dimensionals.
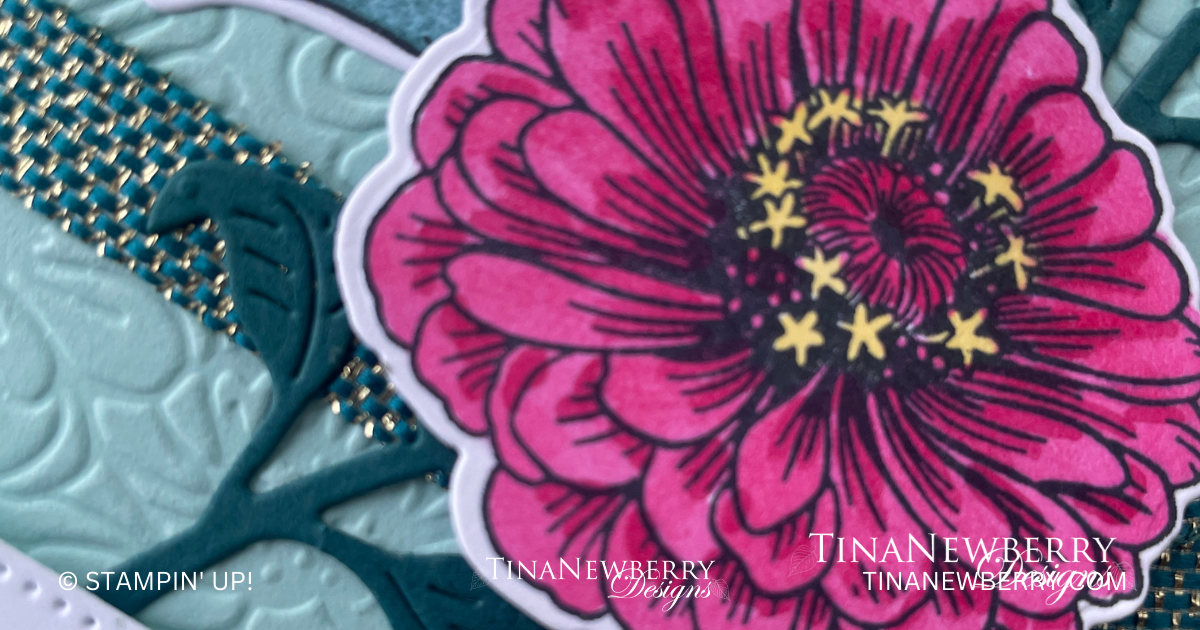
Assemble the Zinnia and attach with Stampin’ Dimensionals.
Tie a sweet little bow with Baker’s Twine and attach with Mini Glue Dots
Sprinkle on some Rhinestone Basic Jewels
Attach 4 1/8” x 5 3/8” Highland Heather to the inside.
Stamp and use DSP strip to decorate the Basic White 4” x 5 ¼” for the inside and attach with Stampin’ Seal.
Decorate your envelope.
So cute! Now send it to someone special.
Lemon Lime Twist label from Unbounded Love Dies
Basic White label from Unbounded Love Dies
Blackberry Bliss, Pumpkin Pie, and Lemon Lolly Zinnia flower and center from Simply Zinnia Dies
Shopping List
This project also uses the Unbounded Love Bundle Item #163384 $54.75 and Pretty in Pink Stampin’ Blends Combo Pack Item #163824 $11.00 available May 1, 2024
Order online from the convenience of your own home or send me your order and I’ll take care of you. ❤ Either way, please use the host code KBSZKQ3A. Order online AND, if your order is $50 or more using host code KBSZKQ3A between now and the end of the month you’ll receive a free pack of embellishment as a THANK YOU gift from me. ❤ If your order is over $150, skip the host code, earn Stampin’ Rewards for free stuff yourself and I’ll still send you a free pack of embellishment as a THANK YOU gift from me. ❤
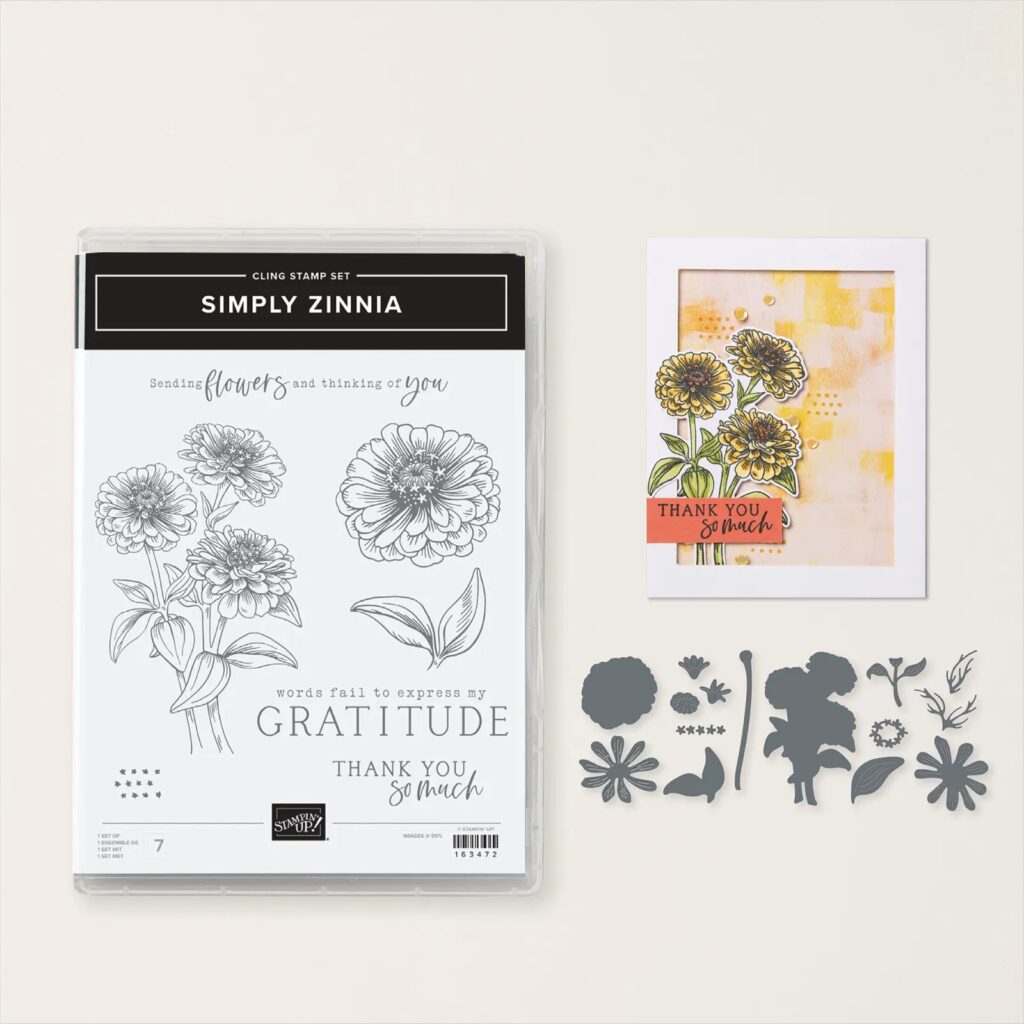
The colors and that big zinnia are gorgeous! Simply Zinnias is an Online Exclusive product. Have you checked out all the newest Online Exclusives lately? New products are being added regularly. Simply Zinnias is available as a bundle or you can order the stamp set and dies seperately. This beautiful bundle is also available in the Flowering Zinnias Suite.
Help your cards, gift tags, and other paper crafts bloom with the Simply Zinnia Stamp & Die Bundle! These stamps have a beautiful hand-etched design and pair perfectly with the floral and greenery dies. Stamp and cut around the individual zinnia blossom, adding some extra dimension with the petals dies. Or build a fun card centerpiece by bundling flowers. You can even create your own unique zinnias with the stem, blossom, and extra greenery dies along with the stamps.
Measurements
Full list of supplies needed, listed below. A die cutting machine is needed for this card.
Basic White Thick Cardstock: 5 ½” w x 8 ½” h scored and folded at 4 ¼” h
Pretty Peacock
5 ⅜” x 4 ⅛”
Scraps for Die cutting stems/leaves
Pool Party: 5 ¼” x 4”
Basic White
4” x 1 ¼” for sentiment
Scraps for stamping and die cutting flowers
Let’s Create
Affix all stamps to Acrylic Blocks.
Fold the Card Base in half using a Bone Folder to sharpen the crease.
Using the Zinnia 3-D Embossing Folder, emboss the 5 ¼” x 4” Pool Party Cardstock.
Stamp the single Zinnia and 1 set of leaves using Black memento ink onto a basic white scrap. Stamp the image with the 3 flowers from the stamp set onto a Basic White Scrap. You’ll only be using the tallest flower from the stamped image. Die cut all of the flowers and leaves using the coordinating dies from the Simply Zinnia Die set. The only flower that will matter in the stamped image of the 3 flowers is the tallest one. Die cut to get the most of the shape and then cut it apart from the others. Or if you don’t mind fussy cutting, you could just fussy cut the whole flower.
Using Stampin’ Blends, color your images. I used Pretty Peacock, Melon Mambo and Daffodil Delight. I also used the color lifter on the leaves to lighten the color a bit.
Using the small stem with the 2 leaves attached, die cut 2 stems from Pretty Peacock cardstock.
Stamp the sentiment using Pretty Peacock ink onto Basic White Cardstock. Die cut using the largest banner die from the Stylish Shapes Die set. The sentiment is a bit tight for this die. DIE CUTTING TECHNIQUE: I enlarged the size the die will cut by cutting just part if the image – from one end to about an inch to the other end. Pull the image and the die from the cutting machine without going the rest of the way. Reposition the die at the other end to make the sentiment fit, you can easily feel where the die should line up with the part that’s cut. Put just the uncut end through the die cutting machine. You can use this technique with many of our labels, and shapes, to enlarge the opening.
Wrap a piece of the Pretty Peacock Ribbon around the Embossed Pool Party Cardstock and tape on the back. Using Stampin’ Seal, adhere the Pool Party cardstock to the 5 ⅜” x 4 ⅛” Pretty Peacock cardstock. Adhere these layers to the folded Card Base.
Take another length of ribbon approximately 4” and fold in half having the ends staggered just a bit from each other. Trim the ends at an angle making one end a tad shorter than the other. Tape this to the ribbon that has been wrapped around the card in a place where it will be covered by the flower.
Adhere the large Zinnia with Stampin’ Dimensionals. Position the smaller flower above the larger flower, taped flat. Position the stems for both of the flowers and tape in place.
Using Stampin’ Seal, tape down the stamped and colored set of leaves where you would like.
Using Stampin’ Dimensionals adhere the sentiment label towards the bottom of the card.
Randomly place 3 Pretty Peacock Foiled Gems to your card.
Don’t forget to decorate the inside of your card and the envelope.
Order online from the convenience of your own home or send me your order and I’ll take care of you. ❤ Either way, please use the host code KBSZKQ3A. Order online AND, if your order is $50 or more using host code KBSZKQ3A between now and the end of the month you’ll receive a free pack of embellishment as a THANK YOU gift from me. ❤ If your order is over $150, skip the host code, earn Stampin’ Rewards for free stuff yourself and I’ll still send you a free pack of embellishment as a THANK YOU gift from me. ❤

")
 Designer Series Paper")


 Metallic Ribbon")
