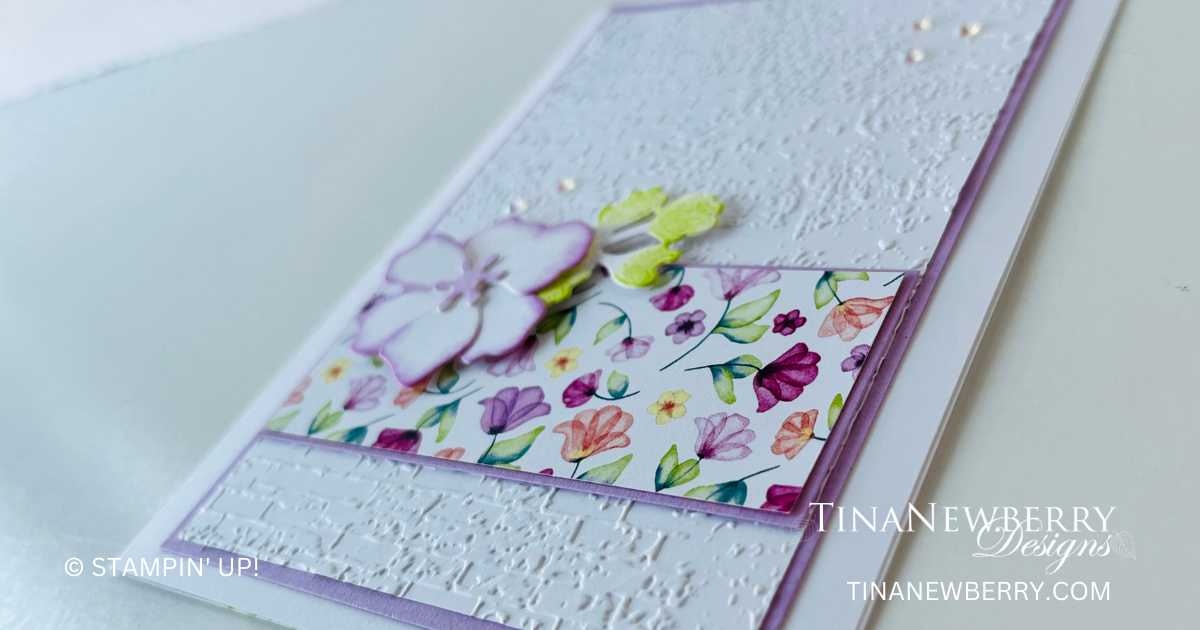
This versatile and beautiful card, by Robbie Rubala, is ready to go for any occasion. Simply add a sentiment to the front or inside before you send. Read on for details on how to layer those stamped flowers and leaves so they overlap to create the beautiful image that mimics the Delicate Florals Designer Series Paper.
Make your blossoms and greenery stand out with intricately designed stamps and delicate dies in the Transluscent Florals Bundle. Mix and match the stamps and dies for unique card fronts and backgrounds. Some of the designs pair perfectly while others offer extra details. You can keep it simple or keep adding layers for intricate designs.
Measurements
Full list of supplies needed, listed below. A die cutting machine is needed for this card.
Card base – Calypso Coral
5 ½” x 8 ½” scored at 4 ¼”
2 ½” x 5 ¼”
3” x 3 ½”
Basic White – 4” x 5 ¼”
2 ⅞” x 3 ⅜”
Delicate Florals Designer Series Paper (DSP)– Pattern with Calypso Coral watercolor wash on the back
2 ⅜” x 5 1/4″
Let’s Create
Affix all stamps to acrylic blocks.
Fold and burnish card base using bone folder.
Attach the large white panel to the card front.
Add the long strip of dsp to the strip of Calypso Coral.
Add the strip from Step 5 to the left side of the card front about ¼” from the side of the White panel.
Use Calypso Coral ink and the middle flower to stamp it randomly 3 times on the small White panel. See photo above for placement.
Create 3 masks using masking paper and the middle flower. Here’s how:
Stamp the middle flower on three pieces of Masking Paper
Die cut or fussy cut each flower.
Place the three masks over the 3 flowers you stamped. These will protect your flowers while allowing you to stamp more images closer to the flowers.
Ink the leaf spray as below and then stamp on the White panel filling in the white spaces around the three flowers.
Ink the leaf spray with Parakeet Party
Use a sponge dauber to apply some Pretty Peacock ink to the stamp similar to the leaf sprays in the DSP
Remove the masks.
Add the panel from to the Calypso Coral panel. Add this panel to the card front using dimensionals centering it on the large White panel and not the card base.
Add Iridescent Rhinestones on the right side of the card front.
Order online from the convenience of your own home or send me your order and I’ll take care of you. ❤ Either way, please use the host code KBSZKQ3A. Order online AND, if your order is $50 or more using host code KBSZKQ3A between now and the end of the month you’ll receive a free pack of embellishment as a THANK YOU gift from me. ❤ If your order is over $150, skip the host code, earn Stampin’ Rewards for free stuff yourself and I’ll still send you a free pack of embellishment as a THANK YOU gift from me. ❤
I completely overlooked the Transluscent Florals bundle in the Sept-Dec Mini Catalog! Lucky for us, my friend Robbie saw the beauty of this lovely, delicate bundle that coordinates with stunning Delicate Florals Designer Series Paper from the Online Exclusives line and shared her creations with us. Double lucky for us, the bundle is carrying over once the catalog retires and the paper is still available. Yippee! I’ve added these to my wishlist!
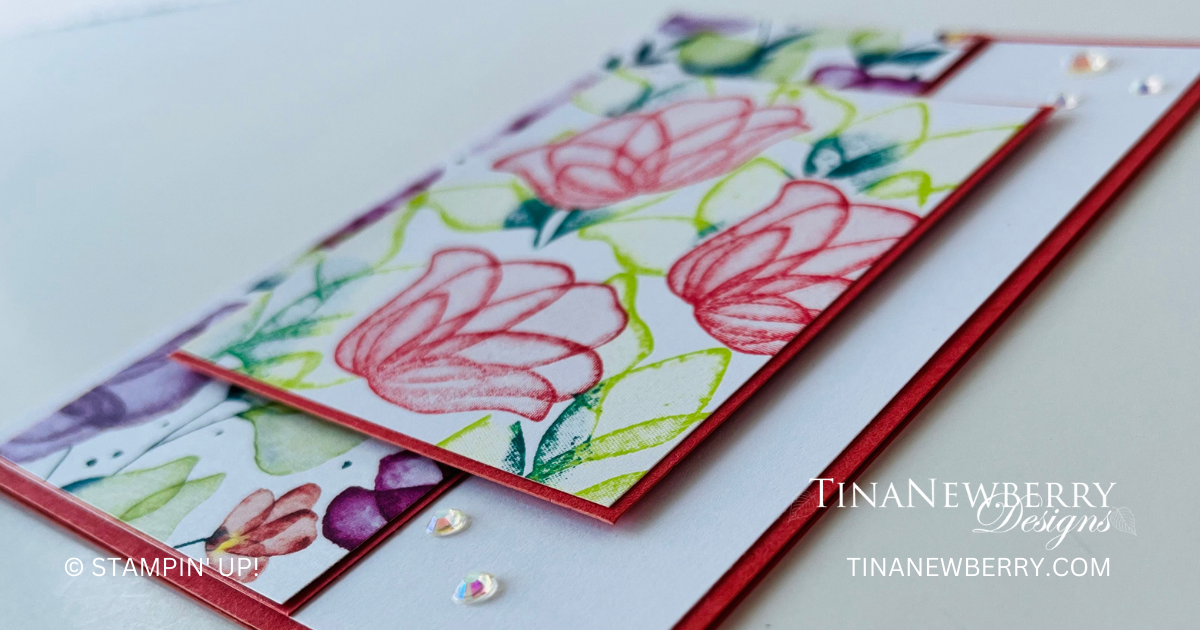
Make your blossoms and greenery stand out with intricately designed stamps and delicate dies in the Transluscent Florals Bundle. Mix and match the stamps and dies for unique card fronts and backgrounds. Some of the designs pair perfectly while others offer extra details. You can keep it simple or keep adding layers for intricate designs.
Measurements
Full list of supplies needed, listed below. A die cutting machine is needed for this card.
Card base – Basic White
5 ½” x 8 ½” scored at 4 ¼”
1 ⅞” x 3 ⅜”
Blackberry Bliss – 2” x 3 ½”
2” x 5 ¼”
Parakeet Party – ⅞” x 5 ¼”
Delightful Florals – Pattern with large flowers 1 ⅞” x 5 ⅛”
Pattern that is Parakeet Party watercolor wash ¾” x 5 ⅛”
Let’s Create
Affix all stamps to acrylic blocks.
Fold and burnish card base using bone folder.
Attach the flowered dsp to the large strip of Blackberry Bliss. Add this to the top of the card base having equal spacing on the sides and top.
Add the Parakeet Party dsp strip to the Parakeet Party card stock strip.
Glue the strip from Step 5 underneath the Blackberry Bliss flower strip butting the 2 strips together.
Use Blackberry Bliss ink to stamp the smaller flower from the stamp set in the lower right hand side of the small white panel. See photo above for placement.
Ink the 2 leaf stamp as below and then stamp on the White panel at the bottom of the flower you stamped from Step 7.
Ink the leaf with Parakeet Party
Use a sponge dauber to apply some Pretty Peacock ink to the stamp similar to the leaf sprays in the dsp
Stamp the sentiment using Blackberry Bliss in the upper left corner of the White panel. Add this panel to the small Blackberry Bliss panel.
Add the panel from Step 9 to the card front centering it side to side and placing it just slightly below center.
Add Iridescent rhinestones around the sentiment. See photo above for placement.
Order online from the convenience of your own home or send me your order and I’ll take care of you. ❤ Either way, please use the host code KBSZKQ3A. Order online AND, if your order is $50 or more using host code KBSZKQ3A between now and the end of the month you’ll receive a free pack of embellishment as a THANK YOU gift from me. ❤ If your order is over $150, skip the host code, earn Stampin’ Rewards for free stuff yourself and I’ll still send you a free pack of embellishment as a THANK YOU gift from me. ❤
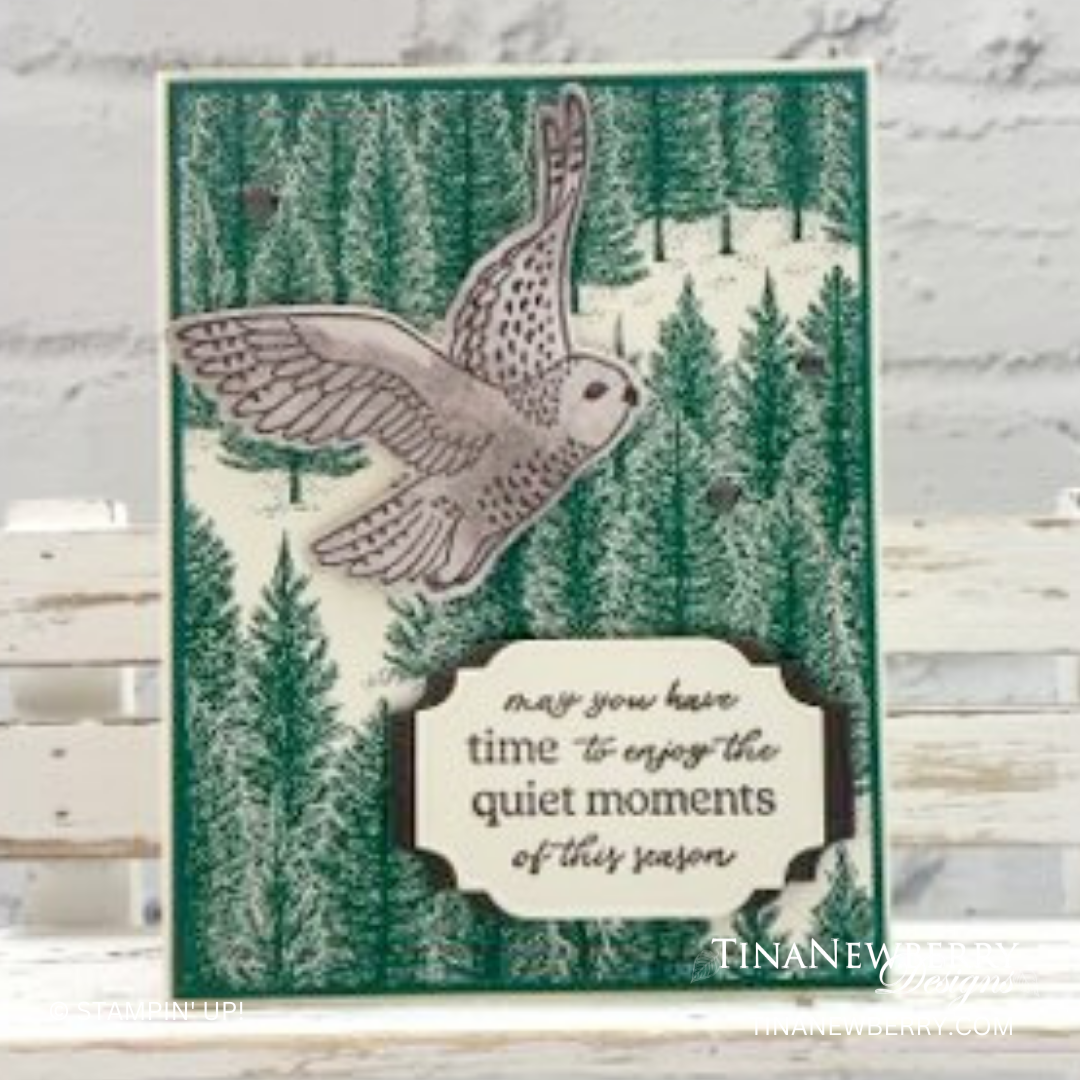
Can you imagine stamping all of those individual trees to make this forest background? I can’t either! Lucky for us we don’t have to! Use the Fragrant Forest background stamp with Shaded Spruce ink and this becomes a Quick & Easy card! My fave.
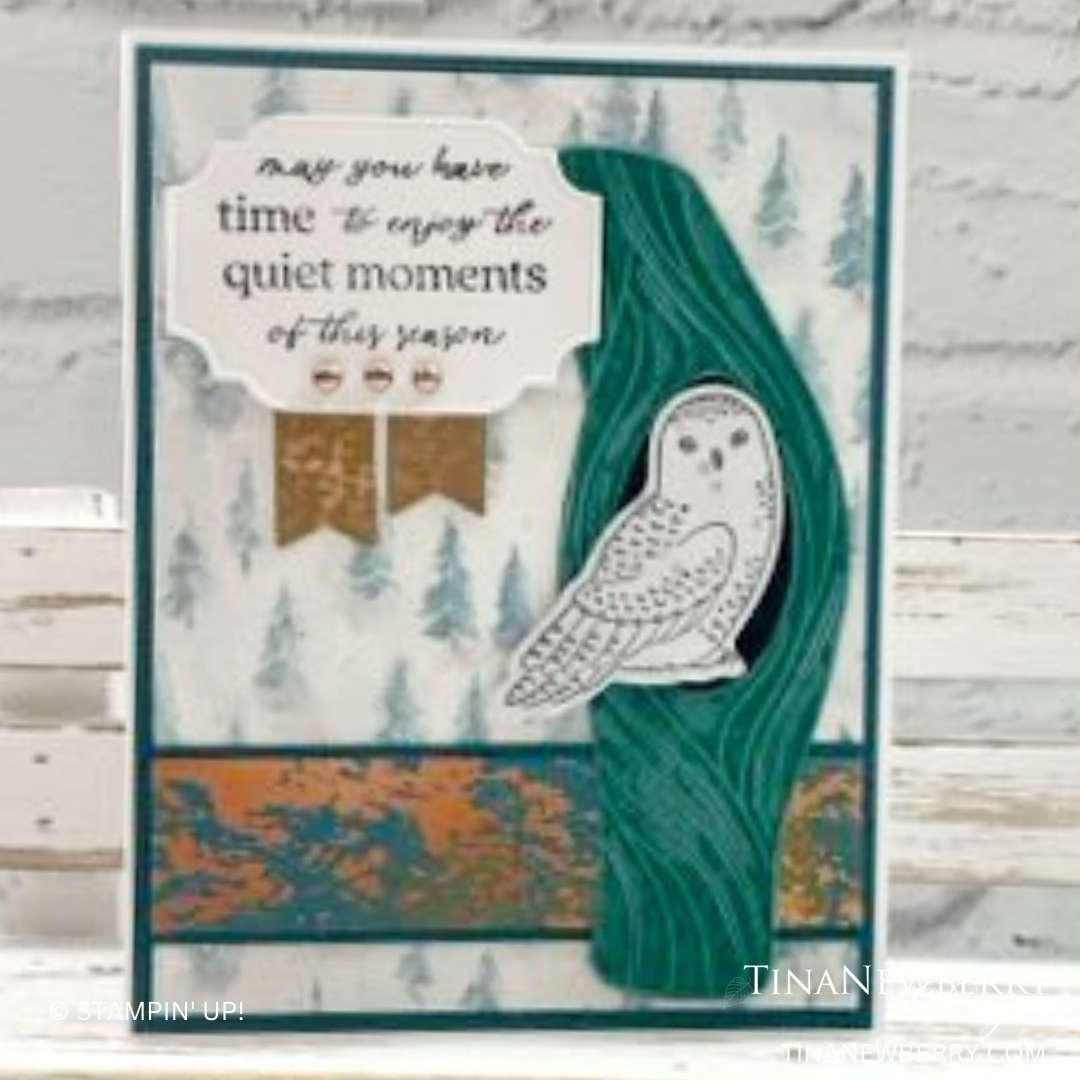
You’ll never have to wing it with the Winter Owls bundle (available while supplies last)! You can build your own woodland scene with detailed owl stamps and nature pieces that you can easily cut out with the coordinating dies. You can stamp and die cut plain paper and then add your own color or use some of our Designer Series Paper for unique patterns and textures. Use these stamps in the summer or winter and explore the many possibilities for creating a memorable paper craft.
Measurements
Full list of supplies needed, listed below. A die cutting machine is needed for this card.
Very Vanilla
5 ½” x 8 ½” scored and folded on the long-side at 4 ¼”
5 ¼” x 4” for background
2 ¾” x 2” (for stamping and die cutting sentiment)
Shaded Spruce
5 ⅜” x 4 ⅛”
Early Espresso
2 ¾” x 2” (for die cutting mat around the sentiment)
Winter Meadow Designer Series Paper
3 ¼” x 3 ¼” (Mottled Print with brown coloring for stamping and die cutting flying owl)
Let’s Create
Affix all stamps to Acrylic Blocks.
Fold the Card Base in half using a Bone Folder to sharpen the crease.
Using Shaded Spruce Ink pad and the Fragrant Forest Background stamp, create the background onto the 5 ¼” x 4” Very Vanilla piece of cardstock.
Using Early Espresso ink, stamp the flying owl onto the 3 ¼” x 3 ¼” Winter Meadow Designer Series Paper.
Using Early Espresso ink, stamp the sentiment onto the 2 ¾” x 2” Very Vanilla cardstock and die cut using the label die from the “All That” die set. Cut a label die using this same die from the 2 ¾” x 2” Early Espresso cardstock. Cut this die cut label in half and adhere to the back of the die cut sentiment so that it shows about ¼” on each side of the Very Vanilla sentiment.
Assemble the card: Adhere the 5 ⅜” x 4 ⅛” shaded spruce cardstock onto the folded Very Vanilla card base.
Adhere the stamped Very Vanilla panel to the card. Using Stampin’ Dimensionals, adhere the owl towards the upper left of the card. Using Stampin’ Dimensionals, adhere the layered sentiment toward the lower right of the card.
Randomly place 3 of the Pebbled Path Adhesive Backed Dots from the 2023-2024 In Color Dots Assortment.
Be sure to decorate the inside of the card and the envelope before sending to brighten someone’s day!
Order online from the convenience of your own home or send me your order and I’ll take care of you. ❤ Either way, please use the host code KBSZKQ3A. Order online AND, if your order is $50 or more using host code KBSZKQ3A between now and the end of the month you’ll receive a free pack of embellishment as a THANK YOU gift from me. ❤ If your order is over $150, skip the host code, earn Stampin’ Rewards for free stuff yourself and I’ll still send you a free pack of embellishment as a THANK YOU gift from me. ❤

")


 Designer Series Paper")


")
")


 Designer Series Paper")

