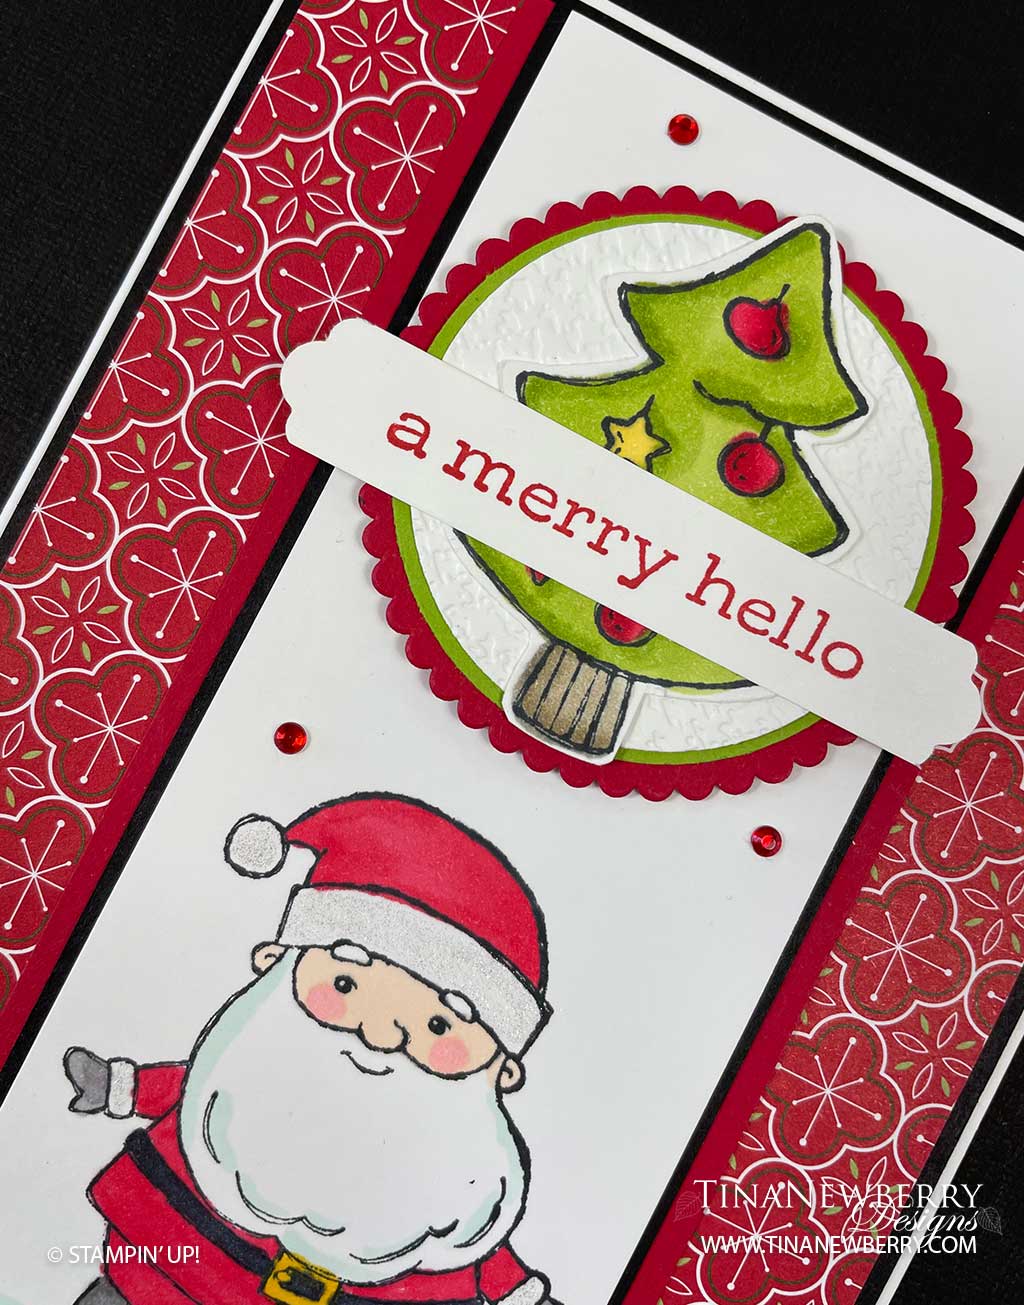
This adorable Santa with his cute little bird, festive tree and sleigh full of presents in the Be Jolly Stamp Set, is sure to get you in the Christmas spirit. This set is made for coloring! Change up the color and no two cards will be the same, but be sure to add this to your collection soon, because it’s available while supplies last.


Measurements
Full list of supplies needed, listed below. A die cutting machine is needed for this card.
Basic White:
- 5 ½” h x 8 ½” w, scored at 4 ¼” Card Base
- 5 ¼”h x 2 ¼” w for stamped layer
- 2 ¼” x 2 ¼” for die cutting circle
- 2 ½” h x 2” w for stamping and fussy cutting Christmas Tree
- ½” h x 3” w for sentiment
- 5 ¼” h x 4″ w for inside
Basic Black:
- 5 ⅜” h x 4 ⅛” w Background
- 5 ¼” h x 2 ⅜” w
DSP Heartwarming Hugs: 5 ¼” h x 4″ w
Real Red:
- 5 ¼” h x 2 ⅝” w
- 2 ½” x 2 ½” small square for die cutting scalloped circle
Granny Apple Green: 2” Circle Punch
Let’s Create
- Affix all stamps to Acrylic Blocks.
- Fold the Card Base in half using a Bone Folder to sharpen the crease.
- Using the scallop circle measuring 2 ¼” from the Layering Circles Dies cut a Real Red scallop circle.
- Using the circle die measuring 1 ⅞” from the Layering Circles Dies, cut a Basic White Circle. Then using the Tasteful Textile 3D embossing folder, emboss the circle.
- Using a 2″ circle punch, punch out a Granny Apple Green Circle.
- Stamp the Christmas Tree using Tuxedo Black Memento Ink onto a Basic White scrap. Using the Stampin’ Blends, color the tree and then use Paper Snips to fussy cut.
- Stamp the Sentiment in Real Red ink on the ½” h x 3” w Basic White piece and trim the ends with the lovely Labels Pick a Punch
- Use Stampin’ Seal to layer the circles with the Real Red scallop on the bottom, then the Granny Apple Green, then the textured Basic White. Attach the fussy cut Christmas Tree center on the Basic White circle with Stampin’ Seal. Then attach the sentiment across the front of the tree with Stampin’ Seal.
- Using Black Memento Ink, stamp the Santa at the bottom of the Basic White 5 ¼” x 2 ¼” layer and color using Stampin’ Blends. Use a little Wink of Stella on his hat and cuffs.
- Assemble your card using Stampin’ Seal: Adhere the stamped Santa layer to the Basic Black matte, then the Real Red Matte. Attach these layers to the DSP, centering side to side, the tops and bottoms will be even. Attach the DSP to the Black card background, then to the folded card.
- Using Stampin’ Dimensionals, adhere the scallop circle layers towards the top of the card.
- Sprinkle with a few Red Rhinestones.
- Stamp and decorate the inside and attach with Stampin’ Seal.
- Decorate your envelope.
- Adorbs! Send off to someone to with them a Merry Hello!
Shopping List

$21.00


$23.00

$35.00


Stamper’s Toolkit
You will also need adhesive, acrylic blocks, scissors and other basic PaperCrafting items from the Stamper’s Toolkit

$8.00

$12.00

$4.00


$5.25

$7.00

$4.00

$7.00

$10.00

$8.00

$8.00

$10.00

$25.00

$7.00

$6.00

$10.00

$8.00

$5.00

$5.00

$6.00

$71.50

$8.00

$11.75
")
$30.00

$9.50


$120.00