12 Days of Christmas Giveaways

November 29 – December 10, 2020

Who’s ready for some fun? Christmas is coming early this year!

As a THANK YOU to my A-MAZING Customers, I will be giving away 12 fun prizes totaling more than $275!!! This is SO FUN!! I can’t wait!

How do I enter?

The good news is, you may already have entries in the drawing. Woot woot! Between June 1 and now, if you:

  • Attended a Live or Online Class, THANK YOU!, you are in! You have one entry for each class you attended.
  • Made a $50 or more product purchase, THANK YOU!, you are in! You have one entry for each $50+ product order.

How do I BOOST my entries?

You can BOOST your entries by placing a $50 or more product order between November 29 and December 10, 2020 using host code BQXN6UEE. With your $50 or more product order, you will receive 10 entries per $50. So 10 entries for a $50 order, 20 entries for a $100 order etc. Order online or send me your order and I’ll take care of it for you! In addition to the 12 Days of Christmas entries, you will also receive my extra monthly FREE Gift as a thank you for your order.

What are the Prizes?

Stay tuned to my Tina Newberry Designs FaceBook page between November 29 and December 10th. I will reveal one prize per day for more than $275 in prizes! If you are not on FaceBook, I will also add the prizes to my blog.

How Do I Know if I Won?

Winners will be announced on December 11th on my FaceBook PageWinners will also be posted on this page and in my weekly eNewsletter.

CONGRATULATIONS TO THE WINNERS
of the 12 Days of Christmas Giveaways Drawing

1 Tag Buffet Card Kit Jessica Vanda

2 Classic Christmas 6″ x 6″ Designer Series Paper Jessica Vanda

3 Mini Trimmer Kim Martin

4 Christmas Designer Series Paper Sampler Pack Kim Martin

5 Poinsettia Petals Bundle Jessica Vanda

6 Power of Hope Bundle Jodi Hargrove

7 Calypso Coral Stampin’ Blend Markers Melissa Canfield

8 Wrapped in Texture Embossing Folders Jodi Hargrove

9 Garden Green Grab Bag: Ink Pad, Cardstock, 2 spools of Ribbon Michele Peradotto

10 Christmas Designer Series Paper Sampler Pack Kim Martin

11 Magnolia Lane Large Specialty Cards and Envelopes Kim Martin

12 Merry Hello & Wrapped in Christmas Gift Card Kit Kathy Couture

Christmas Blessings

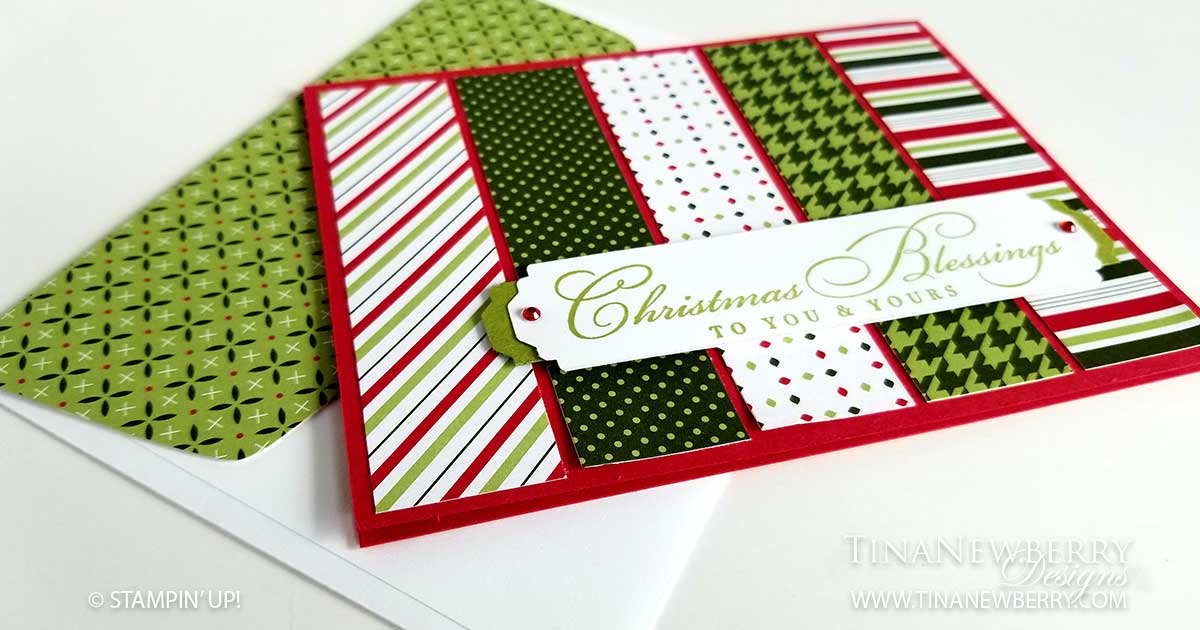
Aren’t the fonts on this stamp devine?! And just look at those patterns! The bright palette of the Heartwarming Hugs Designer Series Paper brings the Christmas cheer for this super simple, fun card using the Wrapped in Christmas Stamp Set. You can make this card. I’ll show you how.

Full list of supplies needed, listed below.
Card Base: Real Red Cardstock 8 1/2 h” x 5 1/2″ w folded to 4 1/4″ h x 5 1/2″ w
Background Strips (5): Heartwarming Hugs DSP 4″ h x 1″ w
Sentiment Background: 3/4″ h x 4 1/4″ w trimmed with the Lovely Labels Pick A Punch
Sentiment Layer: 
Whisper White Cardstock 1″ h x 4 1/4″ w trimmed with the Lovely Labels Pick A Punch

  1. Affix all stamps to Acrylic Blocks.
  2. Fold the Card Base in half using a Bone Folder to sharpen the crease.
  3. Lay the Background Strips in place and then attach using Stampin’ Seal.
  4. Stamp the Sentiment in Pear Pizzaz ink.
  5. Attach the Sentiment Layer to the Sentiment Background using Stampin’ Seal and then attach with Stampin’ Dimensionals.
  6. Add some Red Rhinestones to the Sentiment.
  7. Decorate the Inside Layer and attach.
  8. Decorate the envelope.
  9. Merry Christmas! Now put it in the mail.

Shopping List

Recommended Stamper’s Toolkit ❤


Design inspired by Jackie Bolhuis.

Surround Yourself in the Love of the Season

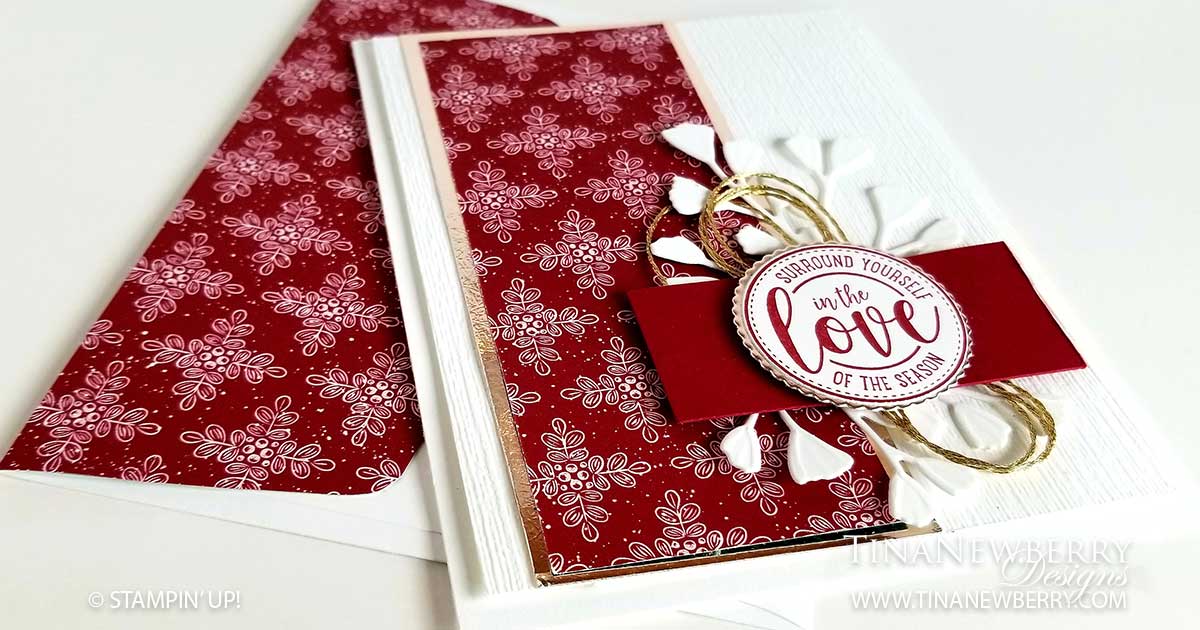
Such a simple, yet elegant card this turned out to be! I really like the clean lines, subtle texture and pop of gold to accent the pretty design of the Cherry Cobbler piece of ‘Tis the Season Designer Series Paper.

Full list of supplies needed, listed below. A die cutting machine is needed for this card.
Card Base: Whisper White Thick Cardstock 11 h” x 4 1/4″ w folded to 5 1/2″ h x 4 1/4″ w
Background: Whisper White Cardstock 5 1/4″ h x 4″ w
Decorative Layer Matte: Gold Foil Sheets 5 1/4″ h x 2 1/4″ w
Decorative Layer: ‘Tis the Season DSP 5″ h x 2″ w
Sentiment Decorative Strip: 1″ h x 2 5/8″ w
Sentiment Matte: Gold Foil 1 3/8″ Scalloped Circle
Sentiment Circle: Whisper White Cardstock 1 1/4″ Circle

  1. Affix all stamps to Acrylic Blocks.
  2. Fold the Card Base in half using a Bone Folder to sharpen the crease.
  3. Run the Background through the Subtle Embossing Folder.
  4. Attach the Decorative Layer Matte and Decorative Layer to the Background using Stampin’ Seal and attach the Background using Stampin’ Dimensionals.
  5. Die cut the leaves with the Forever Flourishing Dies in Whisper White Cardstock and attach using Multipurpose Liquid Glue.
  6. Coil the gold trim and attach with Mini Glue Dots.
  7. Attach the Sentiment Decorative Strip with Stampin’ Dimensionals.
  8. Stamp the Sentiment in Cherry Cobbler Ink and punch with the 1 1/4″ Circle.
  9. Attach the Sentiment Circle to the Sentiment Matte and attach with Stampin’ Dimensionals.
  10. Decorate the Inside Layer and attach.
  11. Decorate the envelope.
  12. Love it! Who will you send it to?

Shopping List

Recommended Stamper’s Toolkit ❤


Design inspired by Sandy McCullough.