Christmas Stocking Trio

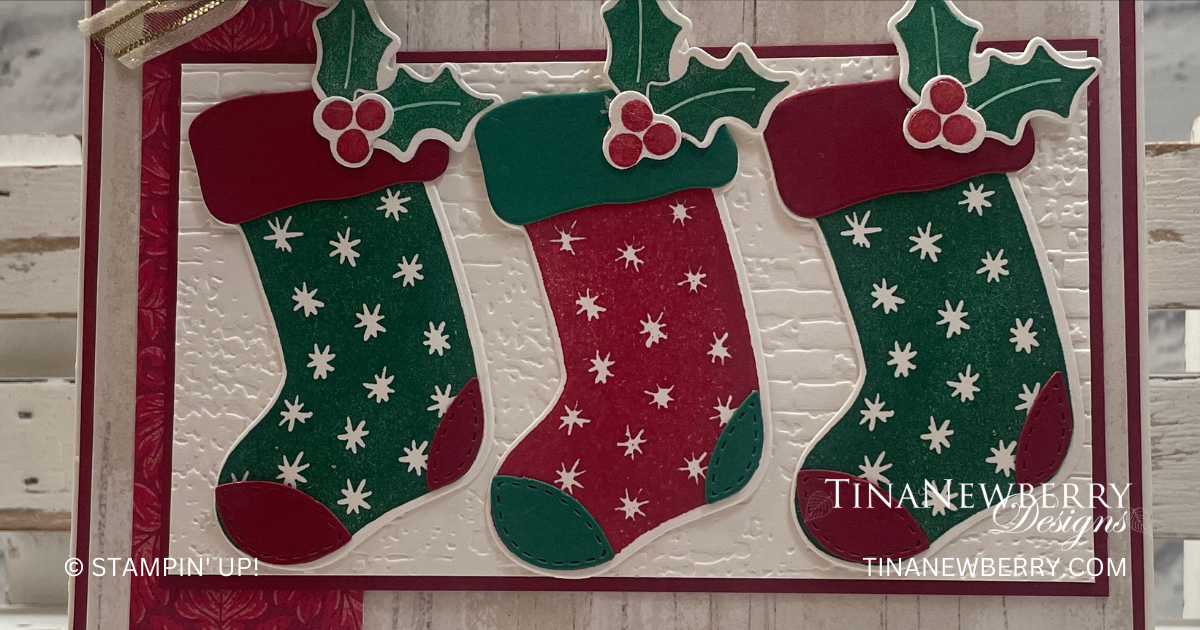
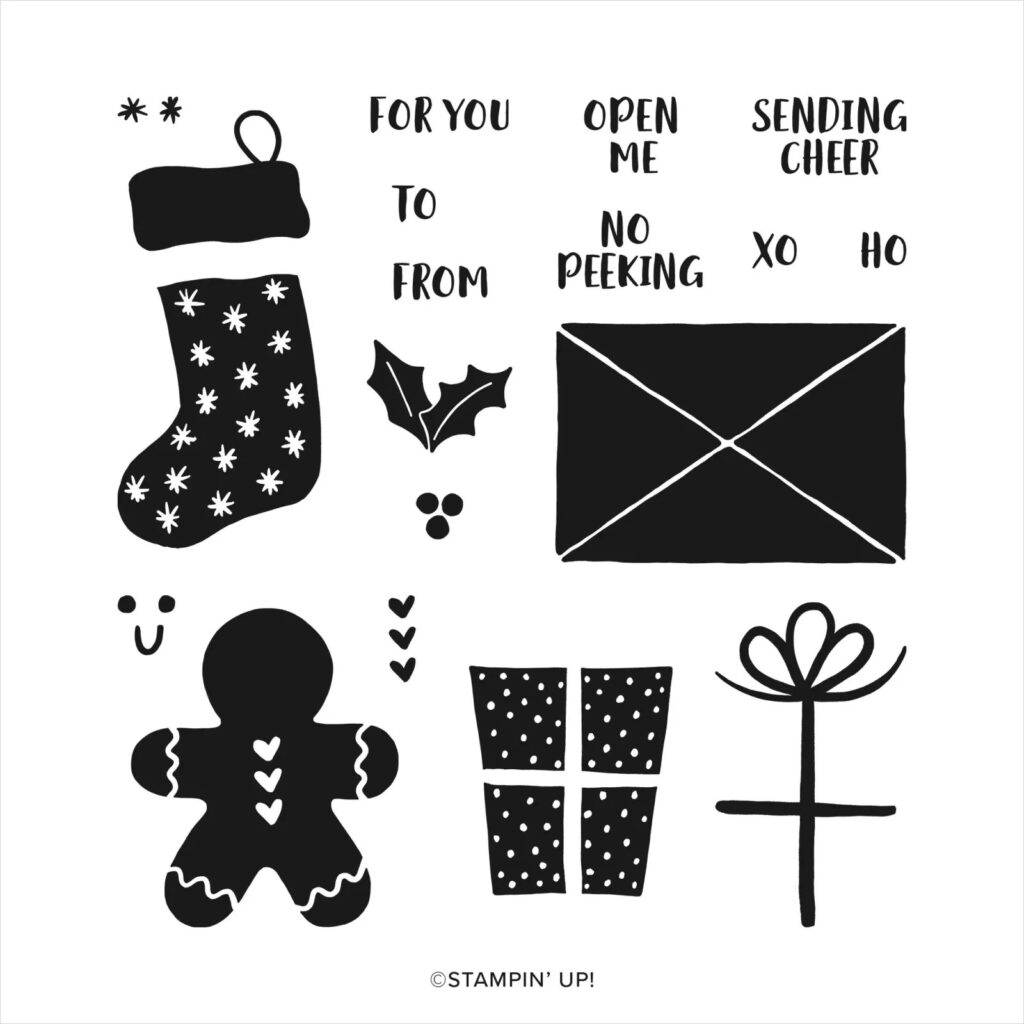
Make custom Christmas stockings with the Sending Cheer Stamp Set! What color will yours be? Mine will be Caribbean blue, of course! Ha! Be sure to get it before it’s gone, because once this bundle retires, it will be gone forever.

This holiday season, make your own gift tags and cards with the Sending Cheer Stamp Set. Stamp an image, then punch or die cut it and you have a tag—it’s quick and easy! But quick and easy doesn’t mean boring. Stamp a gift image in one color, then stamp a bow image on it in a bright ink for fun contrast. Or stamp a stack of stocking images and top each with a different color cuff. And don’t forget cards! Just imagine how festive these images will look on handmade cards.

Measurements

Full list of supplies needed, listed below. A die cutting machine is needed for this card.

Basic White

  • 5 ½” x 8 ½”  scored and folded on the long-side at 4 ¼” 
  • 4 ⅝” x 2 ⅝” 
  • 5 ½” x 4 ¼”  (for stamping and die cutting stockings, holly leaves & berries)

Cherry Cobbler

  • 4 ⅛” x 5 ⅜”
  • 2” x 3” (for die cutting stocking parts) 

One Horse Open Sleigh Designer Series Paper (DSP)

  • 5 ¼” x 4” (light wood grain print)

Shaded Spruce

  • 2” x 2” (for die cutting stocking parts)

Traditions of St. Nick Designer Series Paper (DSP)

  • 4” x 1 ¼” (Cherry Cobbler floral print)


Let’s Create

  1. Affix all stamps to Acrylic Blocks.  
  2. Fold the Card Base in half using a Bone Folder to sharpen the crease.
  3. On 5 ½” x 4 ¼” Basic White Cardstock, stamp 2 stockings in Shaded Spruce Ink, and 1 stocking using Cherry Cobler ink. On this same paper, stamp 3 sets of the holly leaves in Shaded Spruce ink and holly berries in Cherry Cobbler ink.
  4. Die cut the stockings and the leaves and berries.
  5. Die cut the cuff, heel and toe for the stockings.  Two sets in Cherry Cobbler and One set in Shaded Spruce. Adhere these pieces to the stockings – Cherry Cobbler onto the Shaded Spruce stockings and the Shaded Spruce to the Cherry Cobbler stocking.  Adhere the holly leaves and berries to each of the stockings.
  6. Using the Exposed Brick 3D Embossing Folder, emboss the 4 ⅝” x 2 ⅝” piece of Basic White Cardstock.
  7. Using the Gold & Vanilla satin edged ribbon, tie a bow around the top edge of the 5 ⅝” x 4 ⅛” Cherry Cobbler Designer Series Paper.
  8. Assembling your card: Adhere the 3 stockings to the embossed Basic White Panel.
  9. Adhere the strip of Designer Series Paper towards the left side of the wood grain Designer Series Paper, with the bow at the top, leaving about ¼” of the wood grain paper showing on the left.
  10. Adhere the woodgrain paper to the Cherry Cobbler Cardstock panel.
  11. And then these layers can be adhered to the folded card base.
  12. Add a little Wink of Stella to the holly leaves and berries.  
  13. Be sure to decorate the inside of your card and your envelope and it’s ready to send off to wish someone a Merry Christmas.

Shopping List

Recommended Stamper’s Toolkit ❤


Christmas Presents To You

Whip up this card in a jiffy with a few quick and easy layers and a single stamped image. Use Stampin’ Blends to add some color to the stamped image and you’re on your way.

Give a gift from the heart this season with the Gift of Giving Stamp Set! This set comes with five unique Christmas stamps that are perfect for holiday cards or special gift tags. These stamps are filled with detail, which means it’s easy to step up your designs. Stamp your image and then add color however you’d like! This set is perfect for making quick multiples. You’ll end up with many different cards that you can give to your friends and family!

Measurements

Full list of supplies needed, listed below.

  • Card Base Basic White Thick Cardstock:
    • 5 ½” w x 8 ½” h scored and folded at 4 ¼”
    • Scrap for presents
  • Melon Mambo Cardstock:5 ¼” h x 4” w
  • Crushed Curry: 4 ¾” h x 4 ⅛” w
  • Basic White Cardstock:4 ⅝” h x 3 ¼” w
  • Merry Bold & Bright Designer Series Paper (DSP): 4 1/4” h x 4 ⅛” w


Let’s Create

  1. Affix all stamps to Acrylic Blocks.
  2. Fold the Card Base in half using a Bone Folder to sharpen the crease.
  3. Layer on the Melon Mambo, Crushed Curry, and Merry Bold & Bright DSP with Stampin’ Seal. 
  4. On the 4 ⅝” h x 3 ¼” w Basic White layer, stamp snowflakes in Melon Mambo and Crushed Curry. Then attach panel with Stampin’ Seal. 
  5. On Basic White Thick Cardstock stamp the presents in Tuxedo Black Memento Ink. 
  6. Use Stampin’ Blends to color:
    1. Daffodil Delight Stampin’ Blends Combo Pack 
    2. Melon Mambo Stampin’ Blends Combo Pack 
  7. Add some highlights in the middle of the presents with the Stampin’ Blends Color Lifter 
  8. Use Paper Snips to cut out the present and attach with Stampin’ Dimensionals.
  9. Wrap ribbon around all the layers and Tie a bow.
  10. Sprinkle on some Festive Pearls. 
  11. Stamp and decorate the inside.
  12. Decorate your envelope.
  13. Who needs some happy mail? Put this in the mail today

Shoping List

Recommended Stamper’s Toolkit ❤


Gifts from Santa Claus

I just LOVE this light blue striped paper as a backdrop for this cheery card, don’t you? Get this festive stamp set before it’s gone! This set is retiring on January 3rd.

Give a gift from the heart this season with the Gift of Giving Stamp Set! This set comes with five unique Christmas stamps that are perfect for holiday cards or special gift tags. These stamps are filled with detail, which means it’s easy to step up your designs. Stamp your image and then add color however you’d like! This set is perfect for making quick multiples. You’ll end up with many different cards that you can give to your friends and family!

Measurements

Full list of supplies needed, listed below.

  • Card Base Basic White Thick Cardstock:
    • 5 ½” h x 8 ½” w scored and folded at 4 ¼” w
    • Scrap for stamped Santa with presents
  • Subtles Designer Series Paper (DSP): 5 ½” h x 4 ½” w 
  • Basic White Cardstock:
    • Scrap for Stylish Shapes 3” Circle die cut

Let’s Create

  1. Affix all stamps to Acrylic Blocks.
  2. Fold the Card Base in half using a Bone Folder to sharpen the crease.
  3. Tie a bow around the DSP and attach to the Card Base with Stampin’ Dimensionals.
  4. Die cut the 3” circle from Basic White scap and attach to the DSP with Stampin’ Dimensionals.
  5. On Basic White Thick scrap, stamp the Santa with presents in Tuxedo Black Memento Ink.
  6. Use Stampin’ Blends to color in the Santa with presents:
    1. Real Red Stampin’ Blends Combo Pack
    2. Balmy Blue Stampin’ Blends Combo Pack
    3. Granny Apple Green Stampin’ Blends Combo Pack
    4. Bubble Bath Stampin’ Blends Combo Pack
    5. Stampin’ Blends Deep Combo Pack
  7. Use the Stampin’ Blends Color Lifter to add some highlights here and there. 
  8. Use Paper Snips to cut out the Santa and attach with Stampin’ Dimensionals.
  9. Sprinkle on some Festive Pearls. 
  10. Stamp and decorate the inside.
  11. Decorate your envelope.
  12. So Cheery! Put this in the mail today

Shopping List

Recommended Stamper’s Toolkit ❤