I have been helping small businesses, non-profits and institutions of higher education with a variety of print and digital solutions since 2000. From Save-the-Date postcards to eCommerce websites, I am prepared to help you grow your business without breaking the budget.
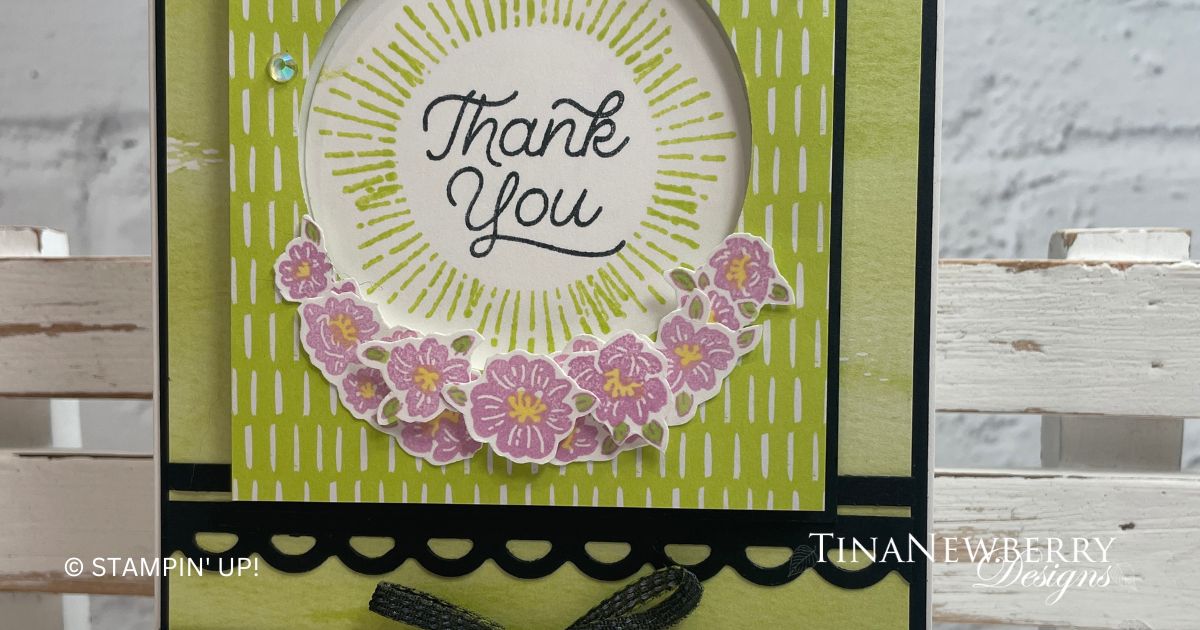
The Misty Moonlight paper from the Bright & Beautiful Designer Series Paper pack does all the work on this simple card featuring the Circled Sayings Bundle.
The Circle Sayings Bundle is filled with a variety of friendly greetings and decorative borders that you can mix and match to make all your projects unique! Pair the stamps together and use the 2-3/8″ (6 cm) Circle Punch to quickly punch it out to use as a centerpiece or a gift tag. Whatever the occasion and whoever your recipient is, you are going to wow them. The creativity in this bundle is endless!
Measurements
Full list of supplies needed, listed below. A die cutting machine is needed for this card.
Basic White
5 ½” x 8 ½” scored and folded on the long-side at 4 ¼”
4 ⅞” x 3 ⅞”
2 ½” x 2 ½” (for stamping and punching Sea Shell Images)
1 ⅝” x ⅝” (for stamping sentiment)
Misty Moonlight
4 ⅛” x 5 ⅜”
Crumb Cake
4 ¾” x 3 ¾”
Night of Navy
2 ½” x 2 ½”
Bright & Beautiful Designer Series Paper
3 ¾” x 3 ½” – Misty Moonlight print
Let’s Create
Affix all stamps to Acrylic Blocks.
Fold the Card Base in half using a Bone Folder to sharpen the crease.
Emboss the 4 ¾” x 3 ¾” Crumb Cake Cardstock just on the right half using the splatters Embossing Folder from the Stripes and Splatters bundle.
Tear the Designer Series Paper at an angle so that the top edge measures approximately 1 ¼”. Use ⅜” – ½” of the torn edge with the to layer about ⅜” to ½” from the edge, this creates a layered, wave look.
Tape this to the left side of the Crumb Cake cardstock layer.
Adhere these layers to the Basic White 4 ⅞” x 3 ⅞” Basic White Cardstock.
Using 2 strands of Linen Thread, wrap around these layers and tie into a bow towards the left of the card.
Adhere these layers to the 5 ⅜” x 4 ⅛” Misty Moonlight Cardstock layer, then adhere to the folded card base.
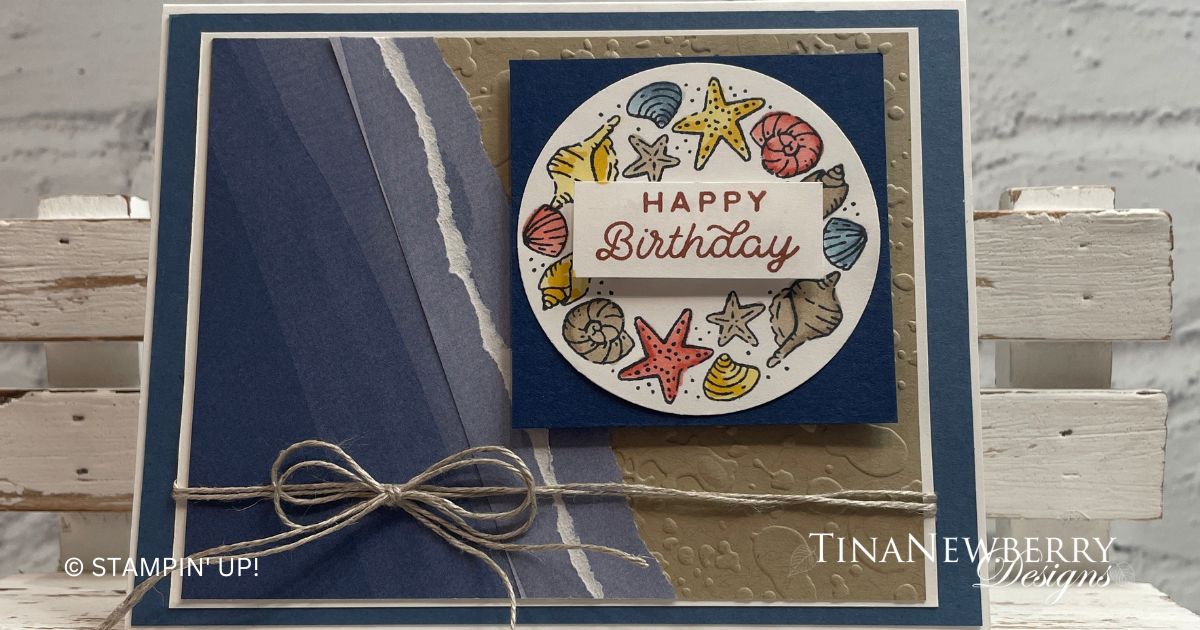
Using Black Memento Ink, stamp the seashell image to the 2 ½” x 2 ½” square of Basic White Cardstock – stamping it twice so the it forms a circle.
Color the shells using Stampin’ Blends. I used Daffodil Delight, Crumb Cake, Calypso Coral, Balmy Blue and Night of Navy.
Use the 2 ⅜” Circle Punch to punch the stamped image and adhere it to the 2 ½” x 2 ½” Night of Navy piece of Cardstock.
Using Copper Clay ink pad, stamp the Happy Birthday onto the 1 ⅝” x ⅝” piece of cardstock.
Adhere this to the center of the circle using Stampin’ Dimensionals.
Decorate the inside of your card and your envelope and send it off to wish someone a Happy Beachy Birthday!
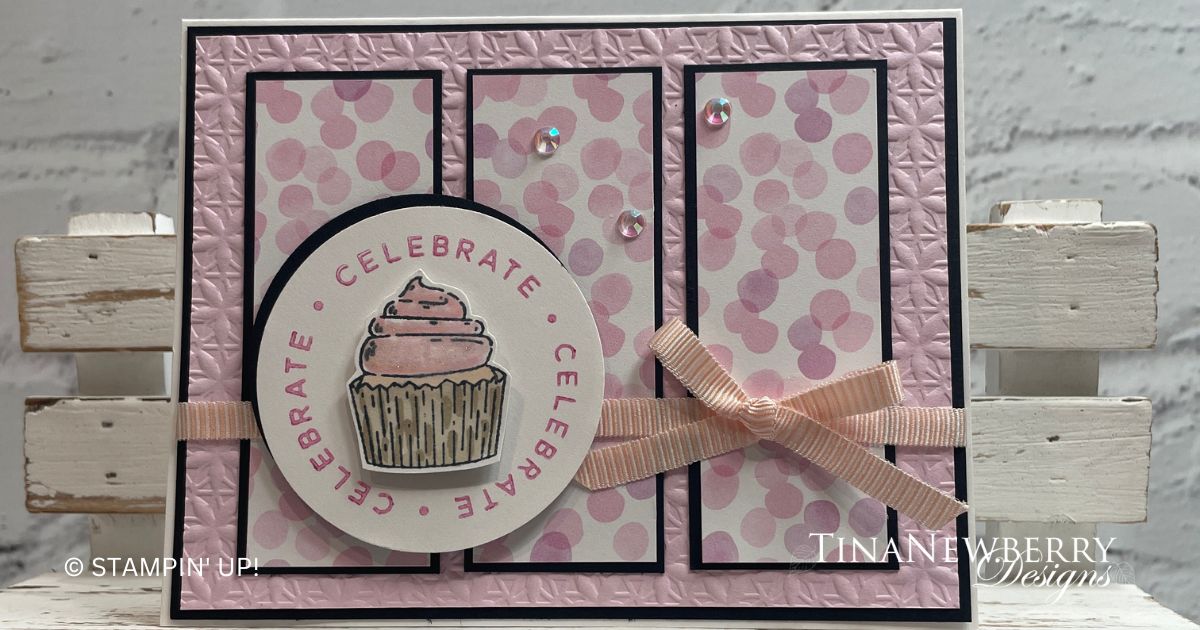
Cake! Cake! Give me all the cake! LOL. Such a cheerful celebration card featuring the new Bubble Bath and returning Berry Burst colors.
The Circle Sayings Bundle is filled with a variety of friendly greetings and decorative borders that you can mix and match to make all your projects unique! Pair the stamps together and use the 2-3/8″ (6 cm) Circle Punch to quickly punch it out to use as a centerpiece or a gift tag. Whatever the occasion and whoever your recipient is, you are going to wow them. The creativity in this bundle is endless!
Measurements
Full list of supplies needed, listed below. A die cutting machine is needed for this card.
Basic White
5 ½” x 8 ½” scored and folded on the long-side at 4 ¼”
2 ¾” x 2 ¾”
1 ¾” x 1 ½” (for stamping and fussy cutting the cupcake)
4″ h x 5 1/4″ w
Basic Black
4 ⅛” x 5 ⅜”
3 ½” x 1 ⅜” (cut 3)
2 ¾” x 2 ¾” scrap for punching circle
Bubble Bath
5 ¼” x 4”
Bright & Beautiful Designer Series Paper ( Pink Polka Dots)
3 ⅜” x 1 ¼” (cut 3)
Let’s Create
Affix all stamps to Acrylic Blocks.
Fold the Card Base in half using a Bone Folder to sharpen the crease.
Emboss the 5 ¼” x 4” Bubble Bath Cardstock using the “star” pattern Embossing Folder from the Embossing Folder Basics Bundle.
Using the Black Memento Ink Pad, Stamp the cupcake onto the 1 ¾” x 1 ½” Basic White scrap of cardstock. Color using Stampin’ Blends. I used Bubble Bath, Ivory and Crumb Cake in the sample. Fussy cut the cupcake.
Using Berry Burst Ink Pad, in up the “Celebrate” circle. I stamp off once to get a 2nd generation shade of ink. Stamp onto the 2 ¾” x 2 ¾” Basic White cardstock. Punch using the 2 ⅜” circle punch.
Punch a Basic Black circle using the 2 ¾” x 2 ¾” Basic Black cardstock.
Layer these two circles, off setting just a bit so the black peaks around the white towards the upper left.
Adhere the 3 pieces of Designer Series Papers to there coordinating Basic Black mats.
Adhere the Bubble Bath Embossed Layer to the Basic Black 5 ⅜” x 4 ⅛” cardstock.
Adhere the 3 Designer Series layers to the Embossed Bubble Bath, starting with the one in the center, then adhere the other two on either side.
Tie a piece of Bubble Bath ribbon around these layers and tie a bow towards the right side of the card. And adhere the layers to the folded card base.
Using Stampin’ Dimensionals, adhere the layer circles to the card towards the left of the card.
Attach the cupcake to the center of the circle using Stampin’ Dimensionals.
Randomly place 3 Iridescent Rhinestone Jewels to the card.
Stamp and decorate the inside and attach with Stampin’ Seal.
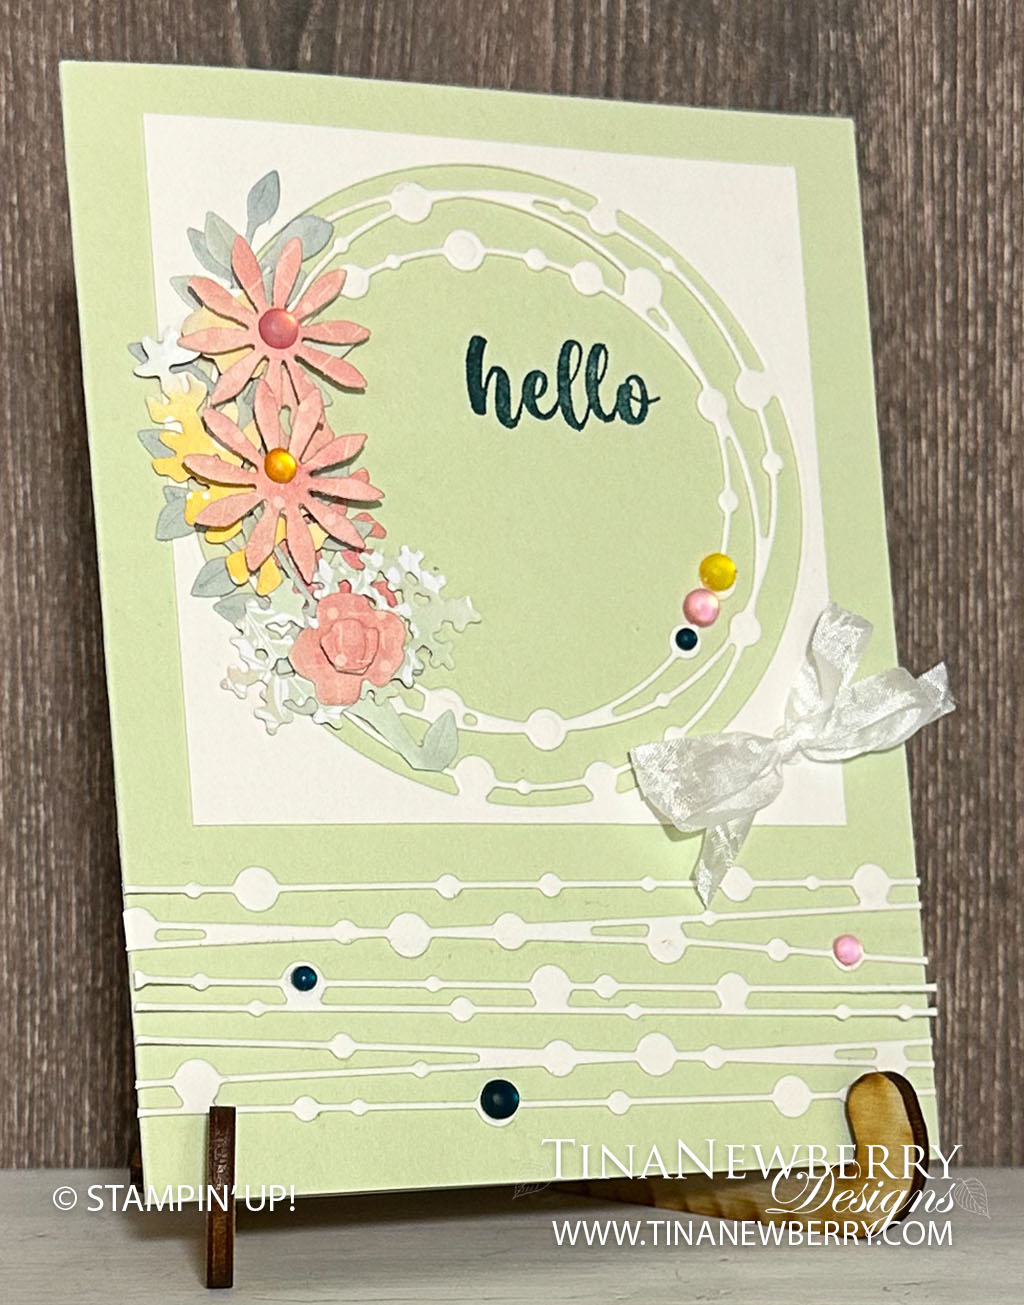
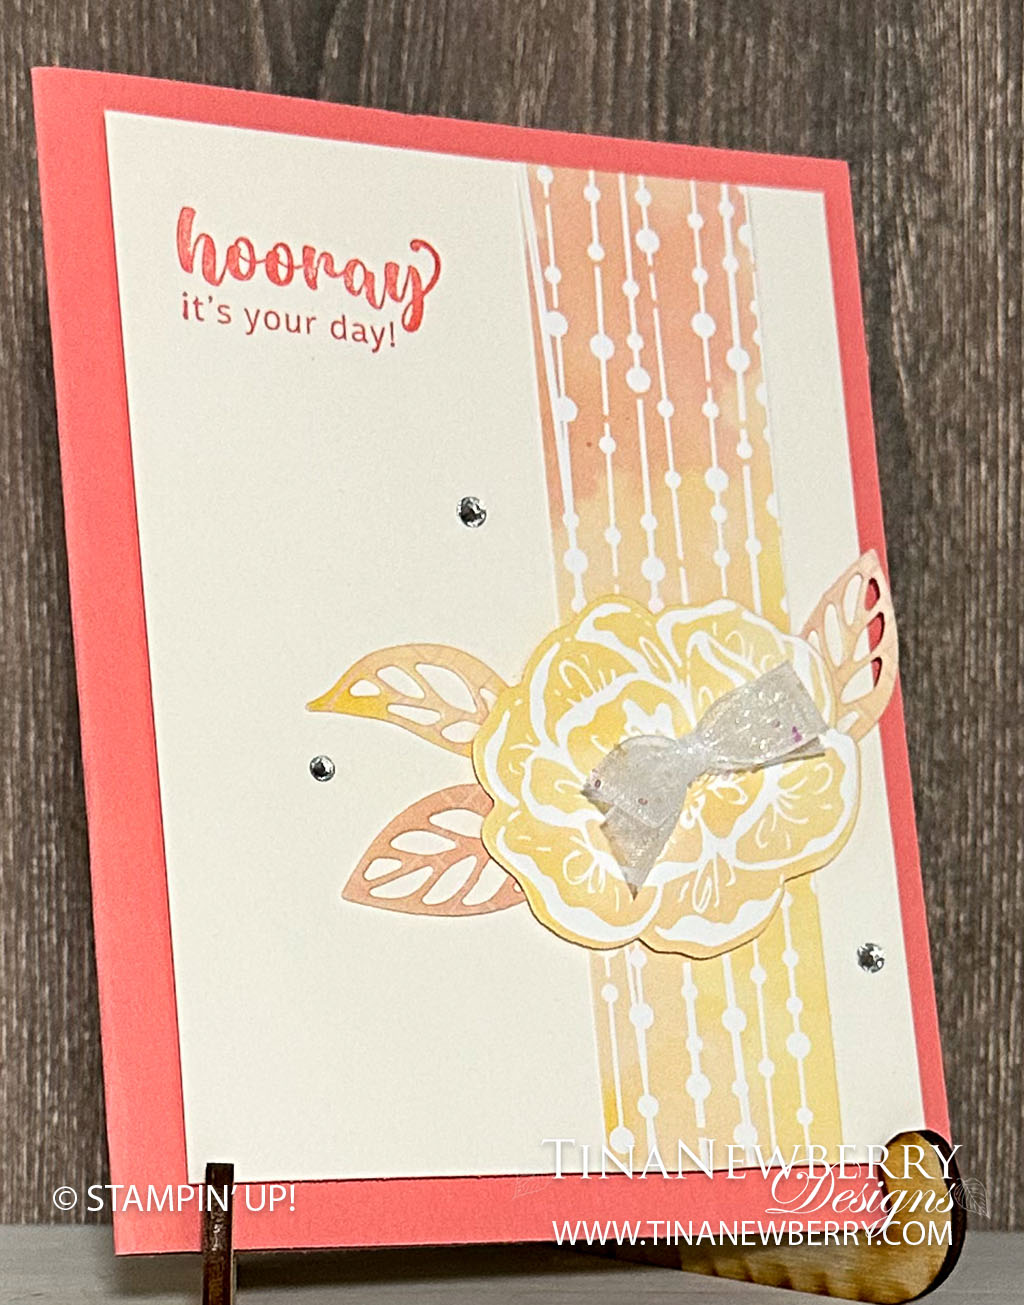
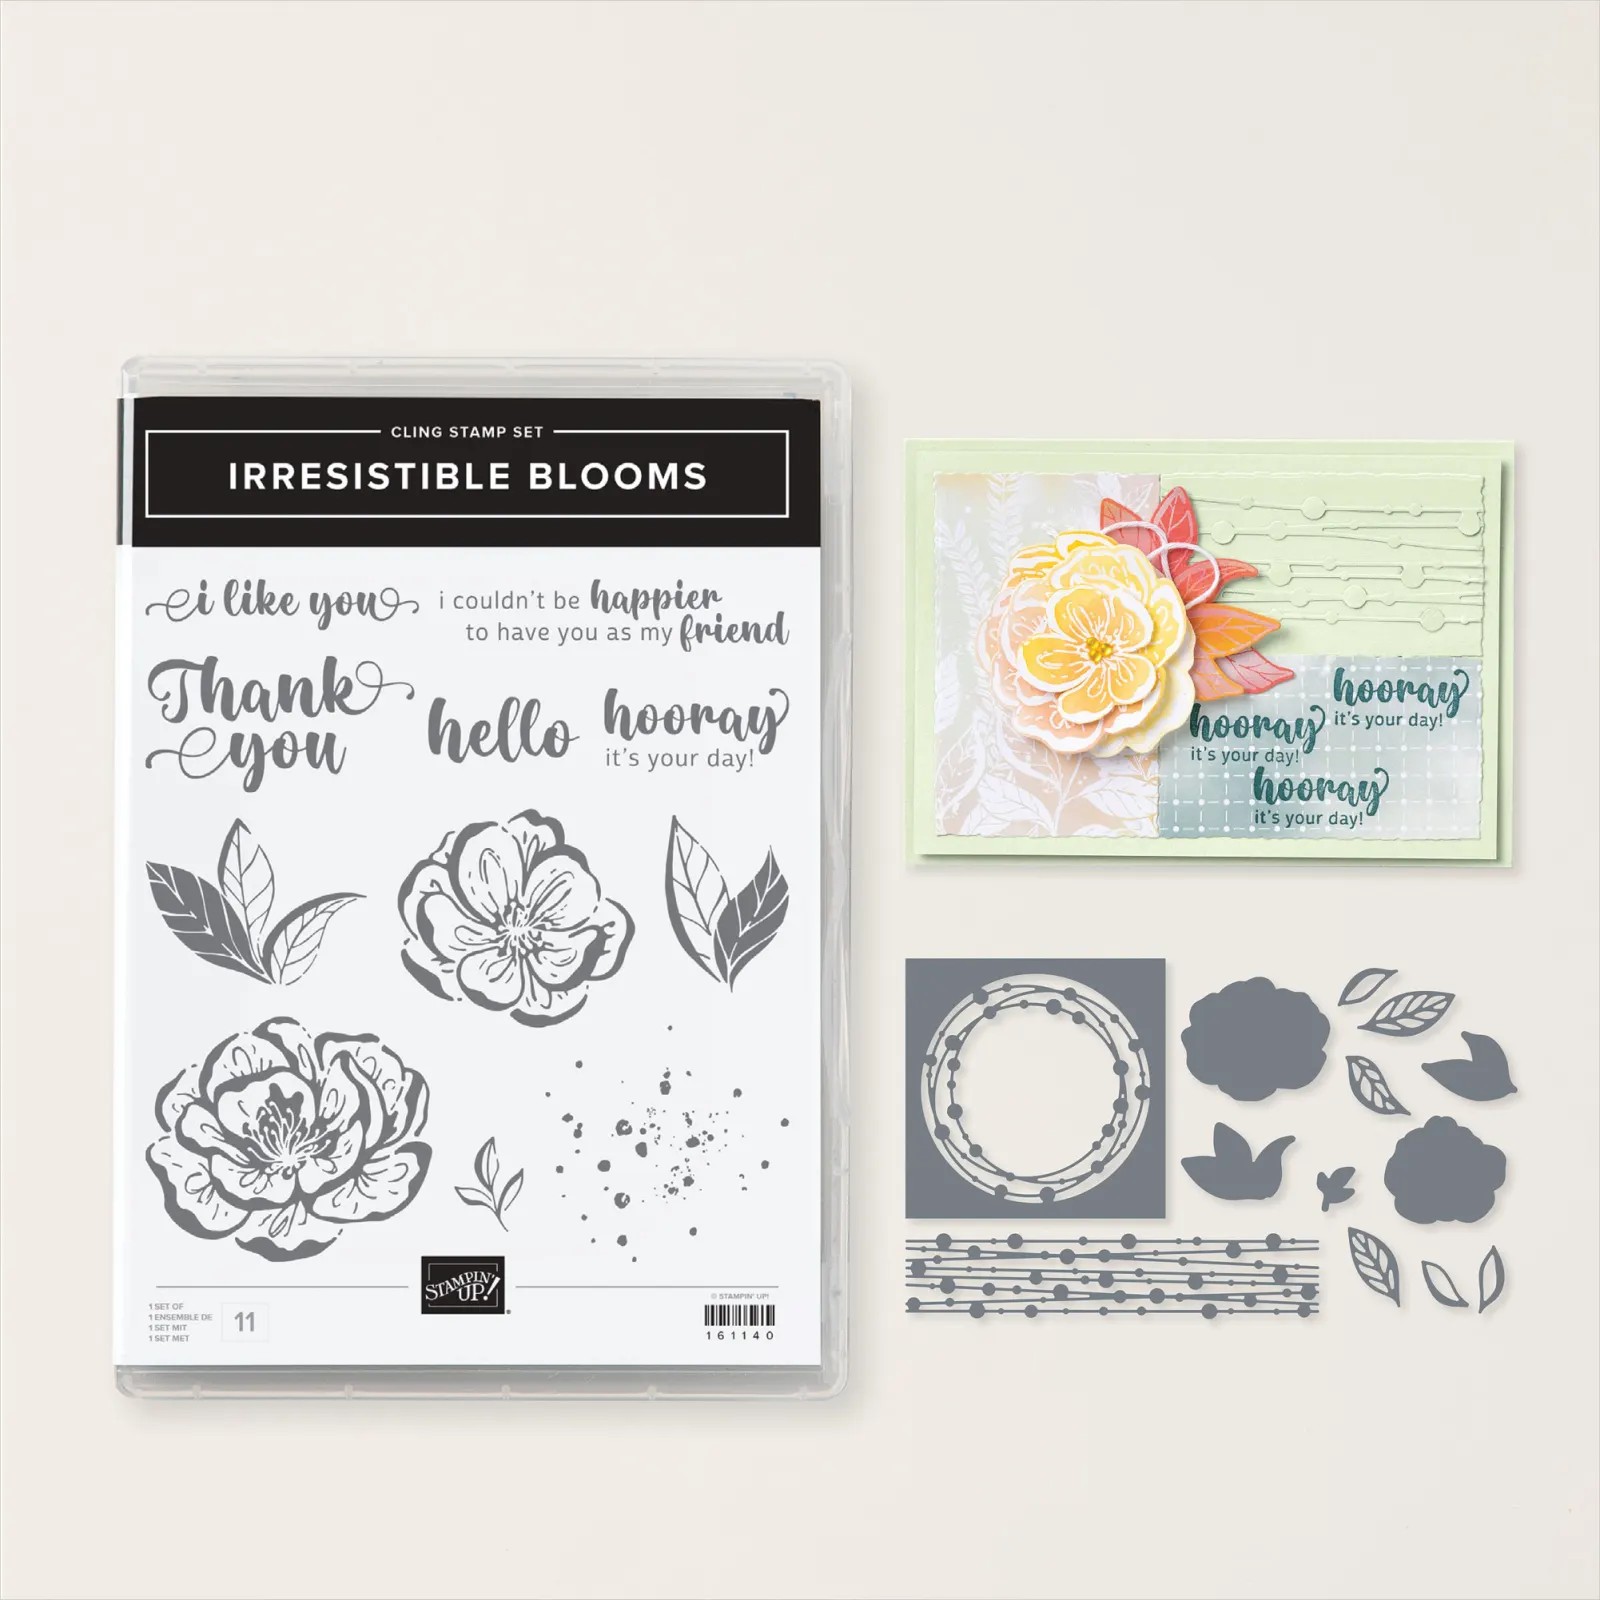
Make a friend’s day with a bright and cheery card from the Irresistible Blooms Bundle – an online exclusive product. That pretty detailed die is easier than it looks! Pro Tip: Attach a piece of adhesive sheets before die cutting.
Meet the Irresistible Blooms Bundle– an online exclusive product. It’s time to make smiles bloom and create gorgeous all-occasion cards friends and family are sure to find artistically captivating! Combine the flower and leaf images from the die and stamp set to create beautiful floral pieces. Add multiple layers to your projects using swirly cutout shapes for projects that pop, or create your own peek-through cards!
Measurements
Full list of supplies needed, listed below. A die cutting machine is needed for this card.
Card Base Flirty Flamingo 8 ½” x 5 ½”, score at 4 ¼”
3 ¾” x 5” Shimmery White
1 ¼” x 5” Designer Series Paper (DSP) strip
Die-Cut flower from Designer Series Paper
Die-Cut leaves from Designer Series Paper- attach adhesive sheets behind the leaves before you die cut.
5 1/4 x 4″ w Basic White Cardstock for inside.
Let’s Create
Affix all stamps to Acrylic Blocks.
Fold the Card Base in half using a Bone Folder to sharpen the crease.
Die-Cut flower from Designer Series Paper
Attach Adhesive Sheets to the back of the leaves on Designer Series Paper and die cut leaves.
Attach Adhesive Sheets to the back of the Shimmery White and die cut with the beads and strings dies.
Stamp sentiment in Flirty Flamingo ink on the Shimmery White layer.
Remove the Adhesive Sheet backing and adhere Designer Series Paper (DSP) strip to back of Shimmery White layer.
Adhere Shimmery White panel to card front with Stampin’ Dimensionals.
Adhere flower to card front with Stampin’ Dimensionals. Remove backing from the Adhesive Sheet and tuck in the leaves behind and underneath the flower.
Add a bow to the center of the flower with mini-glue dots
Sprinkle on the gems.
Stamp and decorate 5 1/4 x 4″ w Basic White Cardstock and attach to the inside with Stampin’ Seal.

")


 Designer Series Paper")


")

 Designer Series Paper")


 Glittered Organdy Ribbon")