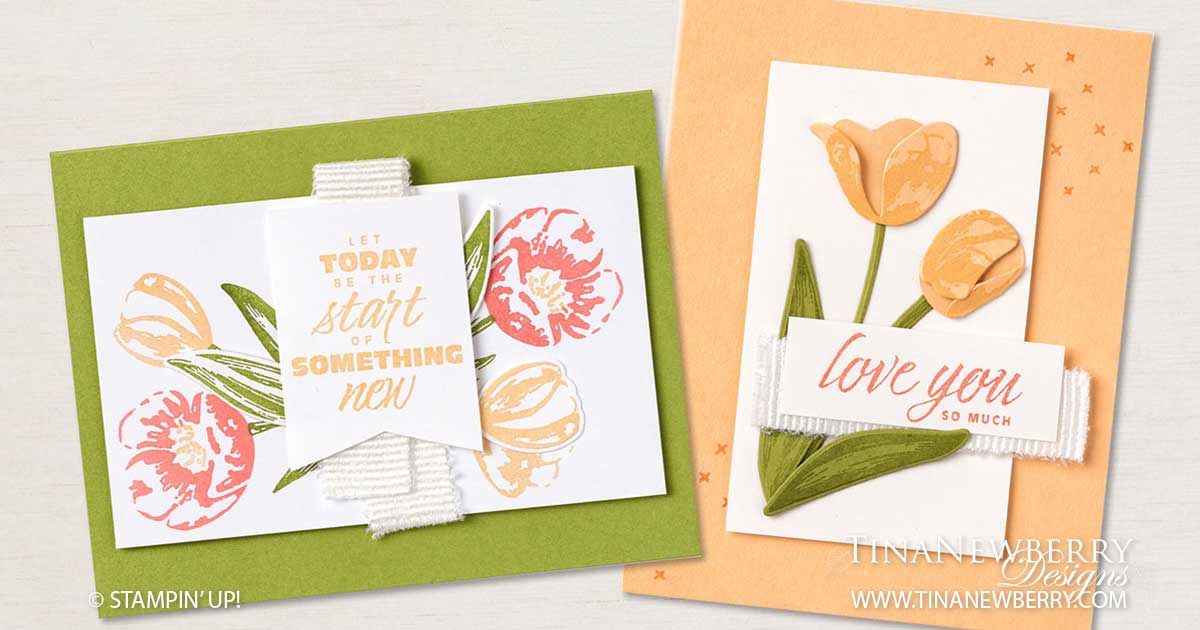
Build sentimental bouquets with the Flowering Tulips Bundle! Use the variety of budding tulips stamps from the Flowering Tulips Stamp Set to create your perfect bouquet to send to someone special, then use your favorite coloring technique to make it shine! Pair the modern sentiments included with your budding tulips for all-occasion card-making projects. The Tulips Dies are a must have for any floral enthusiast. Not only can you create layered tulip fields, but you can also create three types of layered tulip blossoms, perfect for creating your own tulip bouquet! Simply die cut the coordinating dies with contrasting cardstock colors, and then fold the pieces together to make beautiful tulip blossoms. These dies are sized perfectly for the front of a card. Scroll down for the shopping list and assembly video.
START OF SOMETHING NEW CARD
5-1/2″ x 4-1/4″ (14 x 10.8 cm)
- Before you start stamping, cut the following:
• 5-1/2″ x 8-1/2″ (14 x 21.6 cm) Old Olive Cardstock
• 3″ x 5″ (7.6 x 12.7 cm) Basic White Cardstock
• 1-3/4″ x 2-3/8″ (4.4 x 6 cm) Basic White Cardstock
• 2″ x 4″ (5.1 x 10.2 cm) Basic White Cardstock
• 6-1/2″ (16.5 cm) piece from White 3/4″ (1.9 cm) Frayed Ribbon
- Fold the Old Olive 5-1/2″ x 8-1/2″ (14 x 21.6 cm) Cardstock in half to create the
card base. - On the Basic White 3″ x 5″ (7.6 x 12.7 cm) Cardstock
• Stamp the tulip stems in Old Olive ink so they crisscross (you’ll use these
stems as your guide for stamping the head of your flowers, so place
them accordingly).
• Stamp the tulips in Flirty Flamingo ink on the upper right and bottom left
areas, then stamp the tulip centers in Pale Papaya Classic ink
• Stamp the remaining tulips in Pale Papaya ink on the upper left and bottom
right areas.
• Stamp the leaves in Old Olive ink. - Stamp two leaves in Old Olive ink and a tulip in Pale Papaya ink on the
Basic White 2″ x 4″ (5.1 x 10.2 cm) Cardstock. Die cut the images and adhere to
the center of the Basic White 3″ x 5″ (7.6 x 12.7 cm) Cardstock. - Adhere the Basic White 3″ x 5″ (7.6 x 12.7 cm) Cardstock to the folded
Old Olive card base using Stampin’ Dimensionals®. - Fold the White 3/4″ (1.9 cm) Frayed Ribbon over the Basic White piece, then
adhere using Stampin’ Dimensionals. - Stamp the sentiment in Pale Papaya ink on the Basic White 1-3/4″ x 2-3/8″
(4.4 x 6 cm) Cardstock. Cut a V shape at the bottom, then adhere using
Stampin’ Dimensionals.
LOVE YOU SO MUCH CARD
4-1/4″ x 5-1/2″ (10.8 x 14 cm)
- Before you start stamping, cut the following pieces:
• 5-1/2″ x 8-1/2″ (14 x 21.6 cm) Pale Papaya Cardstock
• 2-1/2″ x 4-1/4″ (6.4 x 10.8 cm) Basic White Cardstock
• 7/8″ x 2-1/2″ (2.2 x 6.4 cm) Basic White Cardstock
• 3-1/2″ x 4-1/2″ (8.9 x 11.4 cm) Old Olive Cardstock
• 3″ x 3″ (7.6 x 7.6 cm) Pale Papaya Cardstock
• 3″ (7.6 cm) White 3/4″ (1.9 cm) Frayed Ribbon - Fold the Pale Papaya 5-1/2″ x 8-1/2″ (14 x 21.6 cm) Cardstock in half to create
the card base. - Stamp the x image in Flirty Flamingo ink on the front of the card base at top
right and bottom left. - Stamp the tulip leaves and stems in Old Olive ink on the 3-1/2″ x 4-1/2″
(8.9 x 11.4 cm) Old Olive Cardstock. Die cut using the Tulips Dies and
Stampin’ Cut & Emboss Machine. - Die cut two tulips from the Pale Papaya 3″ x 3″ (7.6 x 7.6 cm) Cardstock.
Stamp the petal image in Pale Papaya ink on the back. Fold so the stamped
petal is visible. - Adhere the leaves, stems and tulips to the Basic White (7/8″ x 2-1/2″;
2.2 x 6.4 cm) Cardstock. - Adhere the White 3/4″ (1.9 cm) Frayed Ribbon over the tulips.
- Stamp the sentiment in Flirty Flamingo ink on the Basic White 7/8″ x 2-1/2″
(2.2 x 6.4 cm) Cardstock. Adhere over ribbon using Stampin’ Dimensionals. - Use Stampin’ Dimensionals to adhere the assembled Basic White
2-1/2″ x 4-1/4″ (6.4 x 10.8 cm) Cardstock to the center of the card base.
")


 Frayed Ribbon")