Keep your crafting spot-on with the trendy Hello Ladybug Bundle! This bundle includes the Hello Ladybug Stamp Set and Ladybug Builder Punch. Create adorable cards, cute tags, fun gift wrapping, and sweet scrapbook pages for loved ones (big and small) with these perfectly coordinated products. Mix and match ladybugs, leaves, daisies, forget-me-not blossoms, and friendly sentiments for unique designs every time. You can also try out the Two-Step Stampin’® technique with the stamp set, then use the punch to punch out your ladybug designs for that extra wow factor!
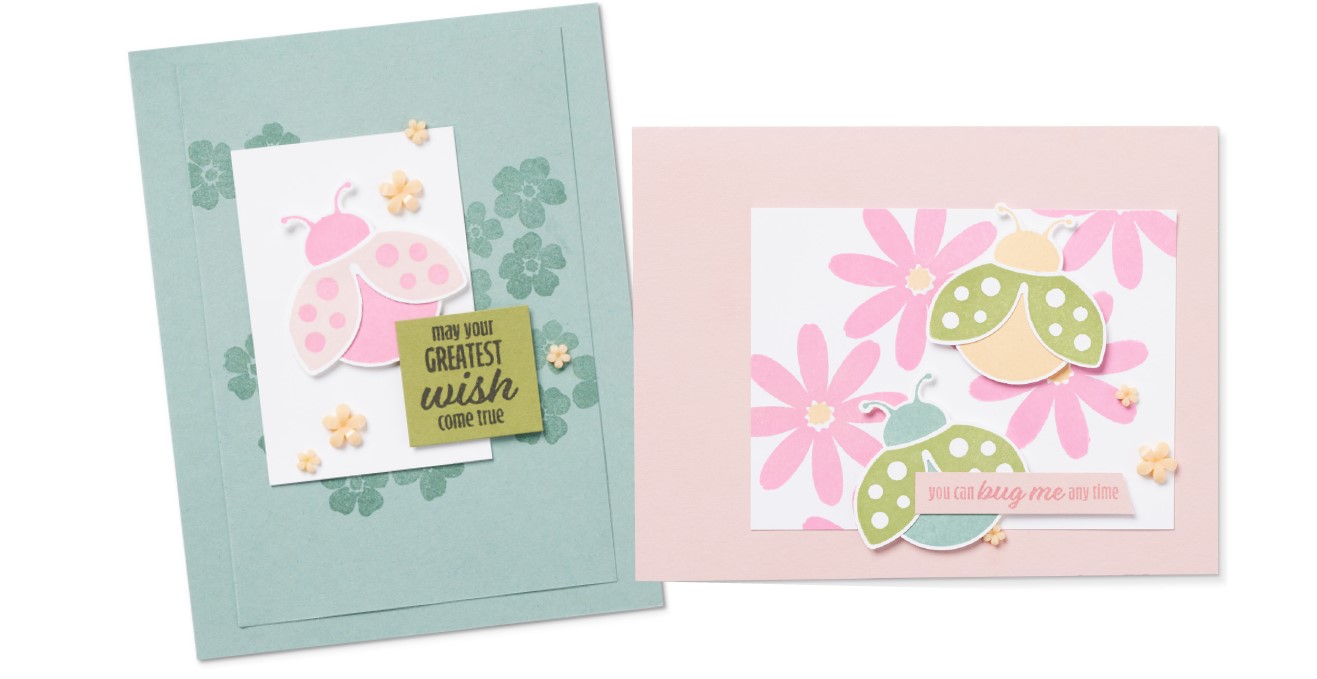
LADYBUG WISHES
4-1/4” x 5-1/2” (10.8 x 14 cm)
- Prepare the following paper sizes before you start stamping:
• 8-1/2” x 5-1/2” (21.6 x 14 cm) from Soft Succulent Cardstock
• 3-1/2” x 5” (8.9 x 12.
7 cm) from Soft Succulent Cardstock
• T
wo pieces measuring 2” x 3” (5.1 x 7.6 cm) from Basic White Cardstock
• 1-1/4” x 1-1/4” (3.2 x 3.2 cm) from Old Olive Cardstock - Fold the 8-1/2” x 5-1/2” (21.6 x 14 cm) Soft Succulent piece in half and score at 4-1/4” (10.8 cm) to create the card base.
- On the 3-1/2” x 5” (8.9 x 12.7 cm) Soft Succulent piece, randomly stamp the small flowers from the Hello Ladybug Stamp Set in Soft Succulent ink.
- Stamp the sentiment in Jet Black StazOn ink onto the 1-1/4” x 1-1/4” (3.2 x 3.2 cm) Old Olive piece.
- Stamp one ladybug body in Polished Pink ink and one set of wings in Blushing Bride ink onto a 2” x 3” (5.1 x 7.6 cm) Basic White piece. Then stamp the dots onto the wings in Polished Pink ink. Punch out the images using the Ladybug Builder Punch, then use adhesive to assemble.
- Adhere the 3-1/2” x 5” (8.9 x 12.7 cm) Soft Succulent piece to the center of the card base. Then adhere the remaining 2” x 3” (5.1 x 7.6 cm) Basic White piece on top of the stamped card front.
- Center the ladybug piece onto the Basic White piece and adhere using Stampin’ Dimensionals®. Then use another Stampin’ Dimensional to attach the sentiment
(it should slightly overlap the ladybug). - Add beautiful embellishments by gluing Loose Flower Flourishes to the card front.
")


$10.00


$7.50
LADYBUG FRIENDS
5-1/2” x 4-1/4” (14 x 10.8 cm)
- Get ready to make this dazzling card by prepping the following paper pieces:
• 5-1/2” x 8-1/2” (14 x 21.6 cm) from Blushing Bride Cardstock
• 3/8
” x 2” (1 x 5.1 cm) from Blushing Bride Cardstock
• 3
” x 4” (7.6 x 10.2 cm) from Basic White Cardstock
• 5-1/2” x 4-1/4” (14 x 10
.8 cm) from Basic White Cardstock - On the 3” x 4” (7.6 x 10.2 cm) Basic White piece, stamp the large daisy image from the Hello Ladybug Stamp Set in a random pattern with Polished Pink ink. Then stamp the flower centers using Pale Papaya ink.
- On the 5-1/2” x 4-1/4” (14 x 10.8 cm) Basic White piece, stamp one ladybug body in Pale Papaya ink and another ladybug body in Soft Succulent ink. Then, stamp two sets of wings in Old Olive ink. Punch out stamped images using the Ladybug Builder Punch. Use adhesive to assemble each ladybug.
- Stamp the sentiment in Polished Pink ink onto the 3/8” x 2” (1 x 5.1 cm) Blushing Bride piece. Trim the top right edge at an angle using scissors.
- Create the card base by folding the 5-1/2” x 8-1/2” (14 x 21.6 cm) Blushing Bride piece in half, then adhere the 3” x 4” (7.6 x 10.2 cm) Basic White piece to the lower right side of the card base.
- Adhere ladybugs and the sentiment to the card front using Stampin’ Dimensionals, then glue Loose Flower Flourishes for a fabulous final touch!


$7.50