Best Dad Award Father’s Day Card

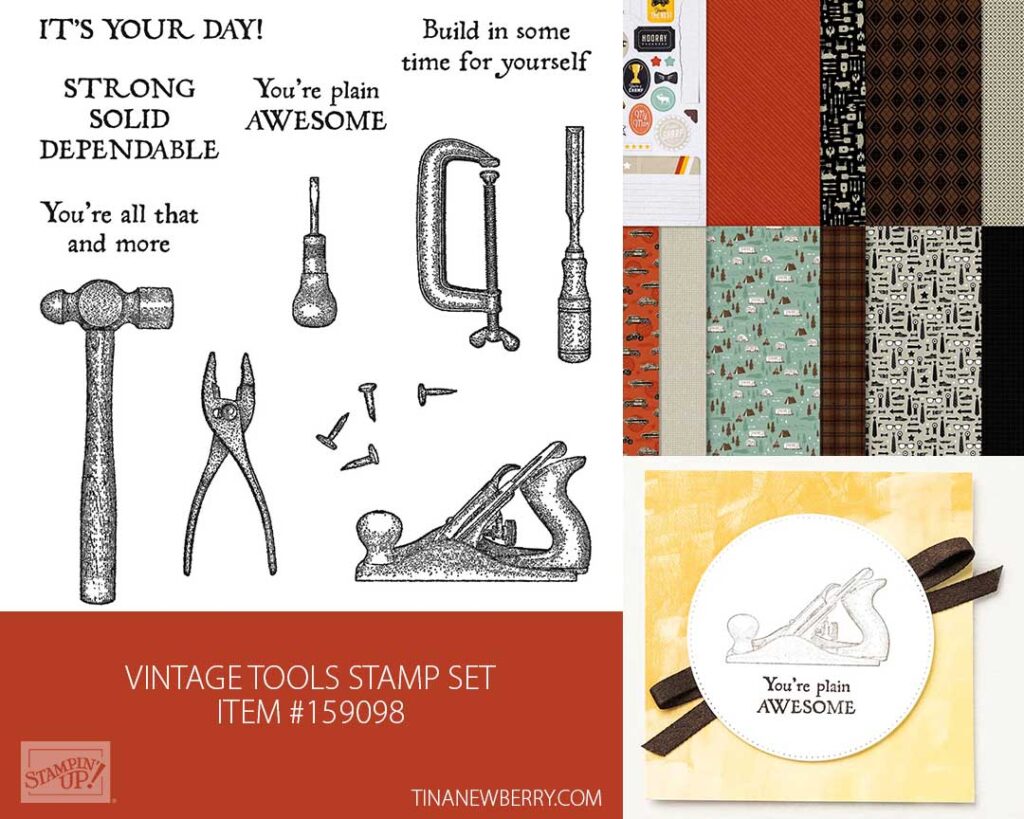
Making cards for men is a struggle! But the Vintage Tools stamp set and He’s the Man Designer Series patterned paper make it easy for this heartfelt Father’s Day card for Dad in orange, brown and tan.

Measurements

Full list of supplies needed, listed below. A die cutting machine is needed for this card.

Basic White Thick Cardstock: 8 ½” h x 5 ½” w – score at 4 ¼” for Card Base

Basic White Cardstock:

  • 5 ¼” w x 4” h
  • 4” x 3” (for Stamping tools – these will be fussy cut)

Early Espresso Cardstock:

  • 5 ⅜” w x 4 ⅛” h for Background
  • 1 ⅛” h x 5 ¼” w

Cajun Craze Cardstock: 2” w x 3” h

He’s The Man Designer Series Paper (DSP):

  • Cajun Craze 2 ¾” w x 4” h (for die cutting with Deckled Rectangle Die)
  • Sahara Sand 5 ¼”w x 1” h
  • “Best Dad Around” and the 3 stars are from the Die Cut sheet from this DSP.

Let’s Create

  1. Affix all stamps to Acrylic Blocks.
  2. Fold the Card Base in half using a Bone Folder to sharpen the crease.
  3. Stamp the tools onto 4” x 3” Basic White using Crumb Cake Ink Pad. Color these tools using Stampin’ Blends.  I used Smoky Slate on the clamp, Crumb Cake and Smoky Slate on the Hammer and Pumpkin Pie and Smoky Slate on the chisel. Then go ahead and fussy cut these.  
  4. Using the Deckled Rectangle Dies, cut the He’s the Man Designer Series Paper (DSP) Cajun Craze panel. 
  5. Adhere the “diamond shape” Best Dad Award label from the Die Cut sheet from the He’s the Man DSP to the Cajun Craze piece of cardstock.  Trim around the edges to make a matte. 
  6. Now you’re ready to assemble your card.  Adhere the 5 ⅜” w x 4 ⅛” h Early Espresso Cardstock to the folded card base.
  7. Attach the die cut Cajun Craze DSP to the left side of the card.  Adhere the fussy cut tools to this piece.
  8. Adhere the Sahara Sand strip to the Early Espresso layer. Wrap a double strand of linen thread and tie into a knot. Use Stampin’ Dimensionals to adhere this to the lower edge of the card, leaving about ¼” of the white showing. 
  9. Using Stampin’ Dimensionals Adhere the Sentiment to the card.  Choose 3 stars for the He’s the Man DSP and adhere those to your card.  
  10. Scatter 3 Rustic Metallic dots.
  11. Decorate the 5 ¼” w x 4” h Basic White Cardstock and attach to the inside of your card.
  12. Decorate your envelope.
  13. So manly! Now send it to someone special who is a Dad.

Shopping List

Recommended Stamper’s Toolkit ❤


Happy Birthday Baseball (or Softball) Fan Greeting Card

Thank you for your interest in this project. Some projects are exclusive to subscribers who will receive passwords by email.

Are you a subscriber? Awesome! Check your email for the password and enter it here to view this project.

Not yet subscribed?  We’d love for you to join us.  Subscribe to my email list and receive news, information and inspiration by email.

#1 Baseball Fan Greeting Card

This baseball-themed stamp set and dies has a vintage feel to it just perfect for America’s number 1 pasttime. You can add your personal pizzazz by changing the colors for your favorite baseball team.

Baseball themed stamp set and dies
You’re Biggest Fan – Save 10% when you buy the bundle

Measurements

Full list of supplies needed, listed below. A die cutting machine is needed for this card.

Bumblebee or Crushed Curry Cardstock:

  • 5 ½” h x 8 ½” w, scored on the long-side at 4 ¼” w
  • scrap for #1 Die Cut

Very Vanilla Cardstock:

  • 5 ¼” h x 4” w for inside
  • Scrap for scalloped circle

Evening Evergreen Cardstock: 4 7/8″ h x 3 ⅝” w

Hey Sports Fan Designer Series Paper (DSP):

  • 4 ¾” h x 3 ½” w
  • 1 ½” h x 3 ½” w
  • Die-cut or fussy cut large ticket

Let’s Create

  1. Affix all stamps to Acrylic Blocks.
  2. Fold the Card Base in half using a Bone Folder to sharpen the crease.
  3. Adhere to 4 ¾” h x 3 1/2” w DSP to the 4 7/8″ h x 3 5/8” w and adhere to Card Base with Stampin’ Seal.
  4. Attach the 1 ½” h x 3 ½” w DSP using Stampin’ Seal.
  5. Attach the large die cut or fussy cut ticket to the front on an angle with Stampin’ Dimensionals
  6. Die cut scalloped circle Very Vanilla Cardstock
  7. Die-cut #1 on Bumblebee or Crushed Curry Cardstock and adhere to scalloped circle with a tiny amount of Multipurpose Liquid Glue.
  8. Stamp the large pennant on Very Vanilla Cardstock in Poppy Parade ink, stamp the Hooray Sentiment in Night of Navy ink and stamp the stars in Bumblebee or Crushed Curry Ink and then die-cut or fussy cut the pennant.
  9. Arrange and adhere pennant with Stampin’ Dimensionals.
  10. Arrange and adhere #1 panel using Stampin’ Dimensionals stacked two high.
  11. Add a red and white twine bow to the pennant, and sprinkle on the stars.
  12. Stamp and decorate the 5 ¼” h x 4” w Vanilla Cardstock to the inside and attach with Stampin’ Seal.
  13. Decorate your envelope.
  14. So vibrant and cheery! Who will you send it to?

Shopping List

Recommended Stamper’s Toolkit ❤


Let’s Get Together Soon Greeting Card for a Friend

Thank you for your interest in this project. Some projects are exclusive to subscribers who will receive passwords by email.

Are you a subscriber? Awesome! Check your email for the password and enter it here to view this project.

Not yet subscribed?  We’d love for you to join us.  Subscribe to my email list and receive news, information and inspiration by email.