Techinque Focus: Reverse Tri-Fold Card

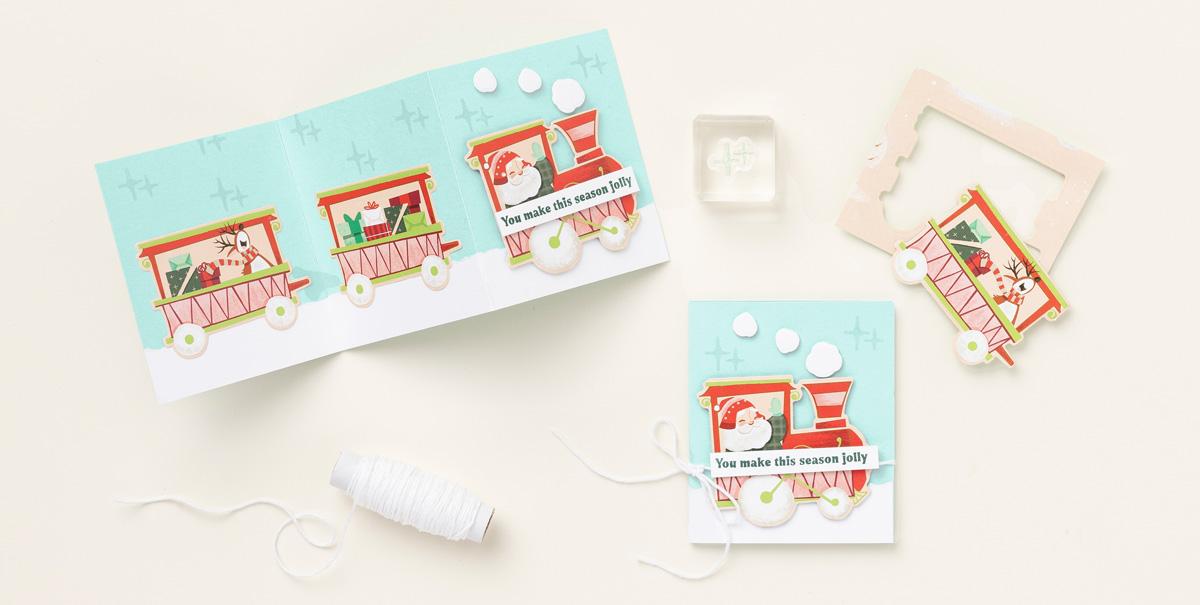
If you’ve seen our snowy and playful Santa Express Designer Series Paper, you may have already added it to your Christmas crafting shopping list. It may move to the top, however, after you check out this month’s technique focus: an adorable, tri-fold card showcasing our very jolly Santa Claus delivering Christmas cheer via the North Pole Express.

To make this clever, expandable card, cut Basic White and Pool Party Cardstock at 3-1/2″ x 9″ (8.9 x 22.9 cm). Tear and adhere the Basic White Cardstock to the Pool Party Cardstock, then score at 3″ (7.6 cm) and 6″ (15.2 cm). Die cut the train from the Designer Series Paper using the Santa’s Train Dies and adhere the pieces to the card front using Stampin’ Dimensionals to give the train engine and cars a little pop! Adhere the festive sentiment—stamped in Shaded Spruce ink on a strip of Basic White Cardstock—and you’re done! Tie up your card with some Linen Thread to keep it closed.

If you adore this card as much as we do, you may want to check out the Santa Express Suite Collection, which includes the Santa’s Delivery Stamp Set, Santa’s Train Dies, Santa Express Designer Series Paper, the Santa Express Memories & More Card Pack, 3/16″ (4. 8 mm) Iridescent Trim, and so much more! Happy festive stamping with Santa Express!

Shopping List

Technique Focus—Stamping on Designer Series Paper

Designer Series Paper isn’t like regular cardstock—it has unique designs and textures. Because of these features, sometimes we forget that we can stamp on it just like cardstock! When we made this week’s card, we decided to do just that—we stamped on the Designer Series Paper, and we loved the way it turned out!

When we started making this card, we didn’t want our flower images to outshine the Silver & Gold Designer Series Paper—we only wanted to enhance it. So, using different flowers and a few leaves from the Sending Smiles Bundle, we stamped off the floral images before we stamped on the paper. Next we adhered the Designer Series Paper to our card base and added a few Fun Flowers Resin Shapes, which were just the right colors and shapes to match our stamped flowers. Then, we die cut “Sending” and the “Sending” word shadow and adhered them to the card base using Stampin’ Dimensionals.

This project uses the Silver & Gold Designer Series Paper from Sale-a-bration, but you can use any Designer Series Paper. What will you make?

Memory Keeping: Sweetest Christmas

Memories of Christmas are something to treasure, but sometimes we get so busy that we forget to preserve these wonderful, nostalgic moments shared with loved ones. To help you start thinking about memory keeping before the rush, our Concept Artist has created a lovely layout using the Sweetest Christmas Suite Collection that you can prepare ahead of time. All you need is a cute photo to complete the page and you’re done! And wouldn’t this make a fabulous Christmas gift—framed with a cute bow on top?

To create this festive layout, our Concept Artist used tone-on-tone stamping to add dimension and depth to the Real Red and Garden Green Cardstock layers. She also distressed the cardstock using Paper Snips and used the Gingerbread House Dies border to make the vintage spiral notebook edges on her cardstock layers.

Sequins from the suite really make the page pop, but the behind-the-scenes heavy lifters of this adorable composition are the Stampin’ Dimensionals—which she used throughout to make elements emerge from the page and bring this project to the next level.

So start getting ready today to do some memory keeping this Christmas. We would of course be thrilled if you CASEd our project and shared it on social media (hint, hint!)—but whatever you do, have fun prepping your holiday scrapbook pages!

Making A Decorative Mask From Paper

If you’re tired of using the same card making techniques week after week, we have a new technique for you! Break out your Matte Finish Embossing Paste but leave your Artistic Mix Decorative Masks on the shelf—this week you’re going to make your own mask using a die and some paper!

First, die cut a piece of Silver Foil Specialty paper with the peek-through tree die from the Aspen Tree Dies. Place the die-cut paper on top of a piece of Basic White cardstock and use some tape to hold it in place. Next, mix together some paste with two drops of the Balmy Blue Ink Refill. Spread a thin layer of the blue paste across the bottom half of the die-cut mask with a Palette Knife. Clean off the knife and then add white paste to the top half of the mask in a thick layer that overlaps the bottom half just a little. Remove the mask and allow the paste to dry, then adhere the cardstock to a Soft Succulent card base. Stamp, color, and die cut the bird and tree branch pieces, then adhere them to the card along with a few die-cut bunches of leaves and a sweet sentiment. Finish the card with a bow of Linen Thread adhered behind the greeting label with a mini glue dot.

We love how this card turned out! Try this new technique this week—you might be pleasantly surprised with the results!

Memories & More

This week we did some traditional scrapbooking with the Today is the Day Memories & More Card Pack, and we loved the way it turned out! We used two sheets of Mint Macaron Cardstock as our base, then we cut one of the 4″ x 6″ (10.2 x 15.2 cm) Memories & More cards into four 1″ x 6″ (2.5 x 15.2 cm) pieces for the strip that runs along the bottom of the pages. Next, we broke out some stamps and ink pads, and used the Flowers of Friendship Stamp Set to stamp out some flowers in Mint Macaron ink and the Alphabest Stamp Set to stamp out “Friends” in Calypso Coral.

We adhered a few photos to Basic White Cardstock using Multipurpose Liquid Glue and added them to the pages. Then we trimmed down one of the 3″ x 4″ (7.6 x 10.2 cm) cards for journaling and adhered it to Pale Papaya Cardstock. To finish our lovely scrapbook pages, we clustered some of the stickers from the card pack along with die cuts from the Layering Hollyhock Dies to create a focal point. Lastly, we used the Garden Green Stampin’ Write Marker to color our white Baker’s Twine.

We want to see how you preserve your memories. Take some time to craft this week and show us what you come up with!

Shopping List