Blotting With Saran Wrap Technique

Create your own custom background using the Saran Wrap Technique. Read on for details.

Help your cards, gift tags, and other paper crafts bloom with the Simply Zinnia Stamp & Die Bundle! These stamps have a beautiful hand-etched design and pair perfectly with the floral and greenery dies. Stamp and cut around the individual zinnia blossom, adding some extra dimension with the petals dies. Or build a fun card centerpiece by bundling flowers. You can even create your own unique zinnias with the stem, blossom, and extra greenery dies along with the stamps.

Measurements

Full list of supplies needed, listed below. A die cutting machine is needed for this card.

Basic White Thick Cardstock: 5 ½” w x 8 ½” h scored and folded at 4 ¼” h

Berry Burst: 5 ⅜” x 4 ⅛” 

Basic White

  • 5 ⅛” x 3 ⅞” 
  • 4 ½” x 3” for stamping, coloring and die cutting the flowers

Let’s Create

  1. Affix all stamps to Acrylic Blocks.
  2. Fold the Card Base in half using a Bone Folder to sharpen the crease.
  3. Adhere the Berry Burst Cardstock to the folded Card Base
  4. Using a saran wrap blotting technique, create the background onto the 5 ⅛” x 3 ⅞” Basic White Cardstock.  
    •  BLOTTING WITH SARAN WRAP TECHNIQUE:
      You will need a large acrylic block – minimum size should be an “E” block, “F” is even better. (NOTE: you can also use any type of hard plastic in place of a block)  Two different ink pad colors, I used Flirty Flamingo and Granny Apple Green, a Stampin’ Spritzer, and a small piece of seran wrap.  Put ink onto the block by gently patting the ink once onto the block, no need to press hard.  Spritz with water, 3-4 spritzes, wait a few seconds for the ink to disperse a little.  With the seran wrap wadded up in your hand, tap it into the diluted ink and then blot in a few places onto your cardstock panel.  Vary the pressure a little in different places and turn once in awhile so as not to get a lot of symmetry.  In my card today, I used the “less is more” idea.  I just did a little green, then started the technique again with a clean block, a new piece of saran wrap with the Flirty Flamingo.  This may take a little practice to get the look you want.  More spritz’s with water will lighten your color a little.  A lighter touch will give you a completely different look than a heavier touch.  Play around and practice lots and you will fall in love with this technique for creating fun backgrounds.  This will dry pretty quickly while you’re finishing the other elements of the card.
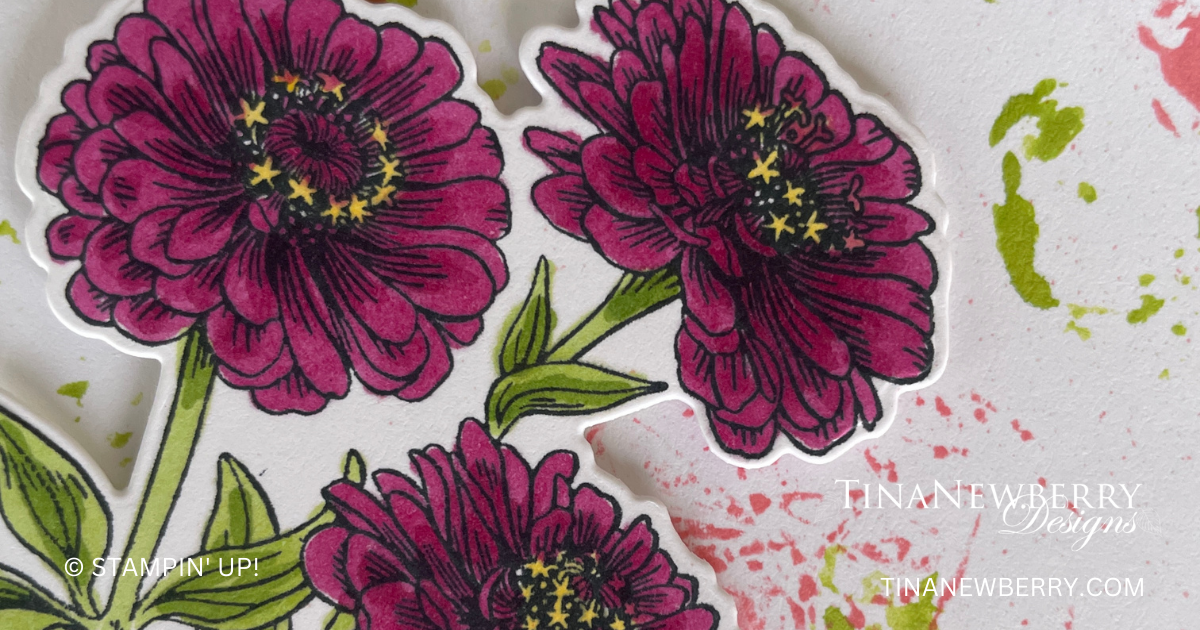
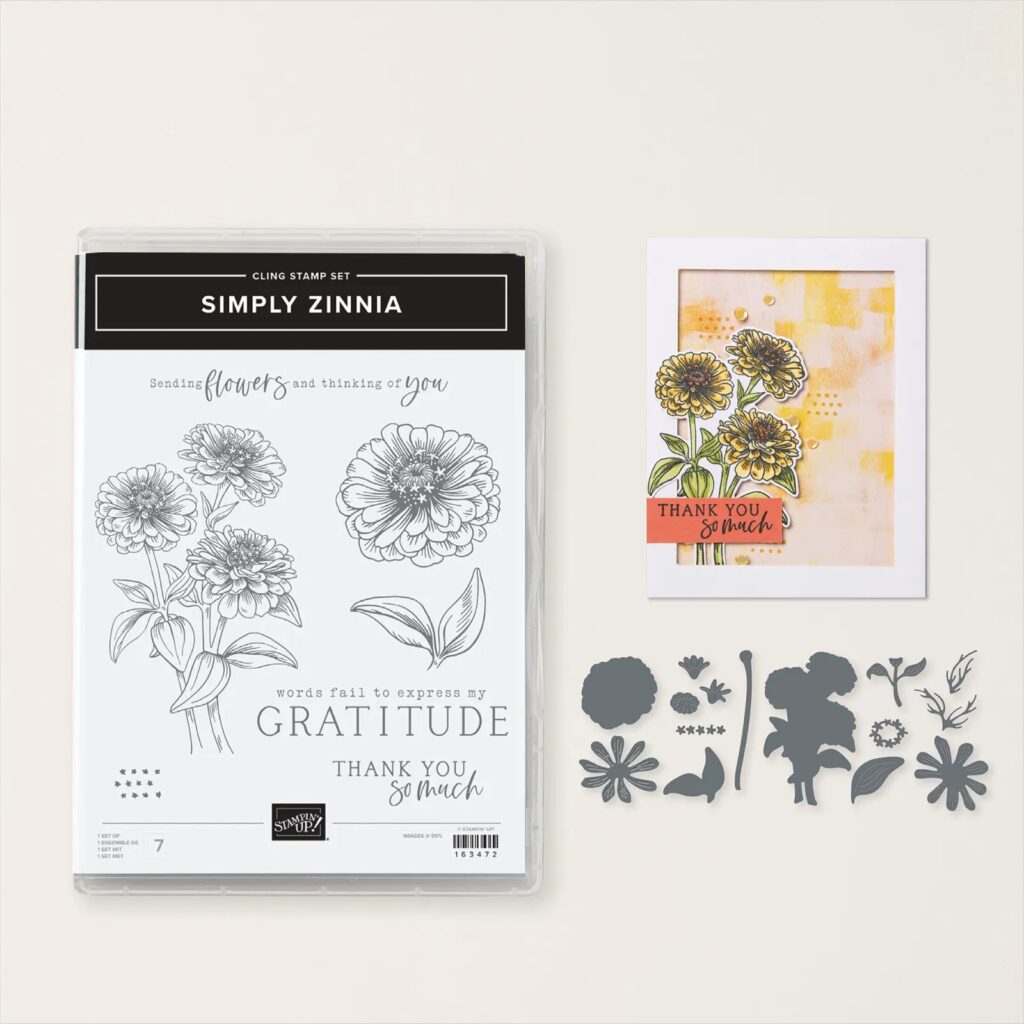
  5. Using Black Memento Ink, stamp the largest zinnia flowers (3 flower stem) onto the Basic White 4 ½” x 3”  piece of cardstock.  Color the flowers, leaves and stems using Stampin’ Blends.  I used Berry Burst,  Daffodil Delight and Granny Apple Green. Die Cut the image using the coordinating Die from the Simply Zinnia Dies. 
  6. Using Black Memento ink, stamp the sentiment towards the lower right of Basic White background panel.
  7. Using Stampin’ Dimensionals adhere the flowers toward the left side of the card.
  8. Adhere these layers to the card base.
  9. Randomly Place 3 of the pink Adhesive-backed Shiny Sequins to the card.
  10. Don’t forget to decorate the inside of the card as well as the envelope, and it’s ready for you to send it off to brighten someone’s day!

Shopping List

Recommended Stamper’s Toolkit

Product List
Order online from the convenience of your own home or send me your order and I’ll take care of you. ❤ Either way, please use the host code ANTD9UHS. Order online AND, if your order is $50 or more using host code ANTD9UHS between now and the end of the month you’ll receive a free pack of embellishment as a THANK YOU gift from me. ❤ If your order is over $150, skip the host code, earn Stampin’ Rewards for free stuff yourself and I’ll still send you a free pack of embellishment as a THANK YOU gift from me. ❤

Use the Mirror Technique

Thank you for your interest in this project. Some projects are exclusive to subscribers who will receive passwords by email.

Are you a subscriber? Awesome! Check your email for the password and enter it here to view this project.

Not yet subscribed?  We’d love for you to join us.  Subscribe to my email list and receive news, information and inspiration by email.

Step It Up: Bee Mine

Need fun ideas for your project? Try making these cards using the Bee My Valentine Bundle. Keep your card simple with the Beginner design or “step it up” by making the Avid card!

BEGINNER

To make this card, we stamped the flower images using Fresh Freesia and Granny Apple Green. Then we stamped the bee body image on Lemon Lolly Cardstock and the wings and antennae on Basic White Cardstock. We punched out all the bee parts using the Bee Builder Punch and adhered them together using Multipurpose Liquid Glue. We adhered the bee to the card front using Stampin’ Dimensionals and finished the card with our sentiment.

CASUAL

To step up this card, we created a card base made of Just Kiddin’ Designer Series Paper. We added an extra panel of Basic White Cardstock, where we stamped a few more flowers and adhered extra flower pieces that we stamped and fussy cut. We finished the card with a few Lemon Lolly Adhesive-Backed Solid Gems.

AVID

We stepped up this card by stamping a few more flowers to the card base using Petal Pink ink. We also used black Stampin’ Emboss Powder to add some shine and dimension to our bee. We stamped the bee wings on Vellum Cardstock and finished the card with a sentiment that we heat embossed with white Stampin’ Emboss Powder onto Basic Black Cardstock.

Shopping List

Recommended Stamper’s Toolkit

Product List
Order online from the convenience of your own home or send me your order and I’ll take care of you. ❤ Either way, please use the host code ANTD9UHS. Order online AND, if your order is $50 or more using host code ANTD9UHS between now and the end of the month you’ll receive a free pack of embellishment as a THANK YOU gift from me. ❤ If your order is over $150, skip the host code, earn Stampin’ Rewards for free stuff yourself and I’ll still send you a free pack of embellishment as a THANK YOU gift from me. ❤

Technique Tuesday: Layout CASEing

Time for another CASEing session (Copy and Share Everything) courtesy of the amazing StampinUp! Concept Art team! Today we’re “on the case” of a lovely layout we admired from the ’23-’24 annual catalog (pg. 89).The how-to is as follows:

  1. Add a scallop border to the top and bottom of the Lemon Lolly Subtles Designer Series Paper layer using the Basic Borders Dies.Blend Lemon Lolly ink over the entire surface of the Lemon Lolly Designer Series Paper, then adhere it to the Lemon Lolly Cardstock card base.Blend Pool Party ink over the Thick Basic White Cardstock layer, then splatter it with water using a Stampin’ Spritzer. Once the piece is dry, adhere it to the card front along with the die-cut pieces.Stamp the texture image in Coastal Cabana ink on the Coastal Cabana Cardstock strip, then add the sentiment. Adhere this piece to the card front using Stampin’ Dimensionals.Finish with a few Iridescent Rhinestone Basic Jewels to add some shine and pick up the project’s color.

Crafting With You Bundle (English)
$54.00
Lemon Lolly Classic Stampin' Pad
$9.00
Pool Party Classic Stampin' Pad
$9.00
Coastal Cabana Classic Stampin' Pad
$9.00
Basic White 8 1/2" X 11" Thick Cardstock
$9.00
Lemon Lolly 8 1/2" X 11" Cardstock
$10.00
Coastal Cabana 8-1/2" X 11" Cardstock
$10.00
Subtles 6" X 6" (15.2 X 15.2 Cm) Designer Series Paper
$12.50
Iridescent Rhinestones Basic Jewels
$7.50
Stampin' Spritzer
$4.00
Basic Borders Dies
$29.00

Technique Tuesday: Coloring Vellum

Did you know you can color vellum? You can! What a great way to customize your favorite stamp sets. Take a look at our tips and then try this technique yourself.

We started by stamping our image in VersaMark ink on Vellum paper and heat embossing it with white Stampin’ Emboss Powder. We then turned the paper over to color on the back of the Vellum with the dark shade of Stampin’ Blends—we used Daffodil Delight for the sun, Petal Pink for the sky, and Fresh Freesia, Orchid Oasis, and Starry Sky for the hills. We loved how this coloring gave the paper a stained-glass look.

We didn’t want the adhesive to show through the Vellum when we adhered it to the card base, so we put some Mini Glue Dots under the space where we knew we would put our sentiment banner. Then we rolled up a few more glue dots and placed them around the top arch under the embossed parts so they wouldn’t be visible. Finally, we fussy cut the leaves, heat embossed our sentiment, and finished the card off with a few Heart Pearls.

If you’re looking for a way to shake things up, try your hand at copying and sharing everything!

Shopping List

Recommended Stamper’s Toolkit

Product List
Order online from the convenience of your own home or send me your order and I’ll take care of you. ❤ Either way, please use the host code ANTD9UHS. Order online AND, if your order is $50 or more using host code ANTD9UHS between now and the end of the month you’ll receive a free pack of embellishment as a THANK YOU gift from me. ❤ If your order is over $150, skip the host code, earn Stampin’ Rewards for free stuff yourself and I’ll still send you a free pack of embellishment as a THANK YOU gift from me. ❤