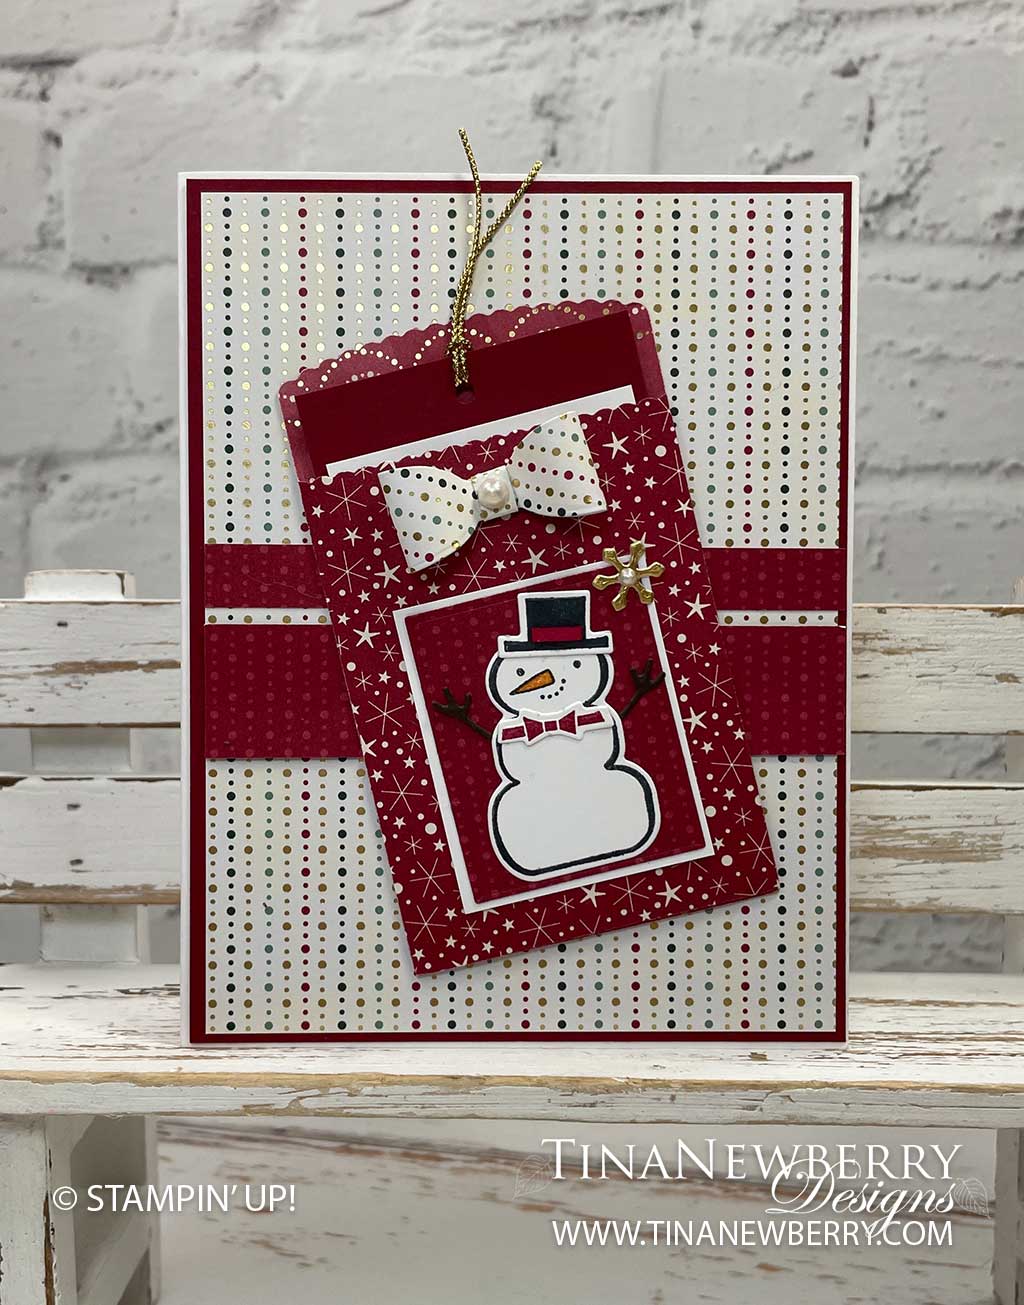
Create and element of surprise with your peekabook tag card and an adorable bow for added fun!
Measurements
Full list of supplies needed, listed below. A die cutting machine is needed for this card.
Basic White Cardstock:
- 8 ½” w x 5 ½” h scored and folded on the long side at 4 ¼” for Card Base
- 3 ⅛” x 2”
- 1 ⅝” x 2”
- scrap for stamping and die cutting snowman, hat and bow tie.
Cherry Cobbler Cardstock:
- 5 ⅜” h x 4 ⅛” w
- 3 ⅝” x 2 ⅛”
Lights Aglow Designer Series Paper (DSP):
- 5 ¼” h x 4” w (Light color of colored polka dot lines)
- 4” w x ⅞” h (Cherry Cobbler print with tone on tone lines of polka dots print)
- 4” w x ⅜” h (Cherry Cobbler print with tone on tone lines of polka dots print)
- 5” h x 6” w (Cherry Cobbler Star Print, For Die cutting Envelope Pocket)
- 1” h x 3 ¼” w (Light color with colored polka dot lines, For Die cutting Bow)
- 1 ½” w x 1 ⅞” h (Cherry Cobbler print with tone on tone lines of polka dots print)
Gold Foil Scrap for die cutting Gold Snowflake
Early Espresso scrap for die cutting snowman arms
Let’s Create
- Affix all stamps to Acrylic Blocks.
- Fold the Card Base iat 4 ¼” using a Bone Folder to sharpen the crease.
- Use Stampin’ to adhere
- the 5 ⅜” h x 4 ⅛” w Cherry Cobbler Panel onto the folded card front.
- the 5 ¼” h x 4” w Light Colored DSP to the card.
- the 2 narrow strips of DSP – 1” h x 3 ¼” w and 1 ½” w x 1 ⅞” h – to the card as shown in the photo.
- Using the Mini Pocket Envelope Die, cut an envelope from the Lights Aglow DSP measuring 5” x 6”
- Fold the envelope along the score lines and adhere the pocket together with Stampin’ Seal.
- Using the 1” h x 3 ¼”w lighter color DSP, cut the bow using the die included in the Mini Pocket Envelope die set. I just cut a narrow strip to wrap around the center of the bow. Use Stampin’ Seal or Mini Glue Dots to tape it all together.
- Using the smallest snowflake die from the Snowman dies, cut a small snowflake from a gold foil scrap.
- On the Basic White piece of cardstock that measures 3 ⅛” x 2” stamp the trees towards the bottom edge using a Soft Succulent Ink pad.
- Stamp the Sentiment on this same cardstock using Cherry Cobbler ink.
- Adhere this stamped panel the the Cherry Cobbler cardstock measuring 3 ⅝” x 2 ⅛” leaving an equal size border along both sides and the bottom. The top border will be quite a bit larger to allow for a hole to be punched and a ribbon pull.
- Using the Label Me Fancy punch, punch a small hole in the top of this tag. (If you have our retired ⅛” circle punch, this works well too.) Slip both ends of a piece of gold cord measuring about 5 inches through the back of the hole and into the loop on the front.
- On a scrap of Basic White Cardstock, using Black Memento ink, stamp the snowman, stamp the snowman’s face in black directly onto the snowman. Color the snowman’s nose using the Pumpkin Pie Stampin’ Blend. Die cut the snowman using the die from the Snowman die set.
- On a scrap of Basic White cardstock stamp the hat with black ink and color the hat band using the Cherry Cobbler Stampin’ Blend. Stamp the bow tie using Cherry Cobbler ink. Die cut.
- Die cut the snowman arms from Early Espresso cardstock.
- Die cut the small frame from 1 ½” x 1 ⅞” Cherry Cobbler DSP. Adhere this to the Basic White panel in similar size. You may need to do a little trimming to get the Basic White piece to frame the die cut piece nicely.
- Assemble your snowman die cuts onto this piece using a small amount of Multipurpose Liquid Glue.
- Adhere the gold snowflake to the upper right corner of this panel and tape to the assembled pocket envelope. Using a mini glue dot, position the bow just above the snowman panel. Place your stamped tag with the gold cord into the pocket. Adhere the pocket onto the card at a slight angle, using Stampin’ Seal.
- Using the White Pearlized Enamel Effects, Put a large drop onto the center of the bow and a smaller drop onto the center of the snowflake. NOTE: This will take awhile to dry. It will take a couple of hours to dry to the touch…. But it will actually take days to dry so they don’t smash down. A little hint – You can pre make these dots on wax paper or on your silicone mat ahead of time. I would leave them for up to a week to dry completely. They peel off easily and can be placed on your card with either a glue dot or a small drop of liquid glue.
- Decorate the inside of your card, as well as the envelope and send your card off to wish someone a special holiday!
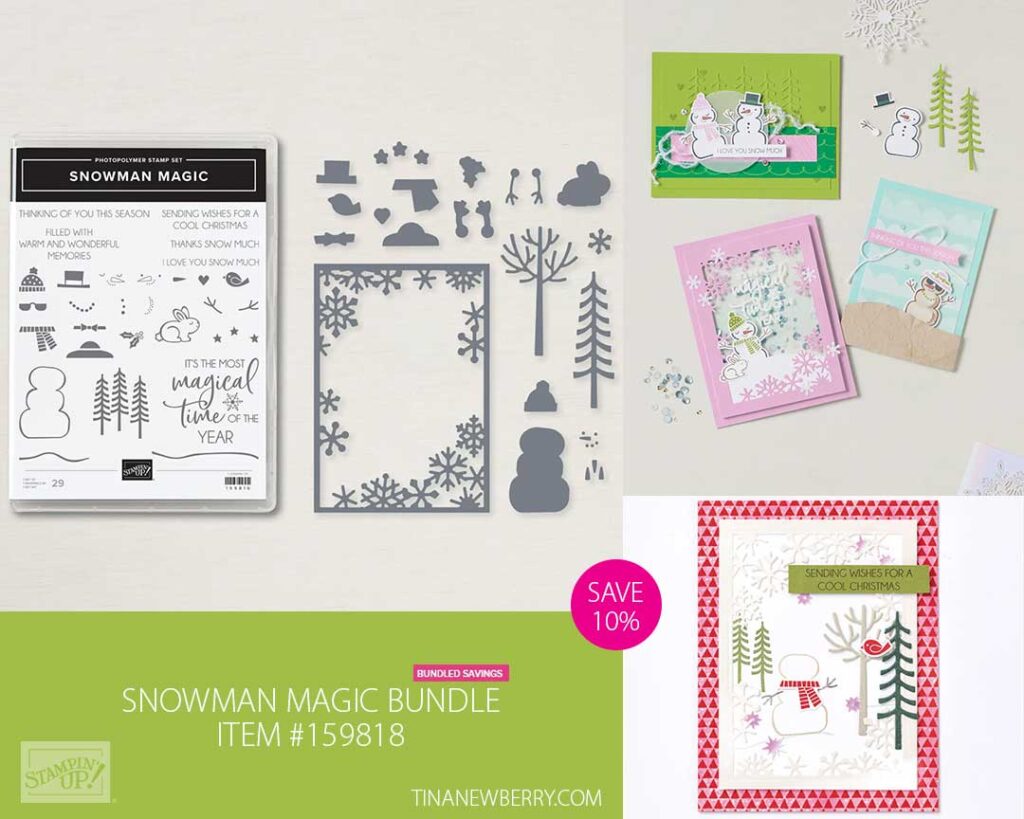
Shopping List
")


 Specialty Designer Series Paper")

$5.00


$7.50

$19.00

$29.00
Recommended Stamper’s Toolkit ❤
Product List
$12.00

$7.00

$4.25

$5.75

$5.50

$11.00

$26.00

$7.00

$6.50

$11.00

$20.00

$11.00

$80.75

$128.00

$16.00

$13.00


