During this pandemic, I have had three friends get puppies and two family members adopt rescue pets. Today we are welcoming Petey, my cousins’ new rescue pup. Petey found them while they were on a get-away in another state. He continued to hang around their place, so they decided it was meant to be! Einstein and I went to the local pet store and had a fun time picking out treats and toys to send a Welcome to the Family care package to Petey. And well of course Petey needs a card! Playful Pets Suite was perfect for Petey’s card.
Full list of supplies needed, listed below. A die cutting machine is used for this card.
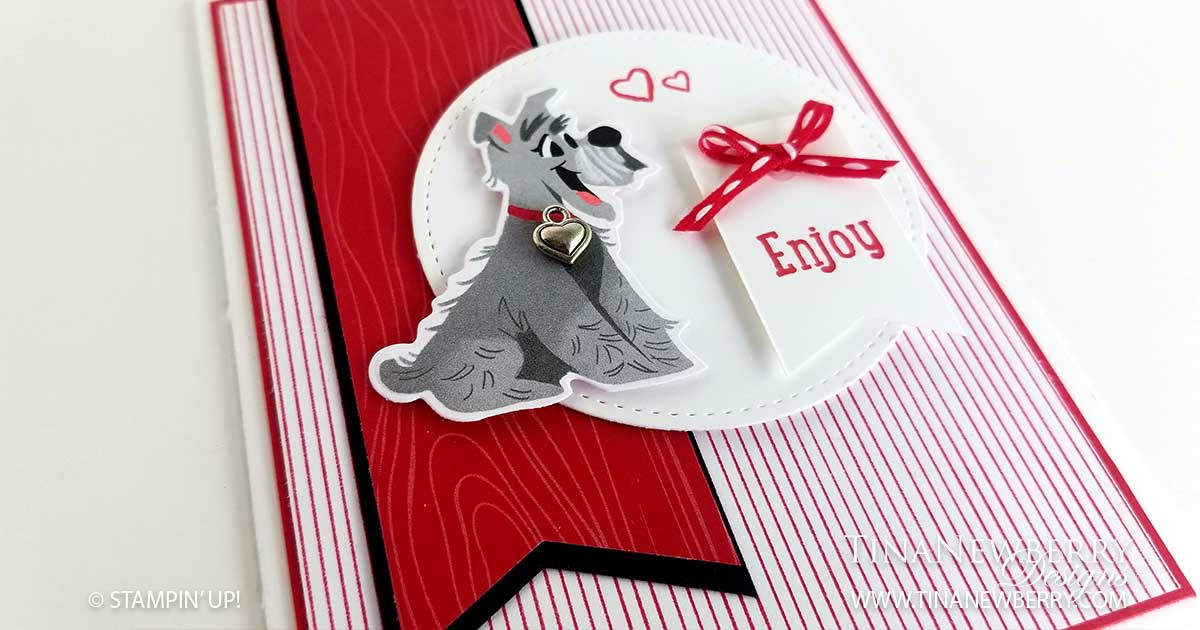
Card Base: Whisper White Thick Cardstock 8 1/2 h” x 5 1/2″ w folded to 5 1/2″ h x 4 1/4″ w.
Background Matte: Real Red Cardstock 5 1/4″ h x 4″ w
Background: Playful Pets DSP 5 1/8″ h x 3 7/8″ w
Banner Matte: Basic Black Cardstock 4 5/8″ h x 1 5/8″ w when trimmed to a banner tip
Banner: Real Red from Regals DSP 4 1/2″ h x 1 1/2″ w when trimmed to a banner tip
Circle: Whisper White Cardstock 3″ Stitched Circle using Stitched Shapes Dies
Sentiment Banner: Whisper White Cardstock 1 3/4″ h x 1″ w when trimmed to a banner tip
Techniques for Making Banner Tips
Banner Tips are much easier to make than you might think. The first method requires a pair of scissors. On the edge you want to be a banner tip, find the center. Use the scissors to cut perpendicular to the edge about 1/2″ to 3/4″. Then cut up from each corner to the top of the cut you just made removing a triangular piece from both sides. When you are cutting a Matte for a banner, cut both the Matte and the Banner together to ensure matching banner tips. For the second method, use the Truly Tailored Punch. Flip the punch over, insert your Banner and Banner Matte so they slightly pass through the first edge of the punch and squeeze to trim the banner tip.
- Affix all stamps to Acrylic Blocks.
- Fold the Card Base in half using a Bone Folder to sharpen the crease.
- Attach the Background Matte, Background, Banner Matte and Banner using Stampin’ Seal.
- Stamp the Hearts onto the Circle with Real Red ink.
- Attach the Circle using Stampin’ Dimensionals.
- Stamp the Sentiment on the Sentiment Banner with Real Red Ink and attach the Sentiment Banner with Stampin’ Dimensionals.
- Make a bow with the red trim and affix with a Mini Glue Dot.
- Die cut the dog from the Playful Pets Designer Series Paper and attach with Stampin’ Dimensionals.
- Attach a heart trinket to the dogs collar with a Mini Glue Dot.
- So cute! Now send it to someone special. Mine is going to my cousins Joyce and Mike’s new pup, Petey.
Shopping List


 Designer Series Paper")


Recommended Stamper’s Toolkit ❤
Product List


Design inspired by Ann Schach.