
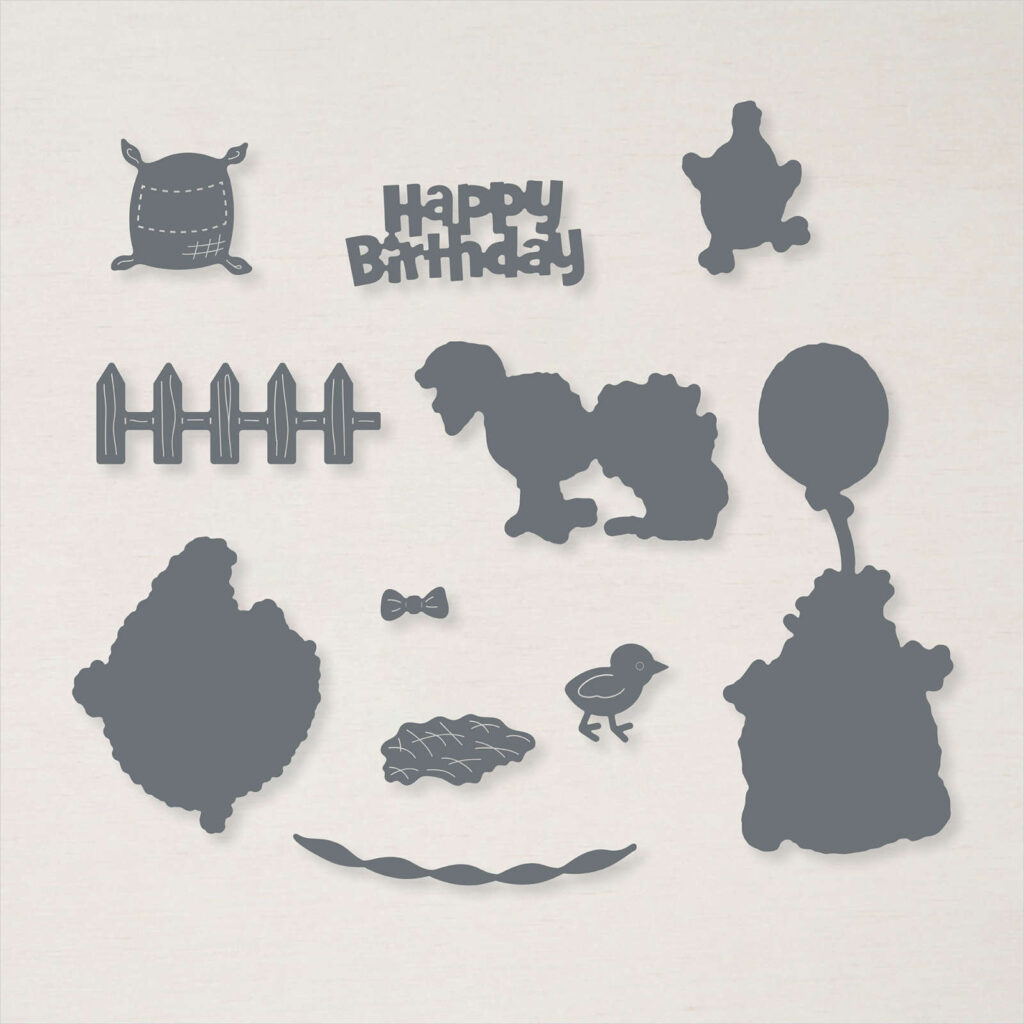
The crested chicken eating the cupcake in this stamp set cracks me up! This whole bundle is funny! I like the added color from the Tailored Tag punches in the background. This is a great card for using up scraps of paper. And that chicken! Ha!

Full list of supplies needed, listed below. A die cutting machine is needed for this card.
Card Base: Basic White Thick Cardstock 8 1/2 h” x 5 1/2″ w folded to 4 1/4″ h x 5 1/2″ w .
Background Matte: Basic White Cardstock 4″ h x 5 1/4″ w
Background: Designer Series Paper Scraps – these are from the 2020-2021 patterns of the Brights Designer Series Paper Pack and the 2020-2022 In-Color Designer Series Paper Pack
Vellum Layer: Vellum Cardstock 3 3/4″ h x 5″ w
Sentiment Layer: Basic Black Scrap
Inside Layer: Basic White Cardstock 4″ h x 5 1/4″ w
- Affix all stamps to Acrylic Blocks.
- Fold the Card Base in half using a Bone Folder to sharpen the crease.
- Run the Background through the Pinewood Planks embossing folder.
- Punch several colors from the Designer Series Paper scraps with the Tailored Tag Punch.
- Attach the punched pieces to the background in a pattern and trim off the excess.
- Attach the Background with Stampin’ Dimensionals.
- For the Vellum Layer, the designer of this card sewed the edges with a sewing machine. You could also use a Stitched Rectangle Die or use your the piercing tip of your Take a Pick Tool to punch a border along the edge. Or leave it plain. Either way, adhesive shows through vellum, so add adhesive strategically so it will be covered by the chick and add to the card.
- Stamp the Chick Eating the Cupcake in Versamark Ink on scrap Basic White Cardstock, sprinkle with Gold Embossing Powder and heat set. Then color with Stampin’ Blends and die cut.
- Stamp the Sentiment in Versamark Ink on scrap Basic Black Cardstock with White Embossing Powder and heat set. Trim the Sentiment.
- Attach the Chick Eating the Cupcake and the Sentiment with Stampin’ Dimensionals.
- Add some Gold Glitter Enamel Dots.
- Decorate the Inside Layer and attach.
- Decorate the envelope.
- Funny!! Send it to someone with a sense of humor. LOL
Shopping List
")


 Designer Series Paper")
 Designer Series Paper")


Stamper’s Toolkit
You will also need adhesive, acrylic blocks, scissors and other basic PaperCrafting items from the Stamper’s Toolkit


")
