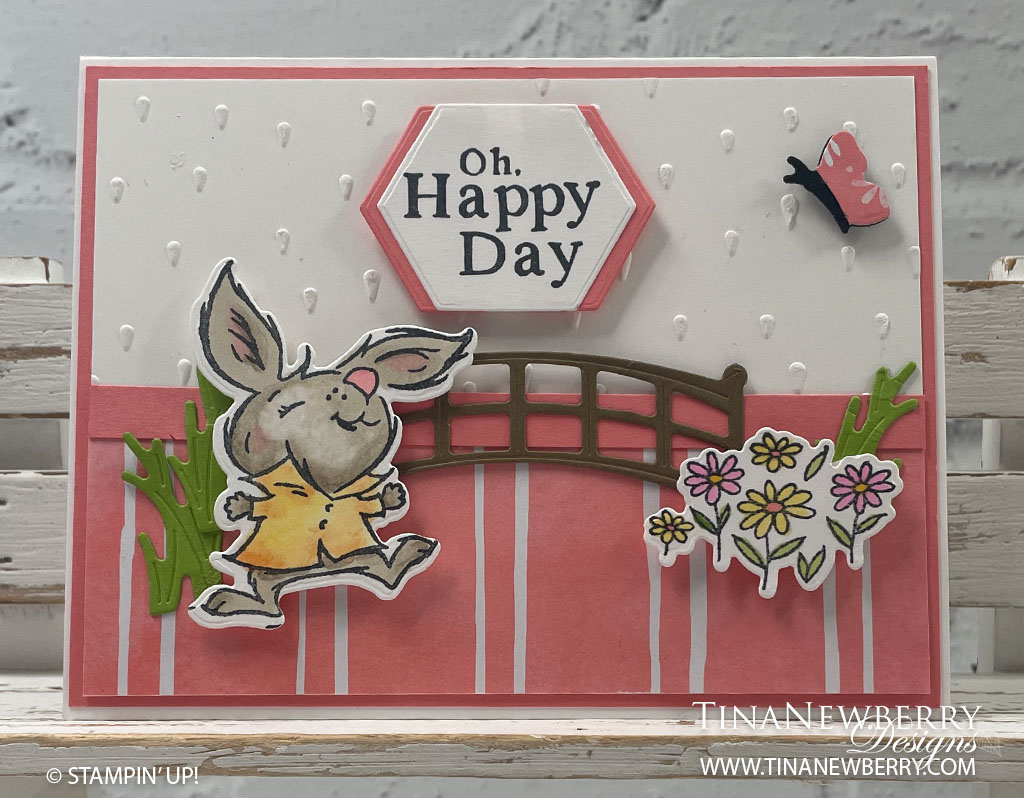
Creating a sweet and cheerful card to send to someone who needs a pick me up is easy and fun.
Measurements
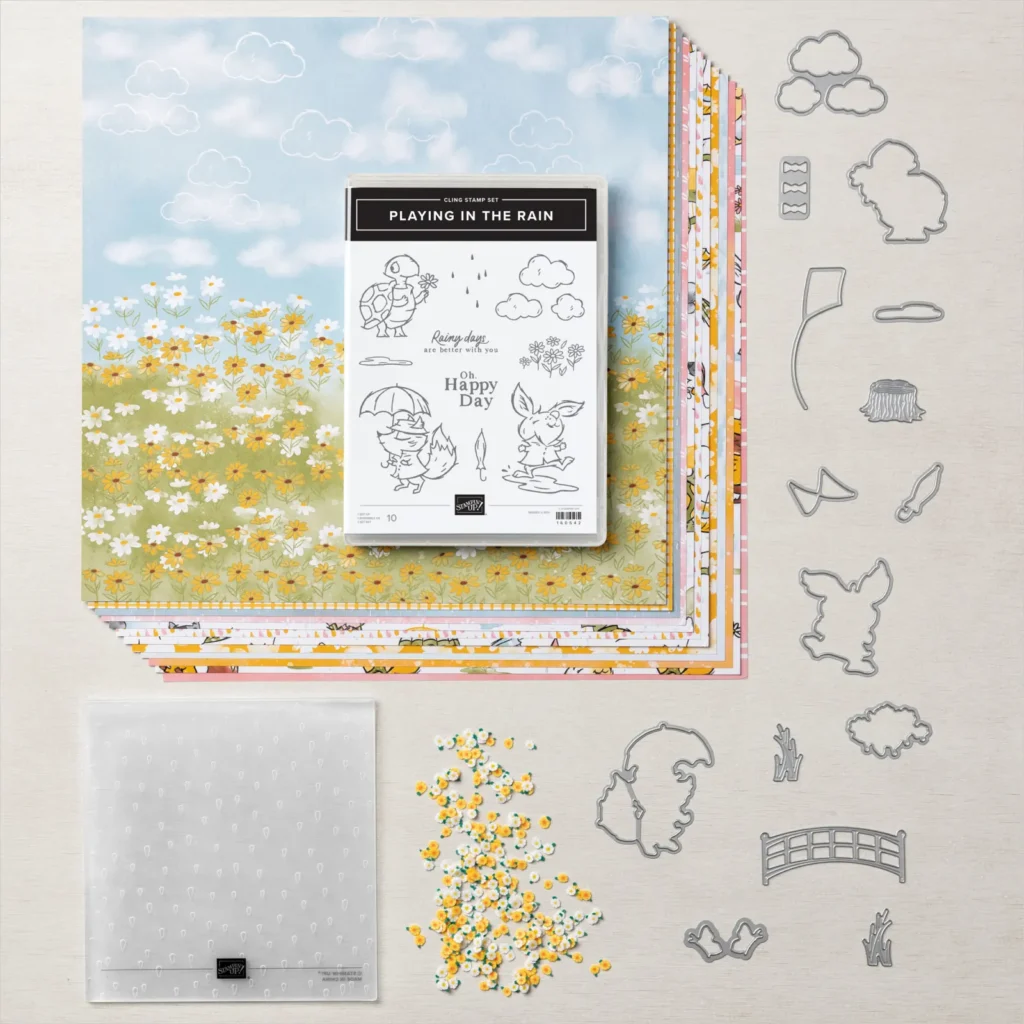
Full list of supplies needed, listed below. A die cutting machine is needed for this card.
Basic White
- 5 ½” x 8 ½” scored and folded on the long-side at 4 ¼”
- 5 ¼” x 4”
- 2” x 2” (for Die Cutting sentiment)
- 4 ¼” x 3” (for stamping and die cutting rabbit & flowers)
Flirty Flamingo
- 5 ⅜” x 4 ⅛”
- 5 ¼” x ⅜”
- 2” x 2” (for framing sentiment)
Granny Apple Green
- 1 ½” x 2” (for die cutting grass)
Soft Suede
- 3 ¼” x 1 ½” (for die cutting fence)
Rain Or Shine Designer Series Paper
- 5 ¼” x 1 ¾” Flirty Flamingo Stripe
- Small Scrap of Flirty Flamingo print for butterfly
Let’s Create
- Affix all stamps to Acrylic Blocks.
- Fold the Card Base in half using a Bone Folder to sharpen the crease.
- Using the Raindrops Embossing Folder, emboss the 5 ¼” x 4” Basic White layer.
- Using the Memento Black ink pad, stamp the rabbit and the grouping of flowers on the 4 ¼” x 3” Basic White. Color these images using Stampin’ Blends and die cut using the coordinating dies.
- Die cut 3 sets of the grass with Granny Apple Green Cardstock, the fence using Soft Suede Cardstock and a butterfly both in Basic Black Cardstock, and flirty Flamingo DSP.
- Cut the butterfly body off of the DSP butterfly and adhere the wings to the black cardstock butterfly.
- Using Basic Black Memento ink pad, stamp the sentiment onto the 2” x 2” Basic White. Die cut using the hexagon shape from the Something Fancy die set. Using this same die, die cut a hexagon shape from Flirty Flamingo Cardstock. Cut this piece in half down the middle to create the frame around the Basic White Sentiment. Attach to each side of the sentiment.
- Adhere the embossed layer of Basic White Cardstock to the 5 ⅜” x 4 ⅛” flirty flamingo cardstock. Adhere the Flirty Flamingo Striped Designer Series Paper to the bottom edge of the embossed white layer.
- Attach the narrow strip of flirty flamingo cardstock to the upper edge of the DSP. Adhere these layers to the folded card base.
- Adhere the Fence to the center of the card. Adhere the grass to both sides of the fence.
- Using Stampin’ Dimensionals Adhere the Rabbit to one side of the fence and the grouping of flowers to the other side of the fence.
- Using Stampin’ Dimensionals, adhere the sentiment to the upper part of the card, centering side to side. Using a Mini Stampin’ Dimensional, adhere the butterfly to the upper right corner of the card.
- Stamp and decorate the inside of your card and the envelope. You have a cute little turtle to send off to a friend.
Shopping List
")

$28.00


 Designer Series Paper")


Recommended Stamper’s Toolkit ❤
Product List
$12.00

$7.00

$4.25

$5.75

$5.50

$11.00

$26.00

$7.00

$6.50

$11.00

$20.00

$11.00

$80.75

$128.00

$16.00

$13.00


