Make a beautiful paper wreath in the colors of your choice. I’ll show you how!

Measurements
Full list of supplies needed, listed below. A die cutting machine is needed for this card.
- Cherry Cobbler Cardstock:
- 8 ½” w x 5 ½” h scored and folded on the long side at 4 ¼”
- Scrap for berries
- Basic White Cardstock:
- 4 ¼” w x 5 ¼” h (1) for inside
- 1” h x 3 ¼” w for tag
- Winter Meadow Designer Series Paper (DSP): 4 ¼” w x 5 ¼” h
- More Dazzle Specialty Paper: 2” circle
- Pretty Peacock:
- ½” h x 3” w
- ~2” circle ring
- Scrap for wreath
- Vellum Cardstock: scrap for wreath
- Garden Green Cardstock: scrap for wreath
Let’s Create
- Affix all stamps to Acrylic Blocks.
- Fold the Card Base in half using a Bone Folder to sharpen the crease.
- Attach the DSP with Stampin’ Seal+
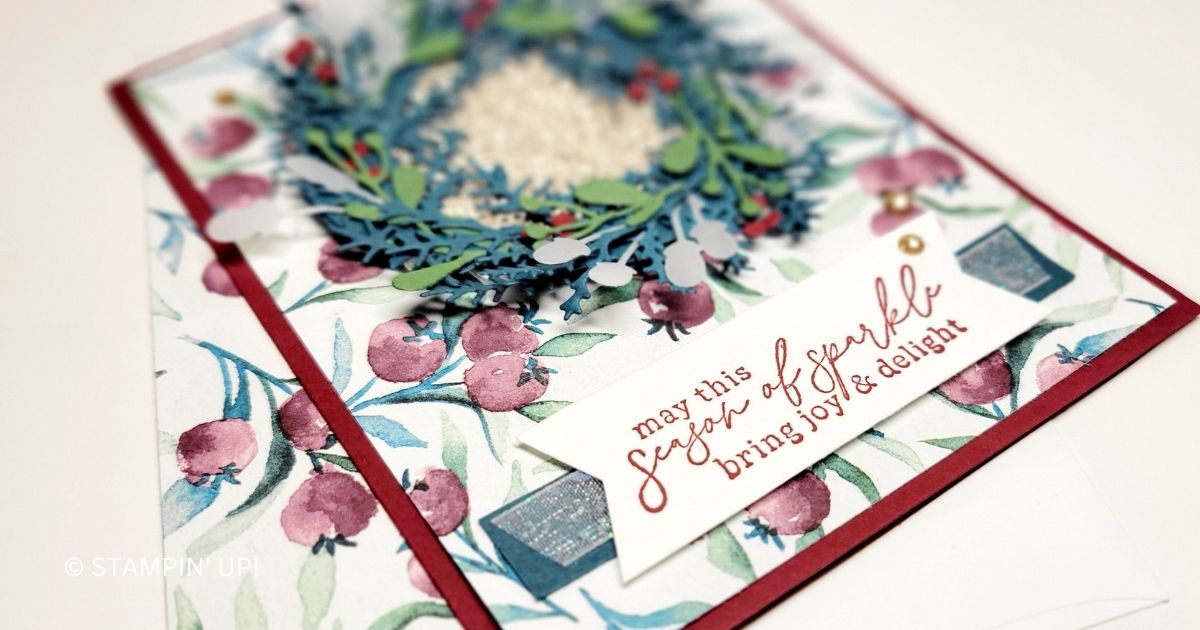
- To make the wreath
- Run the two pine and one curved branch dies through the Stampin’ Cut & Emboss machine several times with Pretty Peacock cardstock so you have 3-4 of die cut pieces of each branch.
- Die cut three pieces of each die with the Vellum and Garden Green Cardstock.
- Attach a piece of Adhesive Sheets to the back of the Cherry Cobbler scrap and die cut the berries die 2-3 times to create a bunch of berries.
- On a Silicone Craft Sheet, set down the Pretty Peacock circle ring. Attach Tear n ‘ Tape to the circle ring and remove the backing.
- Layer the curved branches around the edge of the circle- there will be overhanging pieces. Use Multipurpose Glue to attach the curved branches to each other and use your Paper Snips to snip off the overhanging pieces.
- Next layer the pine pieces, you might find you need to cut some into smaller pieces and tuck them in. Use Multipurpose Glue to adhere into place.
- Break the Garden Green and Vellum branches into smaller pieces and tuck them in here and there. Use Mini Glue Dots to adhere into place.
- Remove the adhesive backing from the berries and attach to the berries on the Pretty Peacock.
- Use Mini Glue Dots to attach to the More Dazzle Circle.
- Attach the wreath to the DSP with Stampin’ Seal+ or Multipurpose Glue or Tear N’ Tape.
- Stamp the sentiment in Cherry Cobbler ink on the Basic White cardstock and trim the ends with the Banners Pick a Punch.
- Use Stampin’ Seal to attach the Pretty Peacock strip.
- Use Tear n Tape to attach the Glitter Organdy ribbon and trim to size with your Paper Snips.
- Attach the sentiment with Stampin’ Dimensionals.
- Sprinkle on some Adhesive Backed Sparkle Gems.
- Stamp and decorate the 5 ¼” w x 4” h for inside.
- Decorate your envelope.
- Stunning! Who will you send this to?
")


 Designer Series Paper")
 Specialty Paper")
 Glittered Organdy Ribbon")


$27.00
Recommended Stamper’s Toolkit ❤
Product List
$12.00

$7.00

$4.25

$5.75

$5.50

$11.00

$26.00

$7.00

$6.50

$11.00

$20.00

$11.00

$80.75

$128.00


$16.00

$13.00


