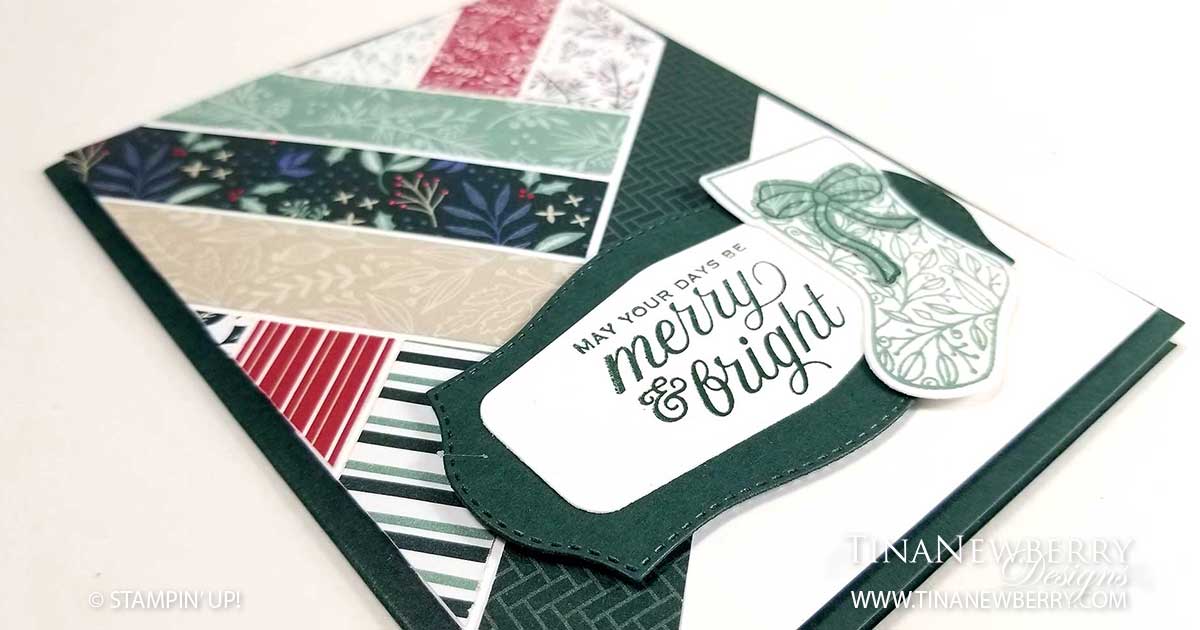
There’s lots of inspiration for what I call the quilt technique, but I’m not really sure that’s what it’s called. Either way, I really like the look of it and this is one more way to use up your scraps! This design would work for countless color palettes and designer series papers. The main this is to cut your DSP going the right way. Follow the cutting instructions in the Measurements section and you will have everything cut correctly.

Measurements
Full list of supplies needed, listed below. A die cutting machine is needed for this card.
- Evening Evergreen
- 5 ½” h x 8 ½” w scored and folded on the long side at 4 ¼” (Card Base)
- 2” h x 3 ¾” w scrap (Sentiment Matte)
- Basic White
- 5 ¼” h x 4” w (Background)
- 1 ½” h x 3” w scrap (Sentiment)
- 2 ½” h x 1 ½” w scrap (Stocking)
- Tidings of Christmas DSP
- 1” h x 5 ¾” w
- 1” h x varying “ w (6-7)
- Varying “h x 1” w (3)
- 1” x 1” Soft Succulent scrap (Bow)
Let’s Create
- Affix all stamps to Acrylic Blocks.
- Use a Bone Folder to sharpen the crease on the Card Base.
- Arrange the Tidings of Christmas DSP Strips on the 5 ¼” x 4” Basic White Background Layer. Use Multipurpose Glue to adhere them, wiggling into position as needed.
- Trim off any excess pieces of DSP that are overhanging the Background.
- Stamp
- The Sentiment in Evening Evergreen Ink on the 1 ½” h x 3” w Basic White scrap.
- The Stocking in Soft Succulent Ink on the 2 ½” h x 1 ½” w Basic White scrap
- The Bow in Evening Evergreen on scrap Soft Succulent DSP.
- Die Cut
- The Sentiment Matte out of the 2” h x 3 ¾” w Evening Evergreen scrap.
- The Sentiment out of the stamped 1 ½” h x 3” w Basic White scrap.
- The Stocking out of the 2 ½” h x 1 ½” w Basic White scrap.
- The Bow out of scrap Soft Succulent DSP.
- Use Stampin’ Seal to attach:
- The Sentiment to the Evergreen Sentiment Matte.
- The Bow to the Stocking.
- The Stocking to the Sentiment.
- Use Stampin’ Dimensionals to attach:
- The Sentiment and Stocking to the Background.
- The Background to the Card Base.
- Stamp Inside Layer and attach.
- Decorate your Envelope.
- #simplestamping at it’s finest! Send it today!
Shopping List
")


 Designer Series Paper")

$31.00
Stamper’s Toolkit
You will also need adhesive, acrylic blocks, scissors and other basic PaperCrafting items from the Stamper’s Toolkit

$8.00

$12.00

$4.00


$5.25

$7.00

$4.00

$7.00

$10.00

$8.00

$8.00

$10.00

$25.00

$7.00

$6.00

$10.00

$8.00

$5.00

$5.00

$6.00

$71.50

$8.00

$11.75
")
$30.00

$9.50


$120.00