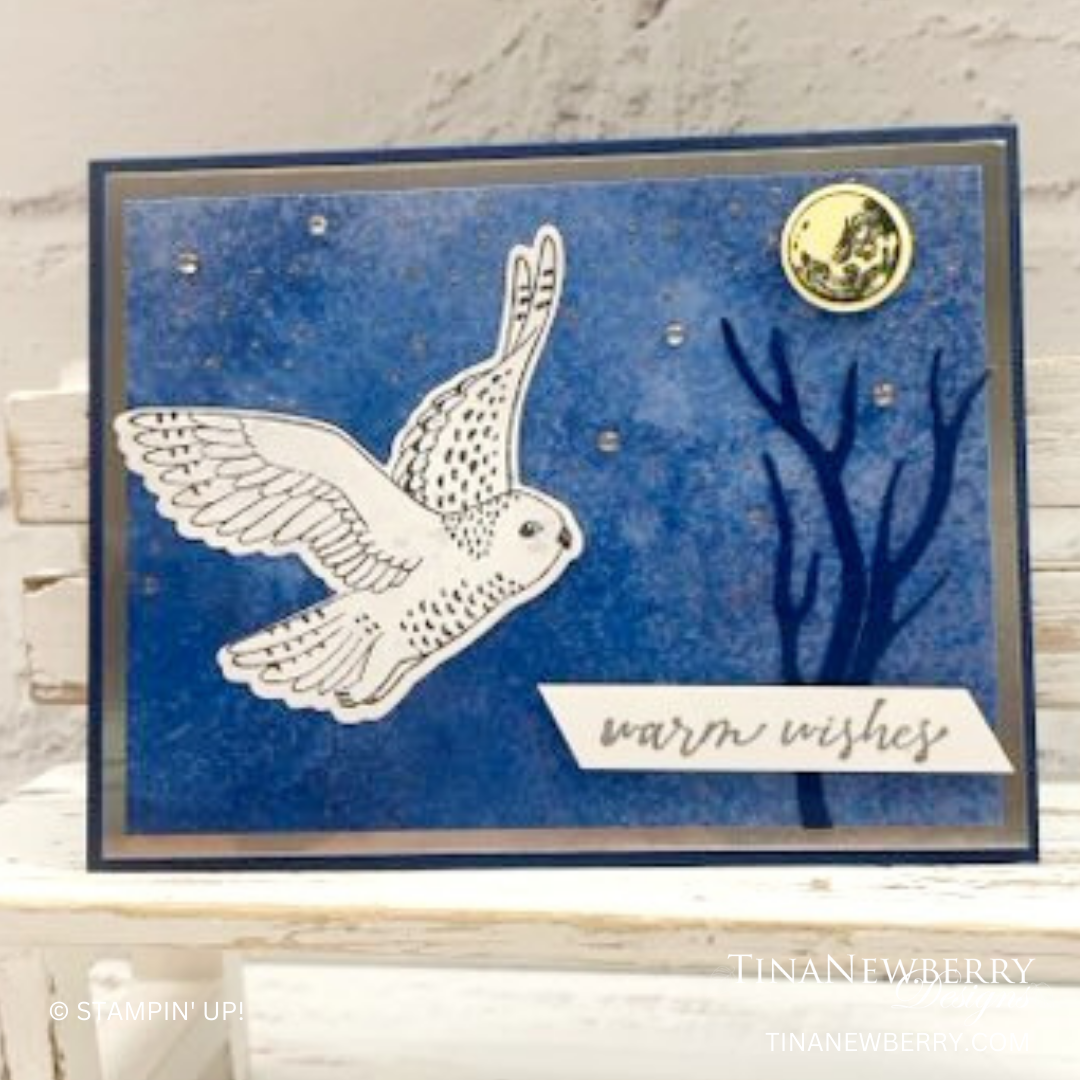
Create a night scene to show off the majestic flying owl in the Winter Owls bundle. Use prints from the Winter Meadow Designer Series Paper pack to set the scene.

Measurements
Full list of supplies needed, listed below. A die cutting machine is needed for this card.
Night of Navy
- 5 ½” x 8 ½” scored and folded on the long-side at 4 ¼”
- 3 ½” x 2” (for die cutting branches)
Silver Foil
- 5 ⅜” x 4 ⅛”
Basic White
- 3” x ½” (for stamping/embossing the sentiment)
Lemon Lolly
- 1 ¼” x 1 ¼” (for stamping and die cutting the moon)
Winter Meadow Designer Series Paper
- 5” x 3 ¾” (Blue “cloudy” print)
- 3 ¼” x 3 ¼” (White with Gray Cloudy print for stamping and die cutting flying owl)
Let’s Create
- Affix all stamps to Acrylic Blocks.
- Fold the Card Base in half using a Bone Folder to sharpen the crease.
- Using a versamark ink pad randomly stamp the speckled/stars from the Winter Owls stamp set along the top half of the 5” x 3 ¾” Blue Winter Meadow Designer series Paper. Emboss with Silver Embossing Powder and the heat tool.
- Using Night of Navy ink pad, stamp the flying owl onto the Gray Cloudy print of the Winter Meadow Designer Series Paper. Die cut using the coordinating die from the Winter Owls die set.
- Using Night of Navy ink pad, stamp the moon onto small scrap of Lemon Lolly cardstock and die cut using the coordinating die from the Winter Owls die set.
- Using both branches from the Winter Owls die set, cut branches from Night of Navy cardstock.
- Using a versamark ink pad stamp the “warm wishes” sentiment onto 3” x ½” Basic White cardstock. Emboss with Silver embossing powder and heat tool. Cut both ends of the strip of Basic White at a slight angle.
- Assemble your card: Adhere the 5 ⅜” x 4 ⅛” Silver Foil to the folded Night of Navy card base. Adhere the stamped and embossed Designer Series Paper to the Silver Foil.
- Adhere the owl toward the left side of the card. Adhere the Night of Navy branches toward the right side of the card.
- Using a stampin’ Dimensional, adhere the moon just above the branches.
- Using Stampin’ Dimensionals, adhere the sentiment toward the lower right side of the card over the base of the branches.
- Randomly place 5 Basic Rhinestone Jewels on the card amongst the “stars”.
- Be sure to decorate the inside of your card and your envelope!
- Your card is ready to send off to wish “warm wishes” to someone special.
Shopping List
")


$9.50


 Designer Series Paper")

$5.00

$6.00

$18.00
Recommended Stamper’s Toolkit ❤
Product List
$12.00

$7.00

$4.25

$5.75

$5.50

$11.00

$26.00

$7.00

$6.50

$11.00

$20.00

$11.00

$80.75

$128.00


$16.00

$13.00


