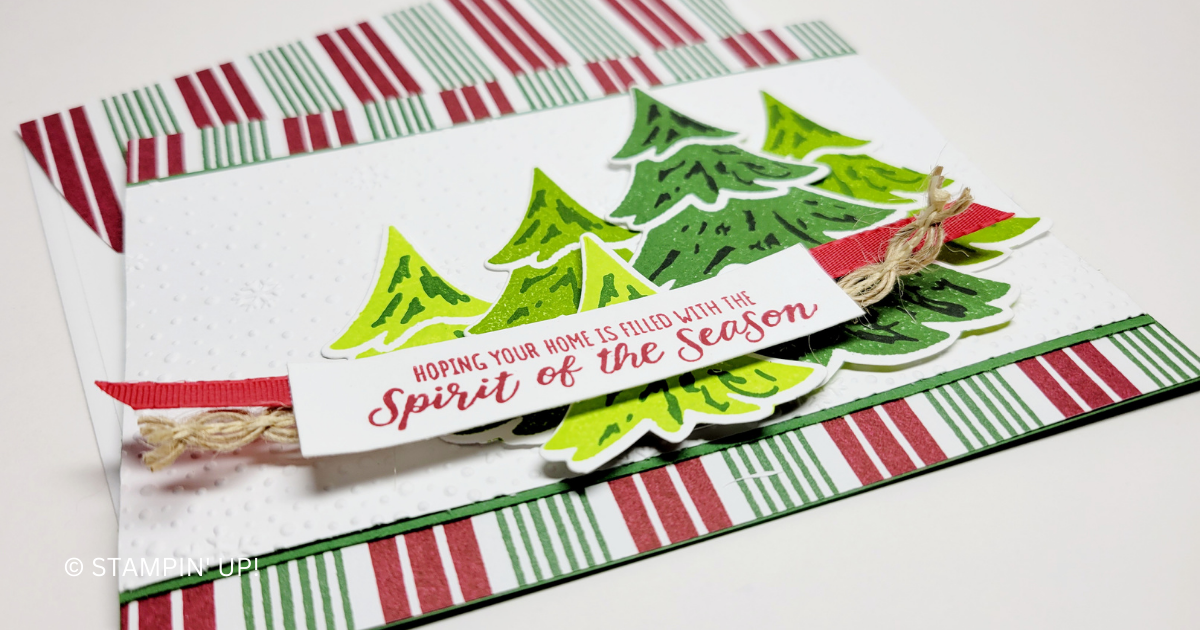
Stamp the trees in any color and then with the dies, cut it to the size you want. All five trees on the front of this card used the same large tree stamp and then were cut to size with the appropriate tree die to make this pretty forest.

Measurements
Full list of supplies needed, listed below. A die cutting machine is needed for this card.
Garden Green Cardstock: 5 ½” w x 8 ½” h scored and folded at 4 ¼” h
Basic White Cardstock:
- 4” h x 5 ¼” w
- 3 ⅛” h x 5 ½” w
- Scrap for trees and sentiment
Garden Green Cardstock: 5 ½” w x 3 ¼” h
A Walk in the Forest Designer Series Paper (DSP): 4 ¼” h x 5 ½” w
Let’s Create
- Affix all stamps to Acrylic Blocks.
- Fold the Card Base in half using a Bone Folder to sharpen the crease.
- Use Stampin’ Seal+ to adhere the DSP to the Card Base.
- Run the 3 ⅛” h x 5 ½” w Basic White Cardstock through the Stampin’ Cut & Emboss Machine with the Snowflake Sky 3D embossing folder and then adhere to the Garden Green cardstock with Stampin’ Seal, then attach to the Card Base with Stampin’ Seal.
- On scrap Basic White Cardstock Stamp five Christmas trees – one Garden Green w/Basic Black, two Granny Apple Green with Garden Green, and two Lemon Lime Twist with Granny Apple Green.
- Die cut the trees – one with four boughs, two with three boughs, two with two boughs and attach to the Snowflake Sky 3D Embossed panel with Stampin’ Dimensionals and Stampin’ Seal.
- Stamp the sentiment in Cherry Cobbler ink on Basic White scrap and then trim to size.
- Use Tear ‘n Tape to attach a stip of Natural Wavy Trim and Real Red Trim behind the Sentiment tag.
- Stamp and decorate the remaining 4” h x 5 ¼” w for inside
- Decorate your envelope.
- Fun! Who will you send it to?
Shopping List

$37.00


 Designer Series Paper")
 Wavy Trim")


Recommended Stamper’s Toolkit ❤
Product List
$12.00

$7.00

$4.25

$5.75

$5.50

$11.00

$26.00

$7.00

$6.50

$11.00

$20.00

$11.00

$80.75

$128.00

$16.00

$13.00


