Create a tag that pops with white text on any dark cardstock. I’ll show you how.
Measurements
Full list of supplies needed, listed below. A die cutting machine is needed for this card.
Balmy Blue Cardstock 5 1/2″ h x 8 1/2″ w folded to 5 1/2″ h x 4 1/4″ w
Basic White Thick Cardstock: scraps for apple, leaves and flowers
Parakeet Party Cardstock: scrap for flower centers
Basic White Cardstock:
- 5 1/4″ h x 4″ w
- 4 3/4″ h x 3 1/4″ w
Basic Black Cardstock: scrap for sentiment tag
Let’s Create
- Affix all stamps to Acrylic Blocks.
- Fold the Card Base in half using a Bone Folder to sharpen the crease.
- Run the Card Base through the Stampin’ Cut & Emboss machine with the scalloped die from the Apple Dies to create the scalloped edge. Attach the small scalloped piece to the inside edge of the Card Base.
- Run the 4 1/2″ h x 3″ w Basic White Cardstock through the Stampin’ Cut & Emboss Machine with the Stitched Rectangle and then again with the Timeworn Typ Embossing Folder. Attach to Card Base with Stampin’ Seal.
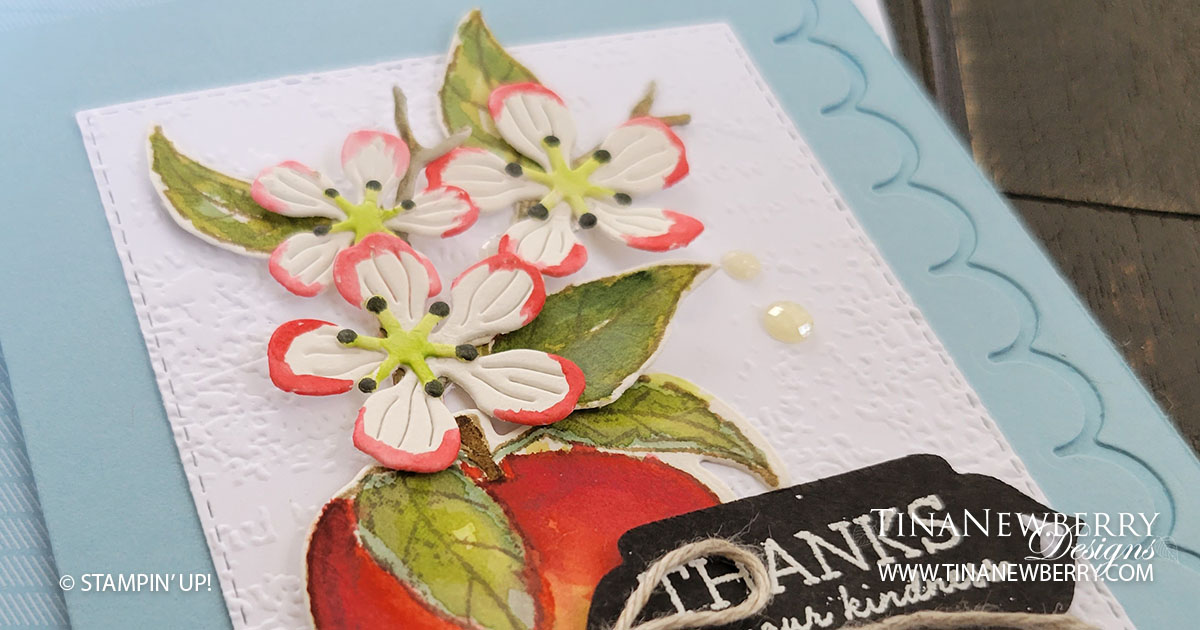
- On the Basic White Thick Cardstock, stamp the apple and leaves in Sahara Sand ink. Then color with Stampin’ Blends:
- Apple: Real Red, Daffodil Delight, and a bit of Cherry Cobbler
- Apple Stem: Soft Suede
- Leaves: Old Olive
- Die cut the apple, leaves, the branch, two large flowers and one small flower from Basic White Thick and three flower centers from Parakeet Party Cardstock scraps.
- Use Stampin’ Blends to add some color to the:
- Flower Tips- Flirty Flamingo
- Branch- Crumb Cake
- Flower Centers- Black
- To create the tag:
- Remove static from the Basic Black Cardstock by rubbing the surface with an Embossing Buddy
- Stamp the sentiment in Versamark Ink
- Sprinkle with White Embossing Powder
- In slow deliberate circles, carefully heat the black cardstock with a Heat Tool to melt the embossing powder. Be careful not to burn your fingers, overheat your work surface or scorch your sentiment. You will see the embossing powder melt as it turns from a chalky dull color to a bright white.
- Run the sentiment through the Stampin’ Cut & Emboss Machine with the tag from the Apple Dies.
- Arrange the apple, flowers, branch, leaves and sentiment tag on the card front.
- Use Fine Tip Glue to attach the Parakeet Party flower centers to the flowers.
- Use Stampin’ Seal to attach the apple, branch and leaves.
- Use Mini Glue Dots to attach the flowers.
- Use Stampin’ Dimensionals to attach the Sentiment Tag.
- Tie a bow with Linen Thread and attach with a Mini Glue Dot.
- Sprinkle on the Fine Sparkle Adhesive Backed gems.
- Stamp and decorate the 5 1/4″ h x 4″ w Basic White Cardstock for the inside and attach with Stampin’ Seal.
- Decorate your envelope.
- So sweet! Now send it to someone special.
Shopping List
")


$9.50

$18.00


$5.00


$35.00

Recommended Stamper’s Toolkit ❤
Product List
$12.00

$7.00

$4.25

$5.75

$5.50

$11.00

$26.00

$7.00

$6.50

$11.00

$20.00

$11.00

$80.75

$128.00


$16.00

$13.00


