Royal Peacock was the first Suite to catch my eye in the 2019-2020 Annual Catalog. I think because well Peacock is of course in my favorite color family and we have some peacocks live in the wild here in my neighborhood. Where I’m from the only peacocks I know of live at Canobie Lake Park or York’s Wild Kingdom, so it was quite unusual to me that they roam the streets here. As far as the catalog goes, I am quite sure the shiny foil papers and my favorite Pretty Peacock color are to blame! I just love those gorgeous Rhinestone jewels too in all my favorite colors.
This entire Suite is retiring June 2, 2020 and is currently on while supplies last status. Get it while you can!
Cutting Dimensions
Full list of supplies needed, listed below.
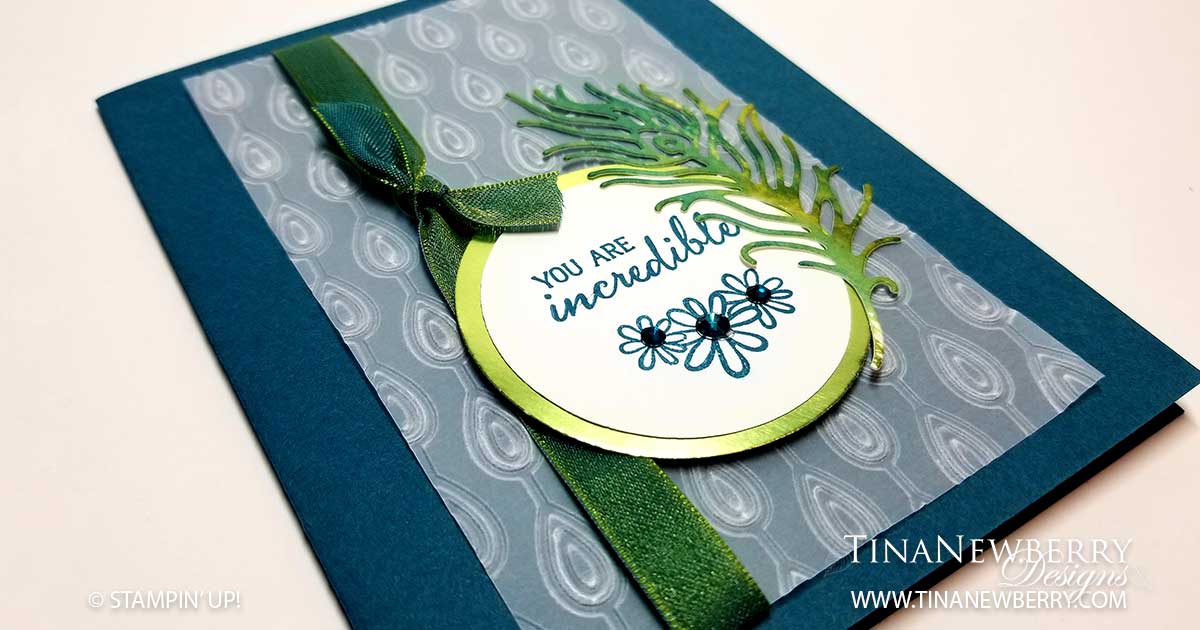
Card Base: Pretty Peacock Cardstock 8 1/2 h” x 5 1/2″ w folded to 4 1/4″ w x 5 1/2″ h
Background: Vellum 5″ h x 3 1/8″ w
2 1/4″ Circle: Old Olive Foil
2″ Circle: Whisper White Cardstock
Ribbon: 6″ Old Olive/Pretty Peacock 3/8″ (1 Cm) Reversible Ribbon
Ribbon Knot: 2″ Old Olive/Pretty Peacock 3/8″ (1 Cm) Reversible Ribbon
Instructions
- Fold the Card Base in half using a bone folder to sharpen the crease.
- Emboss the Vellum Background with the Beads & Baubles embossing folder
- Use Snail Adhesive to adhere the 6″ piece of Ribbon to the right side of the Vellum.
- Apply Snail Adhesive strategically to the back of the Vellum to adhere it to the Card Base without the adhesive showing.
- Tie the 2″ piece of Ribbon onto the front as shown.
- Affix Sentiment Stamp to the Acrylic Block. Apply Pretty Peacock Ink to the Sentiment Stamp and stamp the Sentiment onto the 2″ Whisper White Circle. Clean Stamp.
- Affix Flower Stamp to the Acrylic Block. Apply Pretty Peacock Ink to the Flower Stamp and stamp the Flower onto the 2″ Whisper White Circle. Clean Stamp.
- Add Noble Peacock Rhinestones to the Flower Centers
- Use Snail Adhesive to adhere the 2″ Circle to the 2 1/4″ Circle.
- Use Dimensionals to adhere the 2 1/4″ Circle to the Vellum.
- Lay down a Watercolor Wash on the Watercolor paper using Pretty Peacock Ink and Old Olive Ink. Let dry.
- Die cut the Feather from the Watercolor Wash
- Use Fine Tip Glue to adhere the Feather to the 2″ Circle.
- You did it! Who will you send this beautiful card to?
How to Create a Watercolor Wash
Supplies Needed:
- Fluid 100 Watercolor paper
- Aqua Painters
- Selection of Ink Pads
- Acrylic Blocks
- Paper towels or napkins
- Scrap paper
Instructions
- Examine you Aqua Painters and notice they come in two different tips. Select the Aqua Painter(s) you wish to use.
- Fill the Aqua Painter reservoir(s) with water.
- Squeeze the Aqua Painter reservoir until a few drops of water run through.
- Open the Ink Pads and stamp one Acrylic Block over one ink, to transfer ink to the block. Set the block on the scrap paper ink side up.
- Use the Aqua Painter to lift the first color off the Block and apply the ink in a sweeping motion onto the Watercolor Paper. Repeat until you have the desired amount of that color.
- Between colors, squeeze water through the Aqua Painter and brush it on the paper towel or napkin until the water runs clear.
- Continue to wash more colors until you have the desired amount of color.
- Colors will run together. To limit the amount colors run together, allow time to dry between color applications.
- Set aside to dry.
Product List


 Reversible Ribbon")

 Circle Punch")
 Circle Punch")


Recommended Stamper’s Tool Kit


Design inspired by Lisa Curcio.