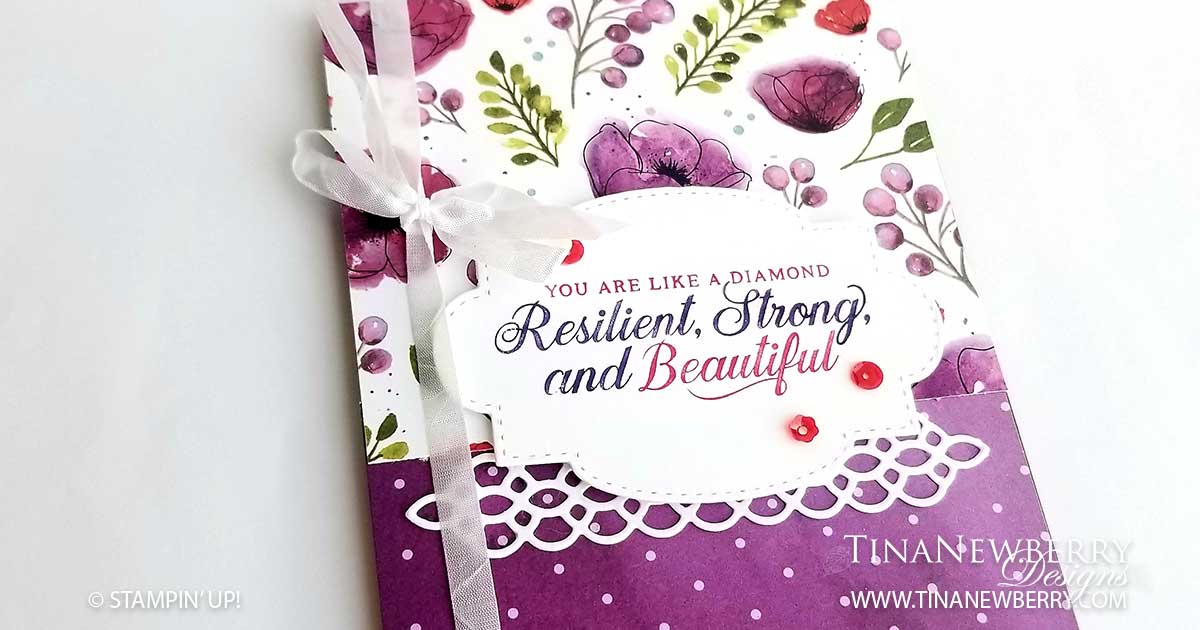
Rich colors and beautiful poppies create a striking backdrop for a thoughtful, powerful sentiment. One of three cards from the Strong & Beautiful Card Class previously scheduled for this Sunday April 26, You Are Like a Diamond is a tribute to the ladies in my life who get it all done day after day and endure no matter what. I’m sad this class was cancelled, but happy to share it with you! I hope you enjoy this little creative vacation to a field of poppies in Blackberry Bliss, Old Olive, Rich Razzleberry, and Whisper White.
Cutting Dimensions
Card Base: Old Olive Cardstock 8 1/2 h” x 5 1/2″ w folded to 4 1/4″ w x 5 1/2″ h
Background Layer: 1 piece Peaceful Poppies DSP 3 1/2” h x 4.25” w and 1 coordinating piece 2 1/2” h x 4.25” w
Tag: Whisper White Cardstock with stitched tag die
Lattice Strip: Whisper White Cardstock with Petals & More Thinlits Die (retired)
Ribbon: 7” and 4” pieces of Crinkle Ribbon
Instructions
- Fold the card base using a bone folder to sharpen the crease.
- Lay the DSP upside down on the card base and overlap them until together they are 5 ½” h. Adhere them to each other.
- To adhere the 7” Crinkle Ribbon, on the back of the new Peaceful Poppies DSP measure about ¾” from left edge and apply a small strip of Snail Adhesive on top and bottom edge. Affix one end of the ribbon to the back of the DSP, then run the ribbon across the front of the DSP and affix the remaining end to the Snail Adhesive on the backside of the far end.
- Use Snail Adhesive to adhere Peaceful Poppies DSP to card base
- Use the Blackberry Bliss Stampin’ Write Marker to color Resilient, Strong and Beautiful on the sentiment stamp and then finish coloring with the Rich Razzleberry Stampin’ Write Marker. You may need to “huff” (breathe) on the stamp to re-wet the ink before you stamp the sentiment.
- Use Fine-Tip Glue to adhere the lattice just below the seam of the two DSP’s on the background.
- Use Dimensionals to adhere sentiment tag.
- Apply glue dots to three sequins and affix to the sentiment tag
- Tie the remaining 4” of Crinkle Ribbon in a bow on the 7” of Crinkle Ribbon.
- Awesome! You’re finished! Who are you going to send it to?
Make This Card
Ready to make this card? Awesome! You are going to LOVE it. Simply click on the products listed below to add them to your cart on my Stampin’ Up Website and check out using this month’s Host Code. OR give me a shout and I’ll place your order for you. You can reach me by email at tina@tinanewberry.com or through my social media accounts.
Sign up for my eNewsletter and you’ll receive instructions for two more card designs using many of these same products.
Products Used
NOTE: The Petals & More Thinlits Die used to make the white lattice on this card, is a retired die.


 Crinkled Seam Binding Ribbon")


Recommended Stamper’s Tool Kit


