This is Knot Good

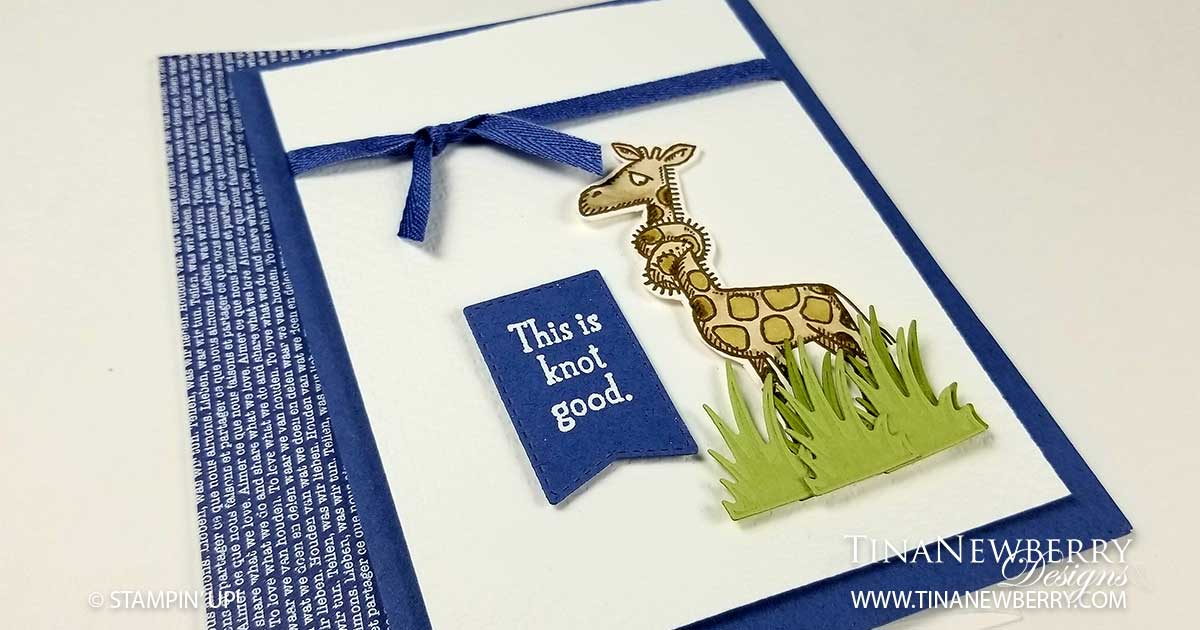
Oh this poor little giraffe makes me smile. Look at the worry in his eye! We’re all felt this way before and this little guy just brings a little lighthearted humor to the situation. The simple ‘Hope things get better soon’ is the perfect inside sentiment to go with him. The soothing cool color palette and crisp white background are sure to brighten the day of someone you love.

Full list of supplies needed, listed below. A die cutting machine is needed for this card.
Card Base: Misty Moonlight Cardstock 5 1/2″ h x 8 1/2″ w folded to 5 1/2″ h x 4 1/4″ w.
Background: Basic White Cardstock 5″ h x 3 3/4″ w
Sentiment Layer: 
Misty Moonlight Cardstock trimmed to 1 1/2″ h x 1″ w with the Tasteful Labels Dies (stamp and emboss first)
Grass: Pear Pizzazz Cardstock trimmed with the Golf Club Dies (retired)
Inside Layer: Basic White Cardstock 5 1/4″ h x 4″ w

  1. Affix all stamps to Acrylic Blocks.
  2. Fold the Card Base in half using a Bone Folder to sharpen the crease.
  3. Run the Background through the Stampin’ Cut & Emboss Machine with the Tasteful Textures Embossing Folder.
  4. Wrap Misty Moonlight Ribbon around the Background and tie knot.
  5. Attach the Background with Stampin’ Dimensionals.
  6. Stamp the sentiment in Versamark ink on the Sentiment Layer and heat emboss with white embossing powder. Then die cut and attach with Stampin’ Dimensionals.
  7. Stamp the giraffe in Soft Suede ink on scrap Basic White Thick cardstock and color with Stampin’ Blends before adding to card with Stampin’ Dimensionals.
  8. Die cut the grass and attach with Mini Glue Dots.
  9. Decorate the Inside Layer and attach.
  10. Decorate the envelope.
  11. Oh! This poor little guy. Who will you send it to? Brighten someone’s day!

Shopping List

Stamper’s Toolkit

You will also need adhesive, acrylic blocks, scissors and other basic PaperCrafting items from the Stamper’s Toolkit

Hope You’re Back On Your Feet Soon

This little turtle and matching sentiment make me chuckle! Such a clever little pick-me-up card. We all need a little humor in our lives. I used Stampin’ Blend alcohol markers to color this little cutie and the new Blending Brushes to color the Stitched Circle he’s sitting on. Both bring super easy color to this simple card.

Measurements

Full list of supplies needed, listed below. A die cutting machine is needed for this card.
Card Base: Coastal Cabana Cardstock 5 1/2″ h x 8 1/2″ w folded to 5 1/2″ h x 4 1/4″ w.
Patterned Background: Neutrals DSP 5 1/4″ h x 4″ w
Embossed Background: Basic White Cardstock 4 3/4″ h x 3 1/2″ w with the Brick & Mortar Embossing Folder
Circle Layer: Basic White Cardstock trimmed with 3″ Stitched Circle Die (color first)
Sentiment Layer: Basic White Cardstock 3/4″ h trimmed with the Lovely Labels Pick a Punch (stamp first)
Inside Layer: Basic White Cardstock 5 1/4″ h x 4″ w

Let’s Create

  1. Affix all stamps to Acrylic Blocks.
  2. Fold the Card Base in half using a Bone Folder to sharpen the crease.
  3. Attach the Patterned Background with Stampin’ Seal.
  4. Run the Embossed Background through the Stampin’ Cut & Emboss Machine with the Brick & Mortar Embossing Folder.
  5. Using the Blending Brushes and ink pads, apply Costal Cabana and Granny Apple Green to a scrap of Basic White Cardstock and then die cut using the 3″ Stitched Circle Die. Stamp the Turtle in Soft Suede Ink. Attach Circle to Embossed Layer with Stampin’ Seal+ or Multipurpose Liquid Glue.
  6. Stamp the Turtle on scrap Basic White Thick Cardstock in Soft Suede Ink and color with Stampin’ Blends. Then use Paper Snips to cut out. Attach to the Stitched Circle with Stampin’ Dimensionals.
  7. Stamp the Sentiment in Coastal Cabana Ink on the Sentiment Layer and trim the ends with the Lovely Labels Pick a Punch. Attach with Stampin’ Dimensionals to the Embossed Layer.
  8. Wrap ribbon around the Embossed Layer and tie a bow. Secure with a Mini Glue Dot, if needed.
  9. Use Mini Glue Dots to add sequins.
  10. Decorate the Inside Layer and attach.
  11. Decorate the envelope.
  12. So cute!! Who needs a pick-me-up? Send them this card.

Shopping List

Stamper’s Toolkit

You will also need adhesive, acrylic blocks, scissors and other basic PaperCrafting items from the Stamper’s Toolkit

Design inspired by Alisa Tilsner.

On the Spot: Night of Navy

Over the weekend I had a little poll on my Facebook page, with the colors from the Berry Delightful Designer Series Paper. Take a look at the color palette. The colors are so vibrant and pretty together, it’s hard to pick just one, but Night of Navy was the winner! Today I’m looking at color combinations for Night of Navy.

Happy Birthday You Sweet Thing!

A new take on my usual favorite white-on-white with some watercoloring thrown in for fun. LOL. The Berry Blessings and Sweet Strawberry Bundles bring this simple card together. I first stamped the images with Tuxedo Black Memento ink, so it wouldn’t run when I started watercoloring. Next I pressed an acrylic block onto my ink pads to lift off some color. I lifted Rich Razzleberry on one half and Blackberry Bliss on the other half of the block and then I was able to add water from my Water Painter and mix them a bit on the block or pull from one side or the other if I wanted my berry to be darker or lighter. At first I was feeling like I needed to stay in the lines, but then I let loose a bit and had fun with it.

Full list of supplies needed, listed below.
Card Base: Basic White Thick Cardstock 8 1/2″ h x 5 1/2″ w folded to 4 1/4″ h x 5 1/2″w.
Background: Basic White Cardstock 4 1/4″ h x 5 1/2″w
Painted Layer Matte: 
Basic Black Cardstock 2 3/4″ h x 5 1/2″ w
Painted Layer: Watercolor Paper 2 1/2″ h x 5 1/2″ w
Sentiment: Basic Black Cardstock 1″ h x 3″ w
Inside Layer: Basic White Cardstock 4″ h x 5 1/4″ w.

  1. Affix all stamps to Acrylic Blocks.
  2. Fold the Card Base in half using a Bone Folder to sharpen the crease.
  3. Stamp the Berries and Leaves in Tuxedo Black Memento Ink on the Watercolor Paper.
  4. Use Water Painters to watercolor the Berries in Rich Razzleberry and Blackberry Bliss and the Leaves in Old Olive.
  5. Using Stampin’ Seal, attach the Painted Layer to the Painted Layer Matte and attach to the card with Stampin’ Seal.
  6. Stamp the Sentiment on the Sentiment Layer with Versamark Ink. Heat emboss with White Embossing Powder. Attach with Stampin’ Dimensionals.
  7. Add Frosted Epoxy Droplets.
  8. Decorate the Inside Layer and attach.
  9. Decorate the envelope.
  10. Very pretty! Now send it to someone special.

Shopping List

Recommended Stamper’s Toolkit

Product List
Order online from the convenience of your own home or send me your order and I’ll take care of you. ❤ Either way, please use the host code ANTD9UHS. Order online AND, if your order is $50 or more using host code ANTD9UHS between now and the end of the month you’ll receive a free pack of embellishment as a THANK YOU gift from me. ❤ If your order is over $150, skip the host code, earn Stampin’ Rewards for free stuff yourself and I’ll still send you a free pack of embellishment as a THANK YOU gift from me. ❤

Design inspired by Emma Goddard.