Making A Decorative Mask From Paper

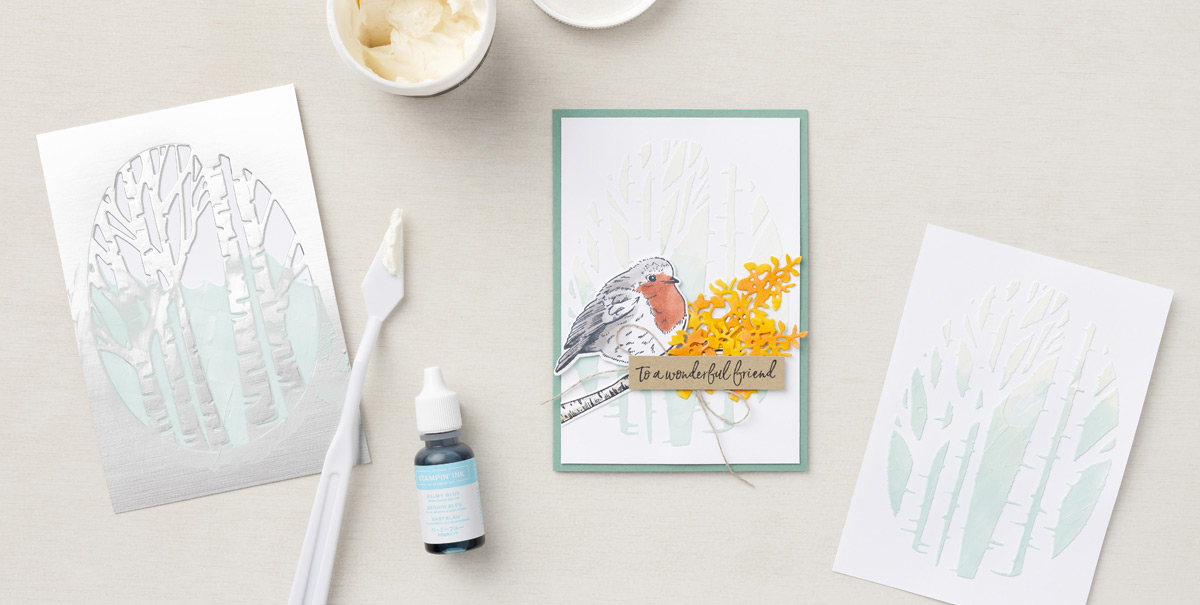
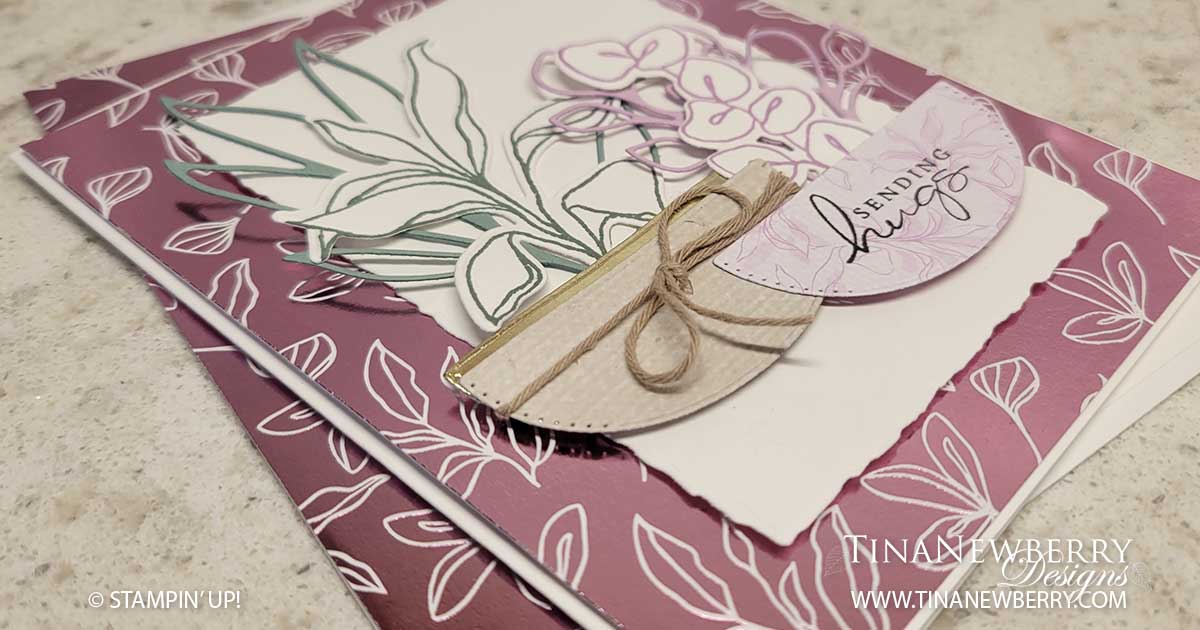
If you’re tired of using the same card making techniques week after week, we have a new technique for you! Break out your Matte Finish Embossing Paste but leave your Artistic Mix Decorative Masks on the shelf—this week you’re going to make your own mask using a die and some paper!

First, die cut a piece of Silver Foil Specialty paper with the peek-through tree die from the Aspen Tree Dies. Place the die-cut paper on top of a piece of Basic White cardstock and use some tape to hold it in place. Next, mix together some paste with two drops of the Balmy Blue Ink Refill. Spread a thin layer of the blue paste across the bottom half of the die-cut mask with a Palette Knife. Clean off the knife and then add white paste to the top half of the mask in a thick layer that overlaps the bottom half just a little. Remove the mask and allow the paste to dry, then adhere the cardstock to a Soft Succulent card base. Stamp, color, and die cut the bird and tree branch pieces, then adhere them to the card along with a few die-cut bunches of leaves and a sweet sentiment. Finish the card with a bow of Linen Thread adhered behind the greeting label with a mini glue dot.

We love how this card turned out! Try this new technique this week—you might be pleasantly surprised with the results!

Sending Hugs Greeting Card

Use the plant pot for your sentiment when you make this heartfelt card. Change up the pots, by making a two-toned pot. I’ll show you how.

Splendid Thoughts Bundle
It takes just minutes to create a luxuriant paper plant arrangement using the hand-drawn botanical imagery in the Splendid Thought bundle. Stamp stems and foliage, cut them out quickly using the dies, and add them to your cards and scrapbook pages. It’s quick and easy! And save 10% when you buy the bundle.

Measurements

Full list of supplies needed, listed below. A die cutting machine is needed for this card.

Basic White Thick Cardstock: 5 ½” h x 8 ½” w scored and folded on the long-side at 4 ¼”

Splendid Day Designer Series paper (DSP):

  • 5 3/8” h x 4 ⅛” w
  • Scrap for pots

Basic White Cardstock: scraps for plants and Deckled Rectangle

Soft Succulent Cardstock: scraps for plant

Fresh Freesia Cardstock: scraps for plants

Let’s Create

  1. Affix all stamps to Acrylic Blocks.
  2. Fold the Card Base in half using a Bone Folder to sharpen the crease.
  3. Attach the large piece of DSP to the front with Stampin’ Seal. 
  4. Run the Basic White Cardstock scrap through the Stampin’ Cut & Emboss machine using the Deckled Rectangles die and attach with Stampin Dimensionals.
  5. Using scrap DSP create three pots.  Layer two of the pots shifting the one in the back up ⅛ to ¼” and attach to the front pot with a Mini Glue Dot.
  6. Wrap a piece of Crumb Cake Bakers Twine around the layered pot and tie a bow. Trim the ends if needed.
  7. On Basic White scrap stamp one plant outline in Soft Succulent and the other outline in Fresh Freesia, then die cut.
  8. Die cut two plants in Fresh Freesia cardstock and another in Soft Succulent cardstock. Make two plant arrangements and secure in place with Mini Glue Dots. 
  9. Stamp the sentiment on one of the pots in Tuxedo Black ink, then attach the pots with Stampin’ Dimensionals.
  10. Stamp and decorate the inside.
  11. Decorate your envelope.
  12. Lovely! Cheer someone up with this pretty card.

Shopping List

Recommended Stamper’s Toolkit

Product List
Order online from the convenience of your own home or send me your order and I’ll take care of you. ❤ Either way, please use the host code ANTD9UHS. Order online AND, if your order is $50 or more using host code ANTD9UHS between now and the end of the month you’ll receive a free pack of embellishment as a THANK YOU gift from me. ❤ If your order is over $150, skip the host code, earn Stampin’ Rewards for free stuff yourself and I’ll still send you a free pack of embellishment as a THANK YOU gift from me. ❤

Today Is A Day To Remember

Create your own dish garden in any colors you like using the various plants in the Spendid Thoughts Bundle. So fun and easy to pull together.

Splendid Thoughts Bundle
It takes just minutes to create a luxuriant paper plant arrangement using the hand-drawn botanical imagery in the Splendid Thought bundle. Stamp stems and foliage, cut them out quickly using the dies, and add them to your cards and scrapbook pages. It’s quick and easy! And save 10% when you buy the bundle.

Measurements

Full list of supplies needed, listed below. A die cutting machine is needed for this card.
Basic Black Cardstock: 5 1/2″ h x 8 1/2″ w folded to 5 1/2″ h x 4 1/4″ w

Basic White Cardstock:

  • 5 1/4″ h x 4″ w (2)
  • scrap for die cutting

Tahitian Tide Cardstock: scrap for die cutting

Daffodil Delight Cardstock: scrap for die cutting

Perfectly Penciled Designer Series Paper (DSP): scrap for die cutting

Let’s Create

  1. Affix all stamps to Acrylic Blocks.
  2. Fold the Card Base in half using a Bone Folder to sharpen the crease.
  3. Run one of the 5 1/2″ h x 4 1/4″ w Basic White Cardstock pieces through the Stampin’ Cut & Emboss machine using the Stitched with Whimsy die.
  4. Stamp sentiment inside the Stitched with Whimsy pattern using Tuxedo Black Memento Ink.
  5. Attach stamped panel to card base with Stampin’ Seal.
  6. On scrap Basic White Cardstock, stamp one plant in Parakeet Party and the other in Crushed Curry ink. Stamp both the outline and fill stamps. The fill stamp is not meant to line up with the outline stamp. Run both images through the Stampin’ Cut & Emboss machine with the coordinating dies. 
  7. Die cut three additional plants with Tahitian Tide and Daffodil Delight scrap cardstock. 
  8. Die cut the plant pot with a scrap piece of DSP. 
  9. Arrange the plants on the stamped panel and use Mini Glue Dots to attach.
  10. Use Stampin’ Dimensionals to adhere the plant pot.
  11. Add some Glossy Dots to finish the front.
  12. Stamp and decorate the remaining 5 1/2″ h x 4 1/4″ w Basic White Cardstock piece for the inside and attach with Stampin’ Seal.
  13. Decorate your envelope.
  14. Love it! Who will you send it to?

Shopping List

Recommended Stamper’s Toolkit

Product List
Order online from the convenience of your own home or send me your order and I’ll take care of you. ❤ Either way, please use the host code ANTD9UHS. Order online AND, if your order is $50 or more using host code ANTD9UHS between now and the end of the month you’ll receive a free pack of embellishment as a THANK YOU gift from me. ❤ If your order is over $150, skip the host code, earn Stampin’ Rewards for free stuff yourself and I’ll still send you a free pack of embellishment as a THANK YOU gift from me. ❤

You Are Such A Blessing Fall Greeting Card

Thank you for your interest in this project. Some projects are exclusive to subscribers who will receive passwords by email.

Are you a subscriber? Awesome! Check your email for the password and enter it here to view this project.

Not yet subscribed?  We’d love for you to join us.  Subscribe to my email list and receive news, information and inspiration by email.