Memories & More

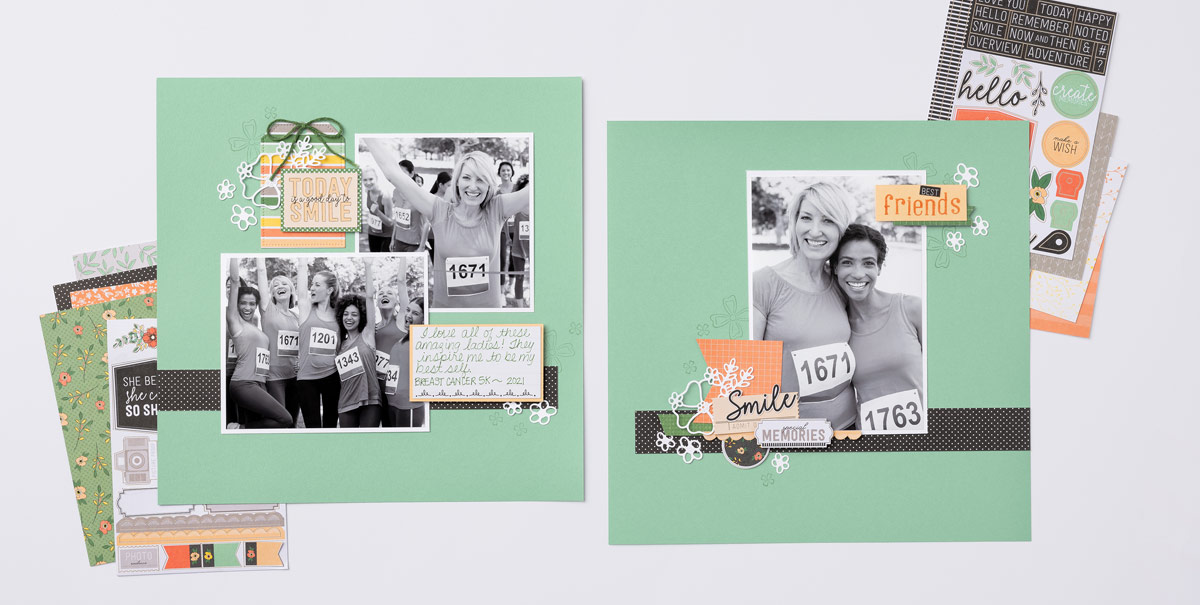
This week we did some traditional scrapbooking with the Today is the Day Memories & More Card Pack, and we loved the way it turned out! We used two sheets of Mint Macaron Cardstock as our base, then we cut one of the 4″ x 6″ (10.2 x 15.2 cm) Memories & More cards into four 1″ x 6″ (2.5 x 15.2 cm) pieces for the strip that runs along the bottom of the pages. Next, we broke out some stamps and ink pads, and used the Flowers of Friendship Stamp Set to stamp out some flowers in Mint Macaron ink and the Alphabest Stamp Set to stamp out “Friends” in Calypso Coral.

We adhered a few photos to Basic White Cardstock using Multipurpose Liquid Glue and added them to the pages. Then we trimmed down one of the 3″ x 4″ (7.6 x 10.2 cm) cards for journaling and adhered it to Pale Papaya Cardstock. To finish our lovely scrapbook pages, we clustered some of the stickers from the card pack along with die cuts from the Layering Hollyhock Dies to create a focal point. Lastly, we used the Garden Green Stampin’ Write Marker to color our white Baker’s Twine.

We want to see how you preserve your memories. Take some time to craft this week and show us what you come up with!

Shopping List

You Are Missed Greeting Card

Truly this card design could be used for any season, just change up the colors. One of my favorite pumpkins is turquoise (of course! You know me. LOL)

Hello Harvest Bundle
You’ll love the versatility of the autumnal Hello Harvest Bundle. You can use it to create handmade cards and gift tags for fall, then use many of the stamp sentiments for year-round greetings. Just stamp an image, then use the coordinating die to quickly and easily create your own die-cut elements.

Measurements

Full list of supplies needed, listed below. A die cutting machine is needed for this card.

Basic White Cardstock:

  • 5 ½” h x 8 ½” w  scored and folded on the long-side at 4 ¼” for Card Base
  • 3 ½” x 2 ½” scrap (for stamping flowers and die cutting) 

Basic Black Cardstock:

  • 5 ⅜” h x 4 ⅛” w
  • 4 ¾” h x 3 ½” w scrap (For die cutting frame)
  • 2” w x 1 ¼” h scrap (For stamping and cutting tag)

Sahara Sand Cardstock:

  • 2 ½” x 2 ½” scrap (For die cutting pumpkin)

Rustic Harvest Designer Series Paper (DSP): 

  • 5 ¼” x 4” (Mossy Meadow print)
  • 2 ¾” x 4” (Black & White stripe print)

Let’s Create

  1. Affix all stamps to Acrylic Blocks.
  2. Fold the Card Base in half using a Bone Folder to sharpen the crease.
  3. Attach 5 ¼” x 4” Mossy Meadow DSP to the 5 ⅜” x 4 ⅛” Basic Black cardstock. Attach to the folded Basic White Cardbase.
  4. Using the Stitched Rectangle Die that measures 4 ⅜” x 3” die cut the 4 ¾” x 3 ½” Basic Black cardstock.  Using the 3 ½” x 2 ¼” Stitched Rectangle Die cut the center out of the first die cut rectangle in order to create a frame.
  5. Using the small “lined/dot” stamp and Black Memento Ink Pad, add lines to the Black and White striped DSP.  (This step is optional) Now tape this panel to the back of the frame and attach to the card closer to right side of the card.
  6. Using the Black Memento Ink Pad stamp the floral image onto 3 ½” x 2 ½” Basic White cardstock. Color using Stampin’ Blends and die cut using the coordinating die from Rustic Pumpkin Die Set.
  7. Using Black Memento Ink Pad, stamp the pumpkin onto 2 ½” x 2 ½” Sahara Sand cardstock. Die cut using the coordinating Pumpkin die from Rustic Pumpkin Die Set.
  8. Using Versa Mark ink, stamp the sentiment onto the 2” x 1 ¼” Basic Black cardstock.  Sprinkle with white embossing powder and heat set using the heat tool. Trim the tag to 1 ½” x ¾” cutting the top corners at an angle to form a tag.
  9. Attach the die cut pumpkin to the lower left of the card covering the lower right corner of the frame. Using Stampin’ Dimensionals attach the flowers covering the top of the pumpkin.
  10. Attach the tag to the pumpkin. Tie a small bow with Linen Thread and attach to the top of the tag using a mini glue dot.
  11. Place 3 Matte Black Dots randomly on the card.
  12. Stamp and decorate the inside of your card and the envelope and let someone know how much you miss them.

Shopping List

Recommended Stamper’s Toolkit

Product List
Order online from the convenience of your own home or send me your order and I’ll take care of you. ❤ Either way, please use the host code ANTD9UHS. Order online AND, if your order is $50 or more using host code ANTD9UHS between now and the end of the month you’ll receive a free pack of embellishment as a THANK YOU gift from me. ❤ If your order is over $150, skip the host code, earn Stampin’ Rewards for free stuff yourself and I’ll still send you a free pack of embellishment as a THANK YOU gift from me. ❤

Who’s Ready for Fall Greeting Cards?

I admit I exit summer kicking and screaming a little – hence I live in Florida – but by August I am ready for rich fall colors, especially deep yellows and oranges.

Hello Harvest Bundle
You’ll love the versatility of the autumnal Hello Harvest Bundle. You can use it to create handmade cards and gift tags for fall, then use many of the stamp sentiments for year-round greetings. Just stamp an image, then use the coordinating die to quickly and easily create your own die-cut elements.

Measurements

Full list of supplies needed, listed below. A die cutting machine is needed for this card.

Basic White Cardstock:

  • 5 ½” w x 8 ½” h scored and folded on the long-side at 4 ¼” 
  • 2” w x 2” h (for stamping flowers and die cutting)

Basic Black Cardstock:

  • 5 ⅜” w x 4 ⅛” h
  • 1 ½” h x 5 ¼” w (for die cutting zig zag border)

Early Espresso Cardstock:

  • 1 ½” x 1 scrap (For die cutting pumpkin stems)

Cajun Craze Cardstock:

  • 7” x 2 ¾” scrap (For die cutting pumpkins)

Mossy Meadow Cardstock:

  • 1 ½” x 2 scrap (For die cutting pumpkin vines)

Rustic Harvest Designer Series Paper: 

  • 5 ¼” w x 4” h (Crushed Curry Print)
  • 5 ¼” w x ¾” h (Black & White Stripe Print)

Let’s Create

  1. Affix all stamps to Acrylic Blocks.
  2. Fold the Card Base in half using a Bone Folder to sharpen the crease.
  3. Stamp the “Hello” sentiment using Black Memento ink to the lower right corner of the Crushed Curry DSP and attach this layer to the 5 ⅜” x 4 ⅛” Basic Black cardstock. Attach to the folded Basic White Cardbase.
  4. Using the Zig Zag Die from the Basic Borders Die Set, die cut the 1 ½” x 5 ¼”  Basic Black cardstock. 
  5. Using a Blending Brush with Crumb Cake Ink Pad, brush color onto the Black & White Stripe DSP.  Then run through the Stamp & Emboss Machine using the Painted Texture 3D Embossing Folder to add just a bit of texture. Attach this piece to the die cut border strip.  You may need to trim the border a bit to create an even mat. Attach this strip to the card. 
  6. Create pumpkins: Using both of the textured pumpkins and Cajun Craze Cardstock, color directly onto the raised part of the pumpkin dies with the Soft Suede light Stampin’ Blend. Then run through the Stampin’ Cut & Emboss Machine. Do this with each die two times in order to make 2 pumpkins. Die cut stems using Early Espresso Cardstock and several of the Pumpkin vine curlies using Mossy Meadow Cardstock. Sponge the edges of each pumpkin using Cajun Craze ink pad. Attach the skinnier pumpkin layer to the top of the larger pumpkin layer on both pumpkins. Attach the Early Espresso Stems onto the backs of each pumpkin.  Attach the Mossy Meadow curlies to the pumpkins. 
  7. Adhere the first pumpkin toward the left side of the card using Stampin’ Seal Adhesive. Using Stampin’ Dimensionals adhere the 2nd pumpkin a little lower than the first one off setting it to the left, but overlapping just a bit. 
  8. Using the Black Memento Ink Pad stamp 3 small flowers onto the 2” x 2” Basic White cardstock. Color using Stampin’ Blends and die cut using the coordinating die from Rustic Pumpkin Die Set. Adhere these flowers to the lower edge of the pumpkin popping 2 of the flowers with Stampin’ Dimensionals.
  9. Tie a small bow with Linen Thread and attach to the top pumpkin using a mini glue dot.
  10. Place 3 Rustic Metallic Dots randomly on the card.
  11. Stamp and decorate the inside of your card and the envelope.
  12. Send it off to say Hello!

Shopping List

Recommended Stamper’s Toolkit

Product List
Order online from the convenience of your own home or send me your order and I’ll take care of you. ❤ Either way, please use the host code ANTD9UHS. Order online AND, if your order is $50 or more using host code ANTD9UHS between now and the end of the month you’ll receive a free pack of embellishment as a THANK YOU gift from me. ❤ If your order is over $150, skip the host code, earn Stampin’ Rewards for free stuff yourself and I’ll still send you a free pack of embellishment as a THANK YOU gift from me. ❤

In Color-ful Simple Stamping

Need a creative break? Sometimes a simple stamping session is just what you need to recharge and refresh!

One of our favorite crafting experiences involves stamping our own Designer Series Paper—just as our concept artist did here. Do you love how the Parakeet Party lime images pop on Basic White Cardstock? To add interest to the hand-stamped layer, she cut a banner shape at the end. So cute!

To create a sweet, bubbly look for our Veel sterkte card, we sprinkled on a few Tahitian Tide and Starry Sky 2022–2024 In Color Matte Decorative Dots. Our artist also die-cut paper hearts and flipped a few of them to show off the opposite side of the In Color 6″ x 6″ (15.2 x 15.2 cm) Designer Series Paper Assortment. Add a contrasting Baker’s Twine bow to finish the card.

For the Ruhe bewahren und Tee trinken card, we used Parakeet Party Matte Decorative Dots to mimic the look of adorable flower buds. Tip: Cut the edge off the Stampin’ Dimensional sheet to adhere behind the sentiment.

Have fun simple stamping! And don’t forget to share your work on social media using the hashtag #SimpleStamping. We love to see your work!

Shopping List