What’s Your Stampin’ Style?

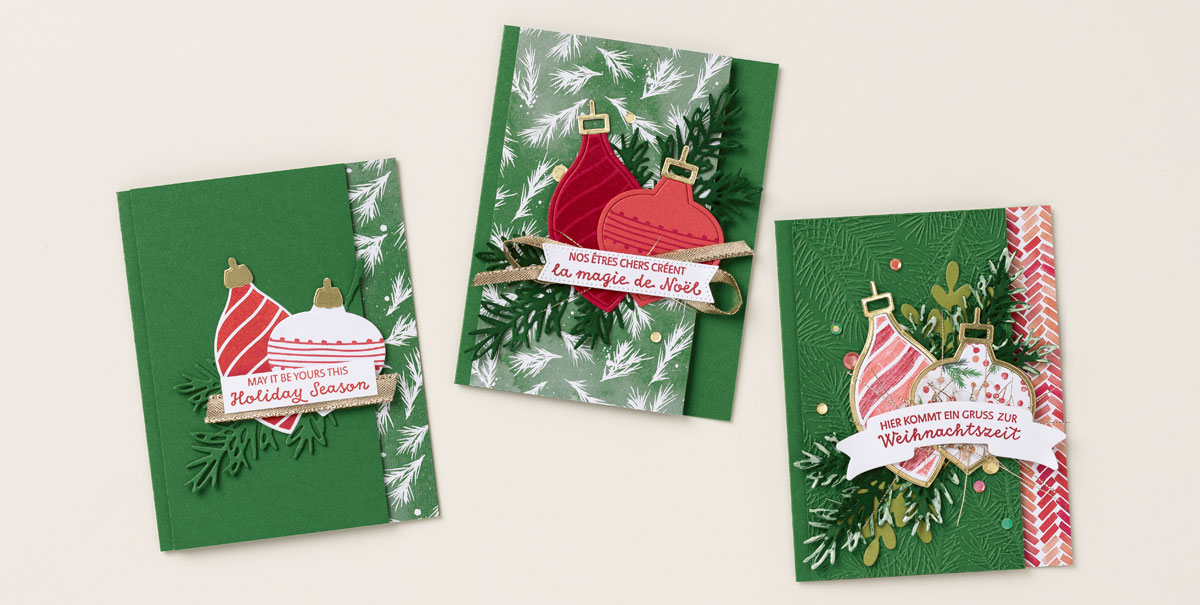
Spruced Up Bundle: This Holiday Season Card (4-1/4″ x 5-1/2″) (10.8 x 14 cm)

Are you on a quest to make a flurry of festive, handmade cards and tags this Christmas season? If so, the Spruced Up Bundle could be your best friend with its boldly-imagined tree and ornament stamps and unique outline dies—ready to help you make merry with Christmas paper crafting before the season rush! We show you how to go from casual to fancy with our samples—but what can you do with this card to make it yours?

CASUAL

To create the casual card on the far left, stamp and die cut the ornaments. Cut the Gold 3/8″ (1 cm) Shimmer Ribbon and layer it behind the sentiment. Add the 3-1/4″ x 5-1/2″ (8.3 x 14 cm) Garden Green Cardstock layer with Stampin’ Dimensionals, and adhere a 1″ (2.5 cm) strip of Painted Christmas Designer Series Paper on the right side of the card. Die cut the pine bough from Garden Green Cardstock using the Decorated Pine Dies and adhere it to the card.

AVID

For this version (center), die cut the Decorated Pine piece in Garden Green Cardstock and use the same color ink with a Sponge Dauber to achieve a darker color. Stamp the sentiment and die cut with the Stylish Shape Dies banner. Cut the ribbon in half, make a bow, and layer it behind the sentiment label with Stampin’ SEAL.

ARTFULLY AVID

(far right) Emboss the 3-1/4″ x 5-1/2″ (8.3 x 14 cm) Garden Green Cardstock layer with the Wintry 3D Embossing Folder. Add Pearlized Enamel Effects Basics in white to the ends of the pine bough die cut (after adding Garden Green ink with a Sponge Dauber). Take the Gold 3/8″ (1 cm) Shimmer Ribbon apart to use the gold threads on it and add them with Stampin’ SEAL behind the sentiment label.

Shopping List

From the North Pole Alternative #2

Thank you for your interest in this project. Some projects are exclusive to subscribers who will receive passwords by email.

Are you a subscriber? Awesome! Check your email for the password and enter it here to view this project.

Not yet subscribed?  We’d love for you to join us.  Subscribe to my email list and receive news, information and inspiration by email.

From the North Pole Alternative #3

Add a stenciled background to your tag on this festive card.

From the North Pole Paper Pumpkin Kit
Put some sparkle into this year’s Christmas giving with your From the North Pole Kit. Make this Christmas the merriest ever with 12 easy-to-make tags to adorn your pretty packages. Check out next month’s Paper Pumpkin Kit with exclusive Cards and Envelope Add-On.

Measurements

Full list of supplies needed, listed below. A die cutting machine is needed for this card.
Real Red Cardstock: 5 1/2″ h x 8 1/2″ w scored and folded at 4 1/4″

Basic White Cardstock:

  • 5 1/4″ h x 4″ w
  • 5″ h x 3 3/4″ w scrap
  • 1 1/2″ h x 2 1/4″ w

2022-2023 Brights Designer Series Paper: 3 1/4″ h x 1″ w

Black & White Designer Series Paper 3 1/4″ h x 1″ w

From The North Pole Kit: Candy Cane tag assembled according to instructions- except I left off the Open Me Tag and swapped Basic Black Baker’s Twine for the Mint Macaron Baker’s Twine

Let’s Create

  1. Affix all stamps to Acrylic Blocks.
  2. Fold the Card Base in half using a Bone Folder to sharpen the crease.
  3. Run the 5″ h x 3 3/4″ w Basic White scrap through the Stampin’ Cut & Emboss machine with the 4 3/4″h x 3 1/2″ w Stitched Rectangle die.
  4. Press an acrylic block onto the Real Red Stamp Pad to lift off some ink. Then using one of the sparkle snowflakes – white side up- for a stencil, apply Real Red ink with a Blending Brush to the die cut Basic White. Press down hard on the snowflake so it doesn’t move (ask me how I know!) to get a crisp stenciled image.
  5. Attach the stenciled die cut white panel to the card base with Stampin’ Seal.
  6. Carefully tear a little bit (like 1/4″) of the Real Red DSP from the right side toward you to achieve a white edge on the right side of the left over piece.
  7. Layer and attach the two pieces of DSP to the back of the assembled Candy Cane tag with Stampin’ Seal.
  8. Attach the tag with Stampin’ Dimensionals.
  9. Stamp the sentiment on the right side of the small Basic White panel in Real Red Ink. Wrap some Black Baker’s Twine around the left edge of the sentiment tag and secure in the back with a Mini Glue Dot. Attach the sentiment with a combination of Stampin’ Seal – where it overlaps the tag and Stampin’ Dimensionals where it overlaps the stenciled layer.
  10. Sprinkle on the Black Matte Dots.
  11. Stamp and decorate the 5 1/4″ h x 4″ w Basic White for the inside and attach with Stampin’ Seal.
  12. Decorate your envelope.
  13. How fun!! Who will you send it to?
Product List

Recommended Stamper’s Toolkit

Product List
Order online from the convenience of your own home or send me your order and I’ll take care of you. ❤ Either way, please use the host code ANTD9UHS. Order online AND, if your order is $50 or more using host code ANTD9UHS between now and the end of the month you’ll receive a free pack of embellishment as a THANK YOU gift from me. ❤ If your order is over $150, skip the host code, earn Stampin’ Rewards for free stuff yourself and I’ll still send you a free pack of embellishment as a THANK YOU gift from me. ❤