I have been helping small businesses, non-profits and institutions of higher education with a variety of print and digital solutions since 2000. From Save-the-Date postcards to eCommerce websites, I am prepared to help you grow your business without breaking the budget.
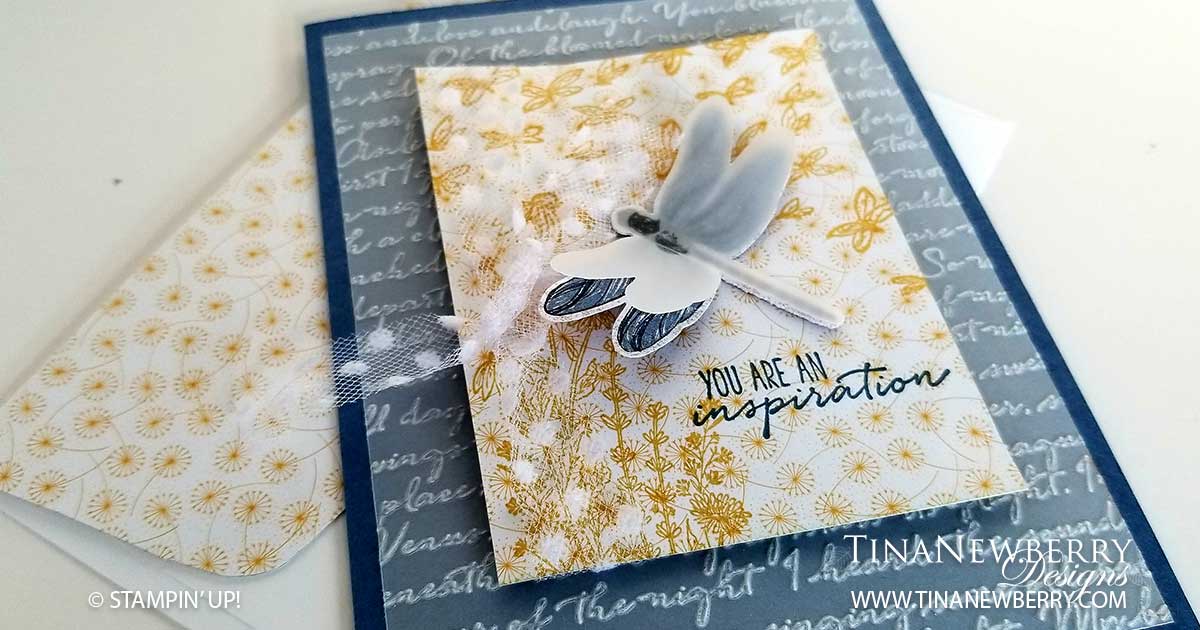
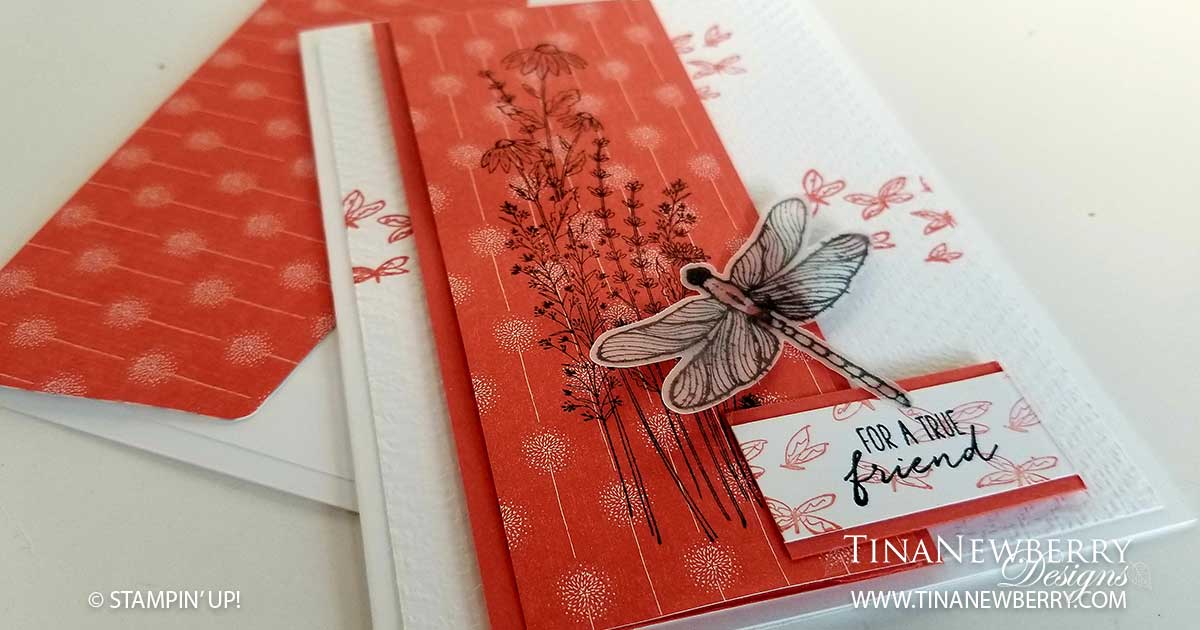
As usual, Sandy McCullough made the most beautiful card! This time she used the Dandy Garden Suite. I couldn’t wait to make it! She used Bumblebee and gold on her original card, so I thought I’d change it up a bit with Calypso Coral. (I think she later made another one with Calypso Coral too). I like the simplicity of it, without being boring. The little swarm of dragonflies stamp adds some wonderful interest to the background without being overbearing and I found the tall Black-eyed Susan stamp to be oddly refreshing in it’s shape and style. And you really can’t go wrong with a vellum Dragonfly can you?
Measurements
Full list of supplies needed, listed below. A die cutting machine is optional for this card. Card Base: Whisper White Thick Cardstock 8 1/2 h” x 5 1/2″ w folded to 5 1/2″ h x 4 1/4″ w Background: Whisper White Cardstock 5 1/4″″ h x 4″ w with the Tasteful Textures Embossing Folder (optional) Decorative Layer: Dandy Garden DSP 5 1/4″ h x 2″ w Decorative Layer Matte: Calypso Coral Cardstock 5 1/4″ h x 2 1/2″ w Sentiment Layer:Whisper White Cardstock 3/4″ h x 1 3/4″ w Sentiment Matte: Calypso Coral Cardstock 1″h x 1 3/4″ w
Let’s Create
Affix all stamps to Acrylic Blocks.
Fold the Card Base in half using a Bone Folder to sharpen the crease.
Stamp the Dragonfly on Vellum Cardstock with Memento Black ink an set aside to dry.
Stamp the Dragonfly Swarm in Calypso Coral Ink on the Background and then run it through the Tasteful Textiles Embossing Folder and attach to card with Stampin’ Seal.
For the Decorative Layer, choose a piece of Designer Series Paper that has a slight pattern to it, but isn’t so busy your stamped image will get lost. Then, stamp the Black-Eye Susan in Tuxedo Black Memento ink on the DSP strip and attach to the Decorative Matte Layer with Stampin’ Seal.
Add the Decorative Matte Layer with Stampin’ Dimensionals.
Stamp the Sentiment on the Sentiment Layer and then stamp off to add the Dragonfly Swarm to the Sentiment Layer. Attach to the Sentiment Matte with Stampin’ Seal.
Stamping Off is the technique of inking your stamp and then first stamping on scrap paper to remove some ink before stamping on the project. This creates a lighter shade of the ink. You can Stamp Off multiple times for a lighter watermarked effect. Have fun with it!
Add the Sentiment Matte with Stampin’ Seal on the left and a Dimensional on the right.
Punch the Dragonfly you stamped on the Vellum Cardstock and adhere using Mini Glue Dots. Be careful where you place the Glue Dots because they will show through. I added two to the head and body because when I added just one it showed through and looked weird.
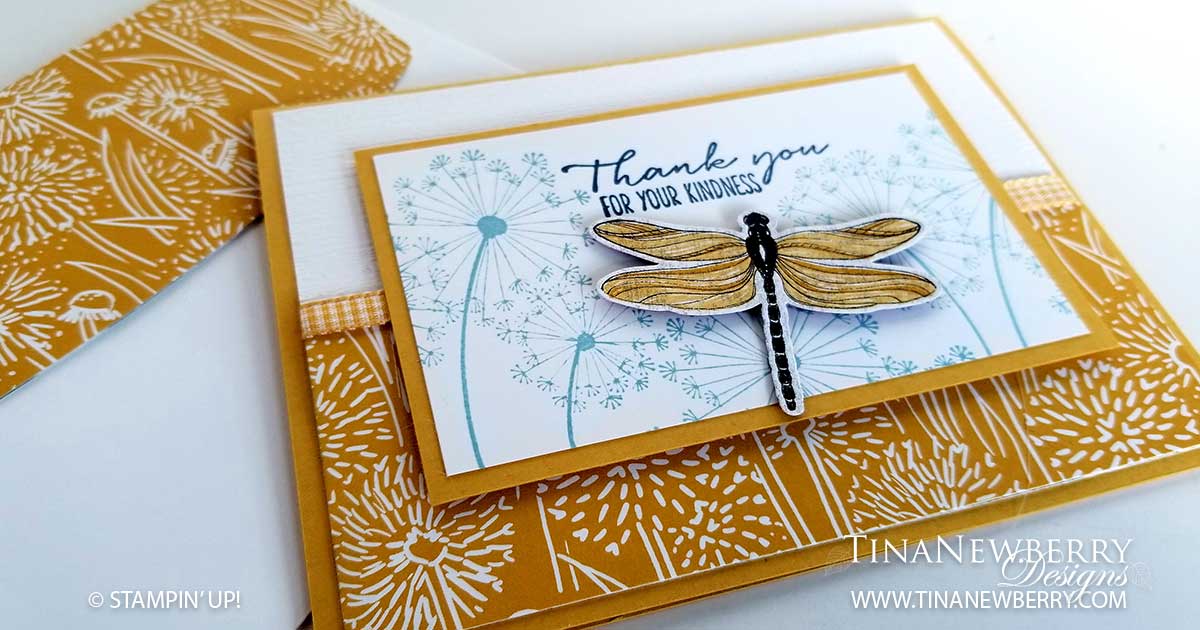
Bringing a little summer to my friends in the north who are enduring winter right now. Dandelions and Dragonflies. You’re welcome! The new Dandy Garden Suite brings us the best of summer with Dragonflies, lady bugs, and a rich color palette of Calypso Coral, Bumblebee, Mossy Meadow, Misty Moonlight, and Blackberry Bliss what’s not to love? I paired this card with my Dandelion Wishes stamp set and the pretty patterned paper with the Dandelions. My little Dragonfly was punched out of another piece of the patterned paper, but I could also have stamped and punched him using one of the two Dragonfly stamps in the set.
Full list of supplies needed, listed below. A Die Cutting Machine is optional for this project. Card Base: Bumblebee Cardstock 8 1/2 h” x 5 1/2″ w folded to 4 1/4″ h x 5 1/2″ w. Background:Whisper White Cardstock 4″ h x 5 1/4″ w with the Subtle Embossing Folder Background Bottom: Dandy Garden DSP 2″ h x 5 1/4″ w Sentiment Matte: Bumblebee Cardstock 2 3/4″ h x 4 1/4″ w Sentiment Layer:Whisper White Cardstock 2 1/2″ h x 4″ w Inside Layer: Whisper White Cardstock 4″h x 5 1/4″ w
Affix all stamps to Acrylic Blocks.
Fold the Card Base in half using a Bone Folder to sharpen the crease.
Run the Background through the Stampin’ Emboss Machine with the Subtle Embossing Folder
Add the Background Bottom to the Background with Stampin’ Seal+
Add the Bumblebee Gingham Ribbon to the Background and attach with Stampin’ Seal+
Stamp the Dandelions on the Sentiment Layer with Seaside Spray ink and the Sentiment with Misty Moonlight Ink.
Attach Sentiment to Sentiment Matte with Stampin’ Seal and attach with Dimensionals.
Punch the Dragonfly from the Dandy Garden DSP and attach with a Dimensional.
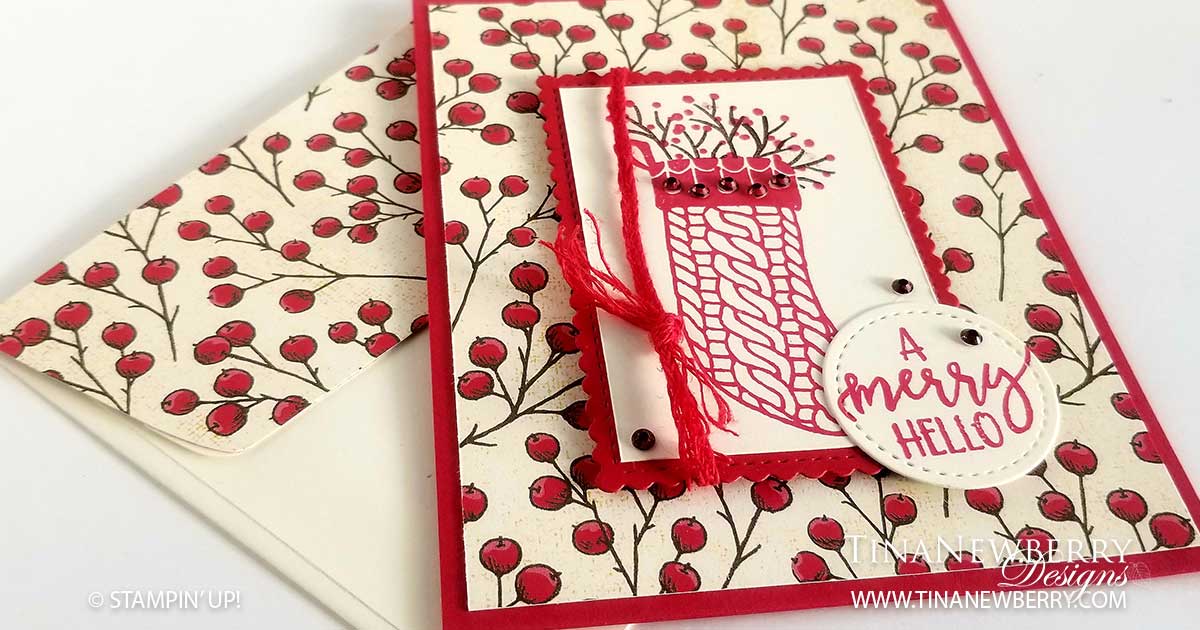
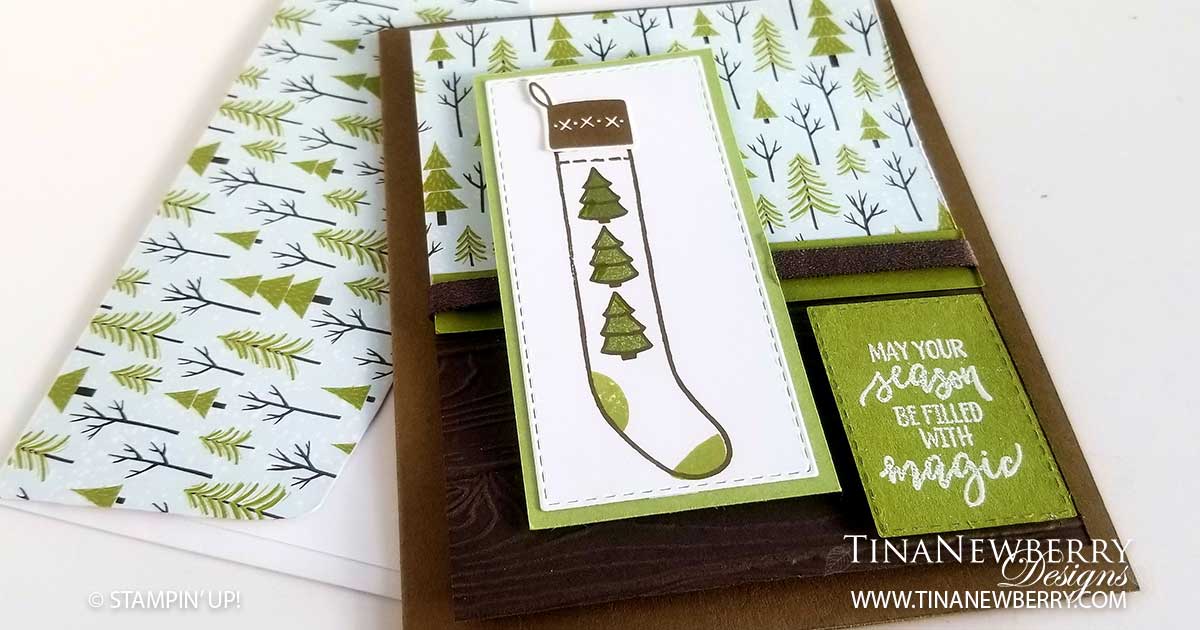
I really wanted to use this stocking stamp, but I was on the struggle bus with it. I looked and looked at ideas and didn’t like any of them. Then I noticed the little trees on it matched the little trees on the Trimming the Town patterned paper and that’s when it all started to come together. It reminds me of a cabin in the woods. Super cute!
Full list of supplies needed, listed below. A die cutting machine is needed for this card. Card Base: Soft Suede Cardstock 8 1/2 h” x 5 1/2″ w folded to 5 1/2″ h x 4 1/4″ w. Background-Top:Trimming the Town DSP 5 1/4″ h x 4″ w Background-Bottom: Early Espresso Cardstock 2 1/2″ h x 4″ w with the Pinewood Planks Embossing Folder Background Strip: Pear Pizzaz Cardstock 1/2″ h x 4″ w Ribbon: 1/4″ Early Espresso Faux Suede Trim 5″ Stocking Matte: Pear Pizzaz Cardstock 3 7/8″ h x 1 7/8″ w Stocking Layer: Whisper White Cardstock 3 5/8″ h x 1 5/8″ w (optional) trimmed with the Stitched Rectangle Dies Sentiment Layer:Old Olive Cardstock 1 3/4″ h x 1 1/4″ w (optional) trimmed with the Stitched Rectangle Dies
Affix all stamps to Acrylic Blocks.
Fold the Card Base in half using a Bone Folder to sharpen the crease.
Attach the Background-Bottom to the Background-Top with Stampin’ Seal.
Add the Background Strip with Stampin’ Seal.
Use Tear & Tape to add the Ribbon across the Background Strip
Attach the Background with Stampin’ Dimensionals.
Stamp the Stocking in Early Espresso, the Toe and Heal with Pear Pizzaz and the Pine Trees in Old Olive ink.
On the Stocking Layer, stamp the Stocking Top in Early Espresso ink, trim with Paper Snips and attach to the Stocking Layer with Stampin’ Seal.
Attach the Stocking Layer to the Stocking Matte with Stampin’ Seal and attach the Stocking Layer with Stampin’ Dimensionals.
Stamp the Sentiment in Versamark Ink and Heat Emboss with White Embossing Powder. Attach the Sentiment with Stampin’ Dimensionals.


 Faux Suede Trim")

")

