It’s Your Special Day

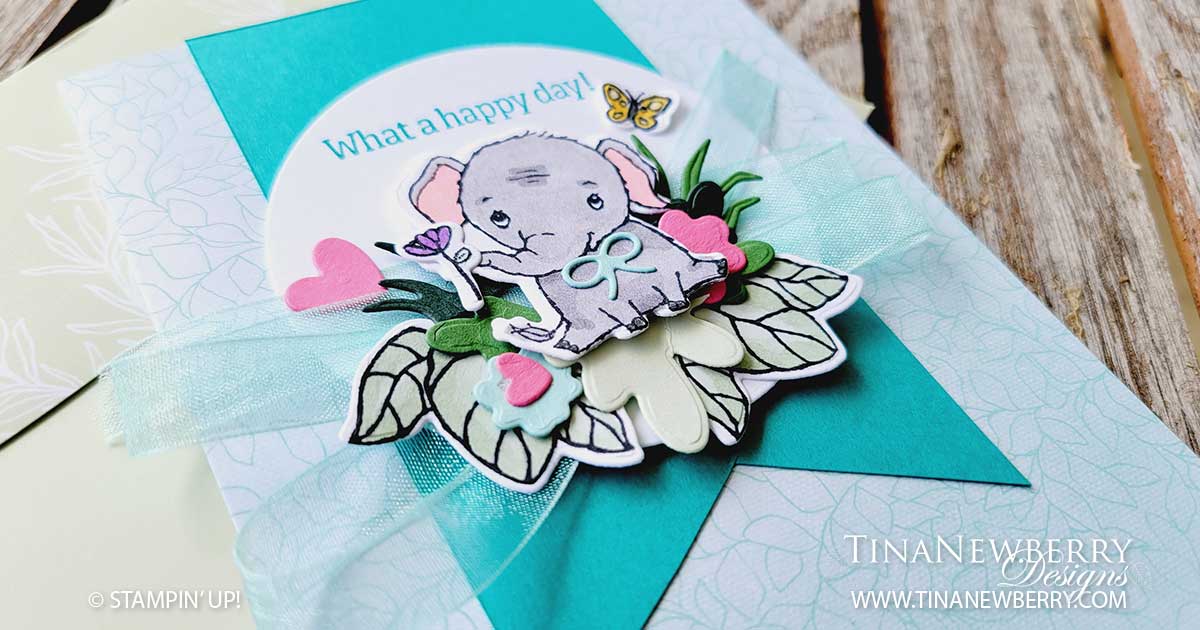
Cute! Remember that cute little elephant card I made a couple years ago? It used a pre-printed cardbase and I think was one of the designs from the catalog… well here it is again with a Cutest Cow instead of the elephant.

Measurements

Full list of supplies needed, listed below. A die cutting machine is needed for this card.
Basic White Cardstock:

  • Scrap for background circle
  • Scrap for Sentiment Circle

Basic White Thick Cardstock:

  • Scrap for cow, milkcan, bell, and roosters.

Shy Shamrock Cardstock: scrap for sprigs

Soft Seafoam Cardstock: scrap for sprigs

Shaded Spruce Cardstock:  scrap for sprigs

Lemon Lolly Cardstock: 4 ½” h x 2 ½” w

Let’s Create

  1. Use a Bone Folder to burnish the green Mix n Match card at the scoreline to create the card base.
  2. Use Paper Snips to banner tip the bottom of the Lemon Lolly Cardstock. Attach with Stampin’ Seal.
  3. Run the Basic White Cardstock through the Stampin’ Cut & Emboss Machine with the large and small Every Day Details Dies. 
  4. Stamp the sentiment on the small die cut circle in Tuxedo Black ink. Attach with Stampin’ Seal.
  5. On the large die, use a Blending Brush to apply Balmy Blue for the sky and Shy Shamrock for the grass. Stamp blades of grass in Shy Shamrock on the grass. Attach with Stampin’ Seal, just above the bottom of the Lemon Lolly flagged end.
  6. Use Paper Snips to cut two pieces of Natural Polka Dot trim about 3 ¾ – 4” w. Then use the Snips to cut the trim on the lines. Attach to the blended die with Tear N’ Tape.
  7. Use the Stampin’ Cut & Emboss Machine to die cut several branches of the Textured Floral Dies with the Soft Seafoam, Shaded Spruce, and Shy Shamrock cardstock. 
  8. Stamp the cow, milkcan, bell, and roosters in Tuxedo Black ink on the Basic White Thick cardstock. Then color with Stampin’ Blends:
    1. For the cow:
      1. Balmy Blue
      2. Copper Clay
      3. Petal Pink
      4. Bronze
    2. For the milkcan and bell:
      1. Gray Granite
    3. For the roosters:
      1. Copper Clay
      2. Pretty Peacock
      3. Blueberry Bushel
      4. Poppy Parade
      5. Daffodil Delight
  9. Use Paper Snips to fussy cut the cow, milkcan, bell, and roosters.
  10. Assemble the cow. Add a Balmy Blue Baker’s Twine bow to the cow.
  11. Attach the bell to the cow with a Mini Glue Dot.
  12. Arrange the cow, milkcan, roosters, and sprigs, then attach with Stampin’ Dimensionals and Mini Glue Dots. 
  13. Sprinkle on some Neutrals Sequins.
  14. Ca-ute!!! Who needs a pick-me-up?
Product List

Recommended Stamper’s Toolkit ❤


Wishing You Comfort

Die cut two banner flags to create the pretty flowered layer on this Quick & Easy card.

Measurements

Full list of supplies needed, listed below. A die cutting machine is needed for this card.
Pretty Peacock Cardstock Card Base 8 ½” x 5 ½”, score at 4 ¼”
Basic White Layer:

  • 4” x 5 ¼” (inside)
  • Scrap for die cute

Lily Pond Lane Designer Series Paper (DSP): scrap for die cuts

Let’s Create

  1. Affix all stamps to Acrylic Blocks.
  2. Fold the Card Base in half using a Bone Folder to sharpen the crease.
  3. Die-Cut Designer Series Paper (DSP) using rounded rectangle die from Nested Essentials.
  4. Roll out (2) die-cuts from Designer Series Paper using banner die from Nested Essentials. Lay them out on the card front, end to end and on the diagonal. Adhere once you are pleased with the placement.
  5. Adhere rounded rectangle die-cut.
  6. Die-Cut Basic White using banner die from Stylish Shapes. Stamp sentiment and adhere to card front using Stampin’ Dimensionals.
  7. Sprinkle on the Adhesive Backed Sequins Trio gems.
  8. Stamp and decorate the remaining Basic White panel for the inside and attach with Stampin’ Seal.
  9. Decorate your envelope.
  10. Lovely! Who needs a pick-me-up?

Shopping List

Recommended Stamper’s Toolkit ❤


There Are Not Enough Words

Create a thoughtful thank you card in minutes with a beaufitul die cut flower and a few pieces of paper. Read on for details.

Let your creativity bloom with this Fully Flowering Ephemera Pack! These laser-cut floral elements give you the look of hand-colored, detailed, die-cut pieces in a jiff—just remove them from the sheet and adhere to a card base using your favorite adhesive. Pair them with our blank cards and envelopes to make quick and easy cards with a personal touch!

Measurements

Full list of supplies needed, listed below.
Pretty in Pink Cardstock:

  • Card Base 8 ½” x 5 ½”, score at 4 ¼”
  • 3” x 1 ¾” (3)

Basic White Cardstock:

  • 4” x 5 ¼” (inside)
  • scrap for 2 1/3″ circle

Unbounded Beauty Designer Series Paper (DSP): 2 ⅞” x 1 ⅝” (3)


Let’s Create

  1. Affix all stamps to Acrylic Blocks.
  2. Fold the Card Base in half using a Bone Folder to sharpen the crease.
  3. Use Stampin’ Seal to attach the DSP layers (3) to the Pretty In Pink layers (3) to create three matted DSP layers.
  4. Arrange the matted DSP layers to the card base and attach with Stampin’ Seal.
  5. Die-Cut or Punch 2 ⅜” Circle from Basic White and attach with Stampin’ Seal.
  6. Use Stampin’ Dimensions to attach the Ephemera flower and sentiment.
  7. Tie a double bow with Basic White Baker’s Twine and attach with Mini Glue Dots.
  8. Sprinkle on the 2024–2026 In Color™ Shimmer Gems
  9. Stamp and decorate the remaining Basic White panel for the inside and attach with Stampin’ Seal.
  10. Decorate your envelope.
  11. So pretty! Now send it to someone special.

Shopping List

Recommended Stamper’s Toolkit ❤