Here’s To You

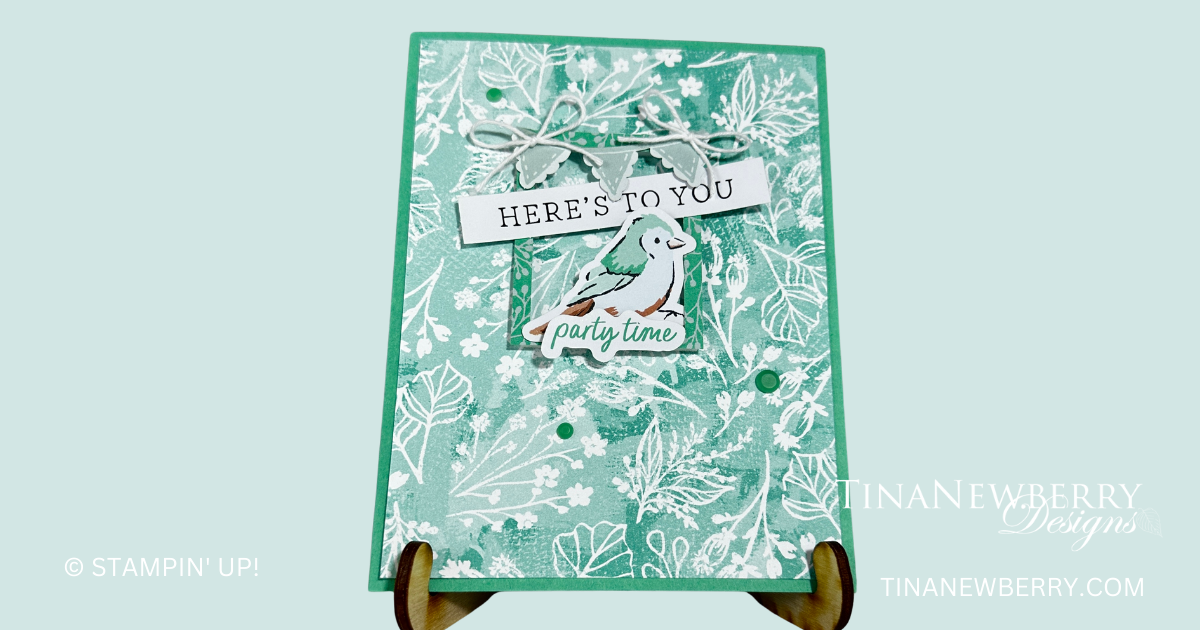
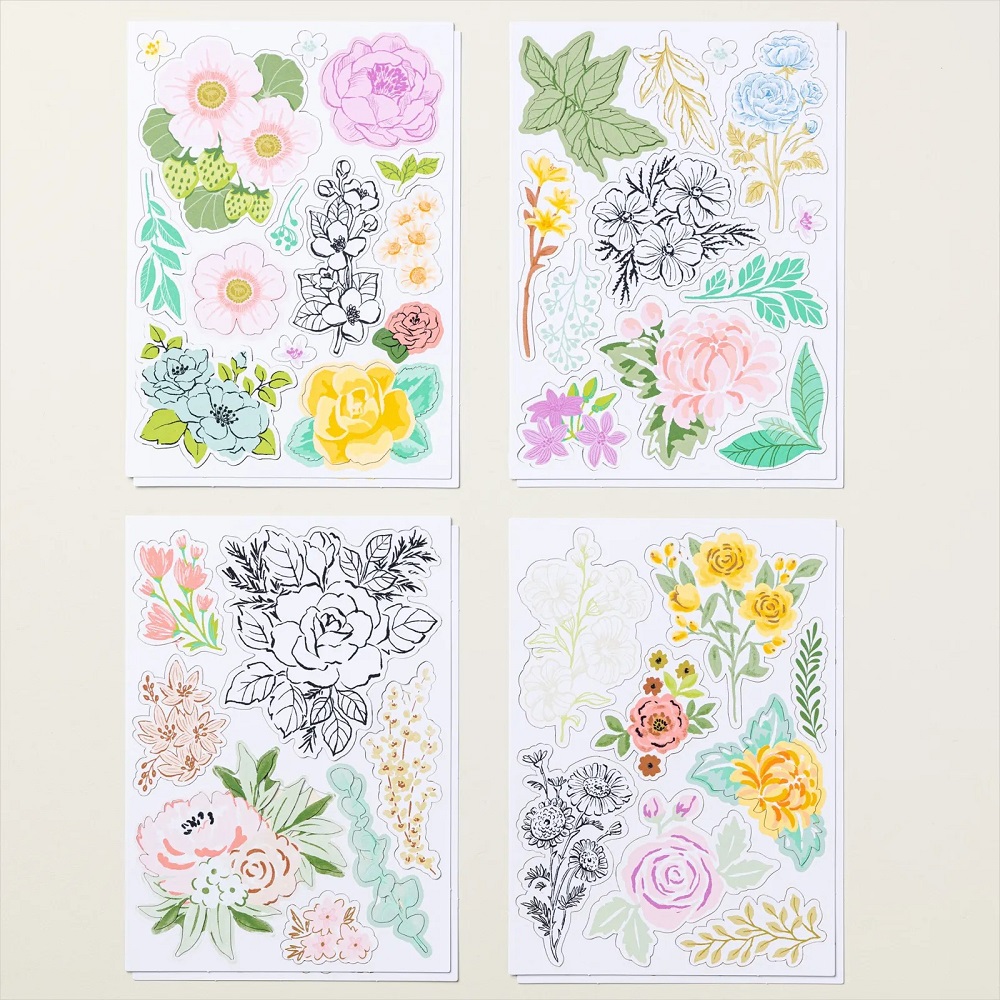
Use Ephemera packs and a bit of Designer Series Paper to create this quick & easy birthday card today.

It’s fun to create personalized cards and customized scrapbook pages using the Something for Everything Ephemera Pack. This collection of laser-cut crafting elements has something for everyone and every occasion on your list of special days. Each piece looks die-cut, but all you have to do is remove the image from the sheet and adhere it to a card base or scrapbooking page using your favorite adhesive. It’s that quick and easy!

Measurements

Full list of supplies needed, listed below.
Shy Shamrock Cardstock: 5 1/2″ h x 8 1/2″ w folded to 5 1/2″ h x 4 1/4″ w
Basic White Cardstock: 5 1/4″ h x 4″ w
Unbounded Beauty Designer Series Paper (DSP): 3 ¾”w x 5” h

Let’s Create

  1. Fold the Card Base in half using a Bone Folder to sharpen the crease.
  2. Adhere DSP to card front with Stampin’ Seal.
  3. Adhere Ephemera frame from Something for Everything pack to card base with Foam Strips.
  4. Snip banner ends and adhere to frame with Multipurpose glue.
  5. Tie two bows with white Baker’s Twine and attach with a Mini Glue Dot.
  6. Use Multipurpose glue to adhere
    • Bird to inside of frame with Stampin’ Dimensionals.
    • Sentiment under bird.
    • Sentiment across frame, and use Stampin’ Dimensionals to reinforce in the middle.
  7. Sprinkle on the In Color Resin Dots
  8. Attach the Basic White panel to the inside with Stampin’ Seal.
  9. Decorate your envelope.
  10. Adorbs! Send this happy mail today.

Shopping List

Recommended Stamper’s Toolkit ❤

Product List
Order online from the convenience of your own home or send me your order and I’ll take care of you. ❤ Either way, please use the host code KBSZKQ3A. Order online AND, if your order is $50 or more using host code KBSZKQ3A between now and the end of the month you’ll receive a free pack of embellishment as a THANK YOU gift from me. ❤ If your order is over $150, skip the host code, earn Stampin’ Rewards for free stuff yourself and I’ll still send you a free pack of embellishment as a THANK YOU gift from me. ❤

Sweet Kitty Card

Use Sketch #2 from the Annual Catalog and a die cut from the By Your Side kit to create this sweet kitty card.

Celebrate the special people around you with the By Your Side Kit. Featuring lovely cat and dog designs, use this kit to make uplifting cards you can share with a pet loving friend, a relative, a special someone, and more! Choose a dog or cat die-cut image depending on which furry friend you or your recipient loves most, and complete your projects with embellishments and the stamped sentiment of your choice to create a card with the right message you want to share. Great for all occasions, you’ll love the possibilities this kit offers!

Measurements

Full list of supplies needed, listed below. A die cutting machine is needed for this card.

Card base – Flirty Flamingo Cardstock: 5 ½” x 8 ½” scored at 4 ¼”

Basic White Cardstock: 4” x 5 ¼”

Crumb Cake from back of Kit card base: 3 7/8” x 5 1/8”

Sketch 2 from page 22 of the ’24-’25 Stampin’ Up! Annual Catalog

Let’s Create

  1. Fold and burnish card base at the score line using bone folder.
  2. Add the White panel to the card front using Stampin’ Seal.
  3. Using the Exposed Brick embossing folder emboss the Crumb Cake panel.  Add this panel to the White panel on the card front using Tear & Tape.
  4. From the ByYour Side Kit, seperate out the die cut of the cat sitting on the green cushion.  
  5. Add a strip of Tear & Tape to the middle of the back of the cat die cut.
  6. Use the Flirty Flamingo twine to add to the back of the cat having loops on each side.  Make sure to catch the twine in the Tear & Tape.  Add another piece of Tear & Tape over the first strip to secure the twine in place.
  7. Attach the cat to the center of the card front using Stampin’ Dimensionals. 
  8. Stamp the fish across the bottom of the inside of the card using Flirty Flamingo. 
  9. Stamp the fish across the bottom of the envelope using Flirty Flamingo.
  10. Sprinkle on some gems (optional)
  11. Stamp and decorate the inside and attach with Stampin’ Seal.
  12. Decorate your envelope.
  13. Add a sentiment before you sent (optional)
  14. Adorbs! Now send it to someone special.
Product List

Recommended Stamper’s Toolkit ❤

Product List
Order online from the convenience of your own home or send me your order and I’ll take care of you. ❤ Either way, please use the host code KBSZKQ3A. Order online AND, if your order is $50 or more using host code KBSZKQ3A between now and the end of the month you’ll receive a free pack of embellishment as a THANK YOU gift from me. ❤ If your order is over $150, skip the host code, earn Stampin’ Rewards for free stuff yourself and I’ll still send you a free pack of embellishment as a THANK YOU gift from me. ❤

Ephemera Focal Image

Card sketches inspire endless creativity. This project was inspired by the first sketch on page 22 of the new annual catalog. What will you make from that sketch?

Sketch 1 (’24 – ’25 Annual Catalog)
Fully Flowering Ephemera Pack
Let your creativity bloom with this Fully Flowering Ephemera Pack! These laser-cut floral elements give you the look of hand-colored, detailed, die-cut pieces in a jiff—just remove them from the sheet and adhere to a card base using your favorite adhesive. Pair them with our blank cards and envelopes to make quick and easy cards with a personal touch!

Measurements

Full list of supplies needed, listed below. A die cutting machine is needed for this card.

Basic White Thick Cardstock: 5 ½” h x 8 ½” w  scored and folded at 4 ¼” h

Vellum Cardstock: scrap for sprig die cuts

Basic White Cardstock: scrap for sprig die cuts

2024-2026 In Color Designer Series Paper: 4 ½” h x 3 ¼” w Summer Splash (2 patterns)

Fully Flowering Mix N Match Ephemera Pack

Saying Something Mix N Match Ephemera Pack

Let’s Create

  1. Use a Bone Folder to burnish the Basic White Thick Cardstock at the scoreline to create the card base.
  2. Attach two Designer Series Paper (DSP) panels using Stampin’ Seal. Off set from each other so both patterns are visible. 
  3. Die cut sprigs in Basic White Cardstock and Vellum Cardstock using the Textured Florals dies.
  4. Attach sprigs behind flower from the Fully Flowering Mix N Match Ephemera Pack using Mini Glue Dots.
  5. Attach flower with Stampin’ Dimensionals.
  6. Overlap the flower with the sentiment from the Saying Something Mix N Match Ephemera Pack. Use Stampin’ Seal to attach where the overlap and a Stampin’ Dimensional where they overhang. 
  7. Double up a piece of White Baker’s Twine and make a small bow. Attach with a Mini Glue Dot. 
  8. Sprinkle on some Brushed Butterflies.
  9. Decorate your envelope.
  10. So sweet! Who will you send it to?
Product List

Recommended Stamper’s Toolkit ❤

Product List
Order online from the convenience of your own home or send me your order and I’ll take care of you. ❤ Either way, please use the host code KBSZKQ3A. Order online AND, if your order is $50 or more using host code KBSZKQ3A between now and the end of the month you’ll receive a free pack of embellishment as a THANK YOU gift from me. ❤ If your order is over $150, skip the host code, earn Stampin’ Rewards for free stuff yourself and I’ll still send you a free pack of embellishment as a THANK YOU gift from me. ❤