Technique Tuesday: Coloring Vellum

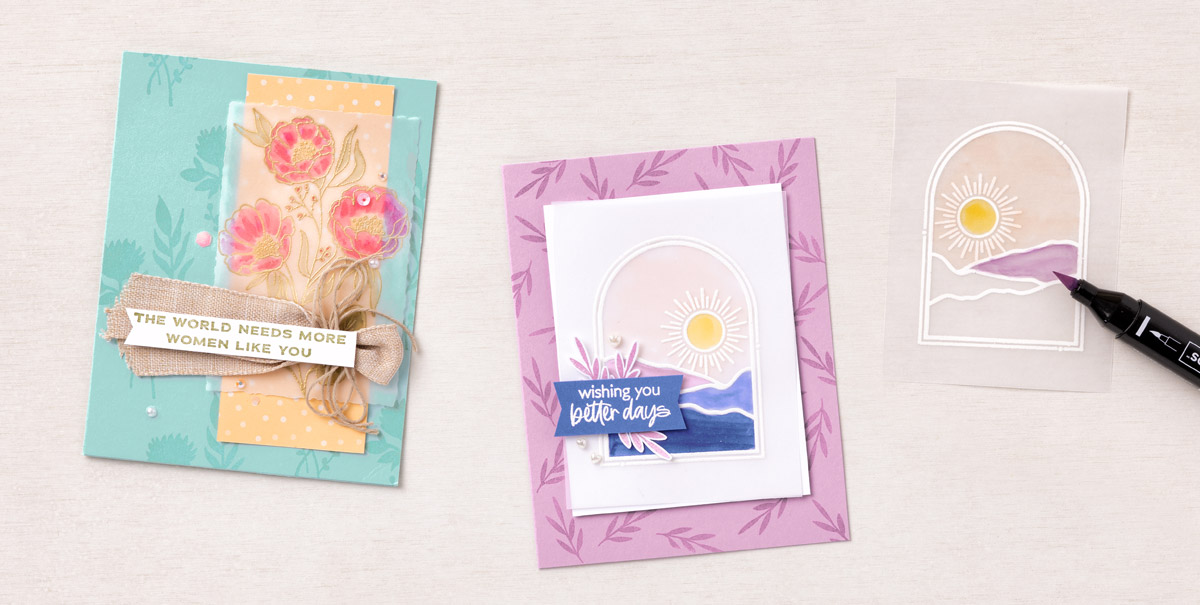
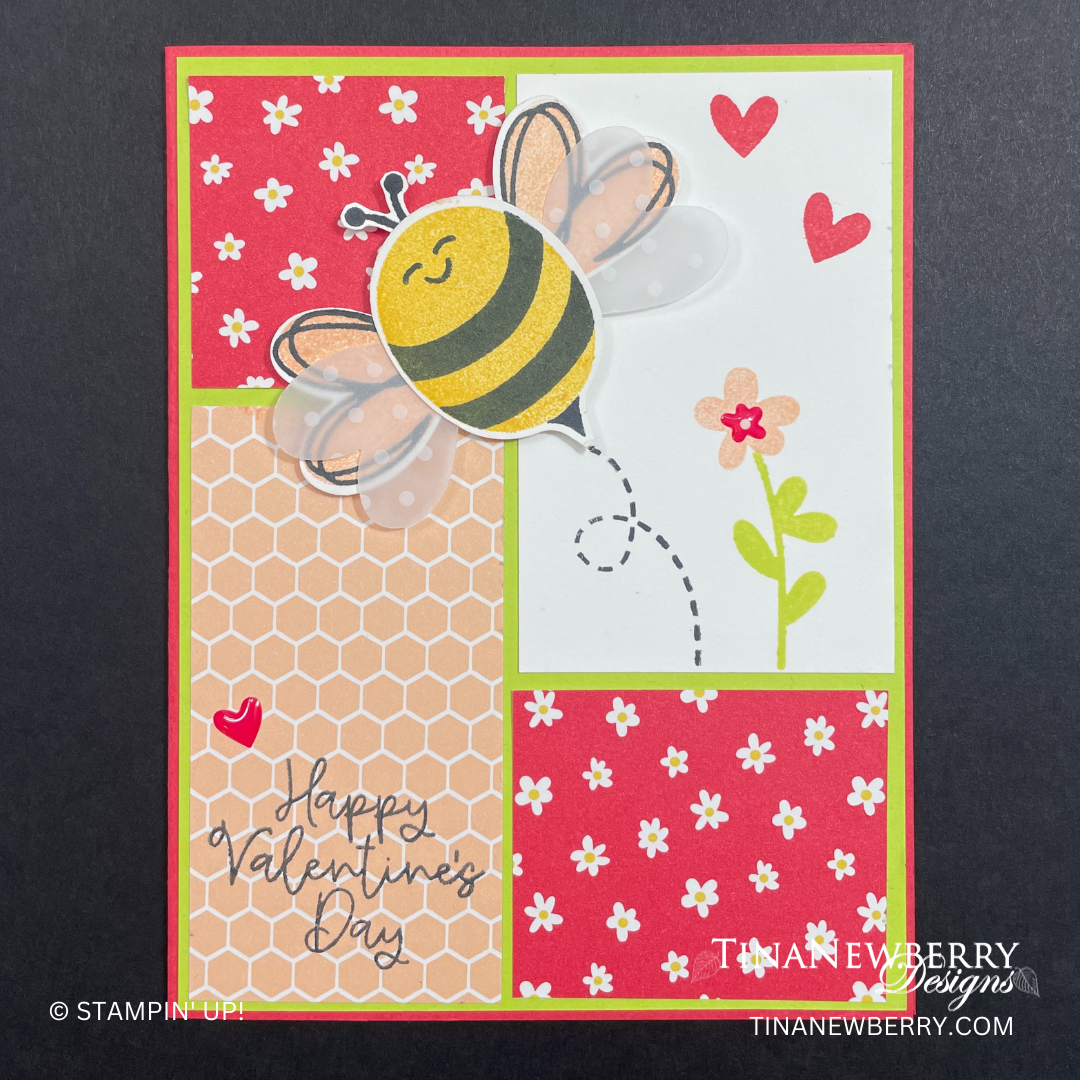
Did you know you can color vellum? You can! What a great way to customize your favorite stamp sets. Take a look at our tips and then try this technique yourself.

We started by stamping our image in VersaMark ink on Vellum paper and heat embossing it with white Stampin’ Emboss Powder. We then turned the paper over to color on the back of the Vellum with the dark shade of Stampin’ Blends—we used Daffodil Delight for the sun, Petal Pink for the sky, and Fresh Freesia, Orchid Oasis, and Starry Sky for the hills. We loved how this coloring gave the paper a stained-glass look.

We didn’t want the adhesive to show through the Vellum when we adhered it to the card base, so we put some Mini Glue Dots under the space where we knew we would put our sentiment banner. Then we rolled up a few more glue dots and placed them around the top arch under the embossed parts so they wouldn’t be visible. Finally, we fussy cut the leaves, heat embossed our sentiment, and finished the card off with a few Heart Pearls.

If you’re looking for a way to shake things up, try your hand at copying and sharing everything!
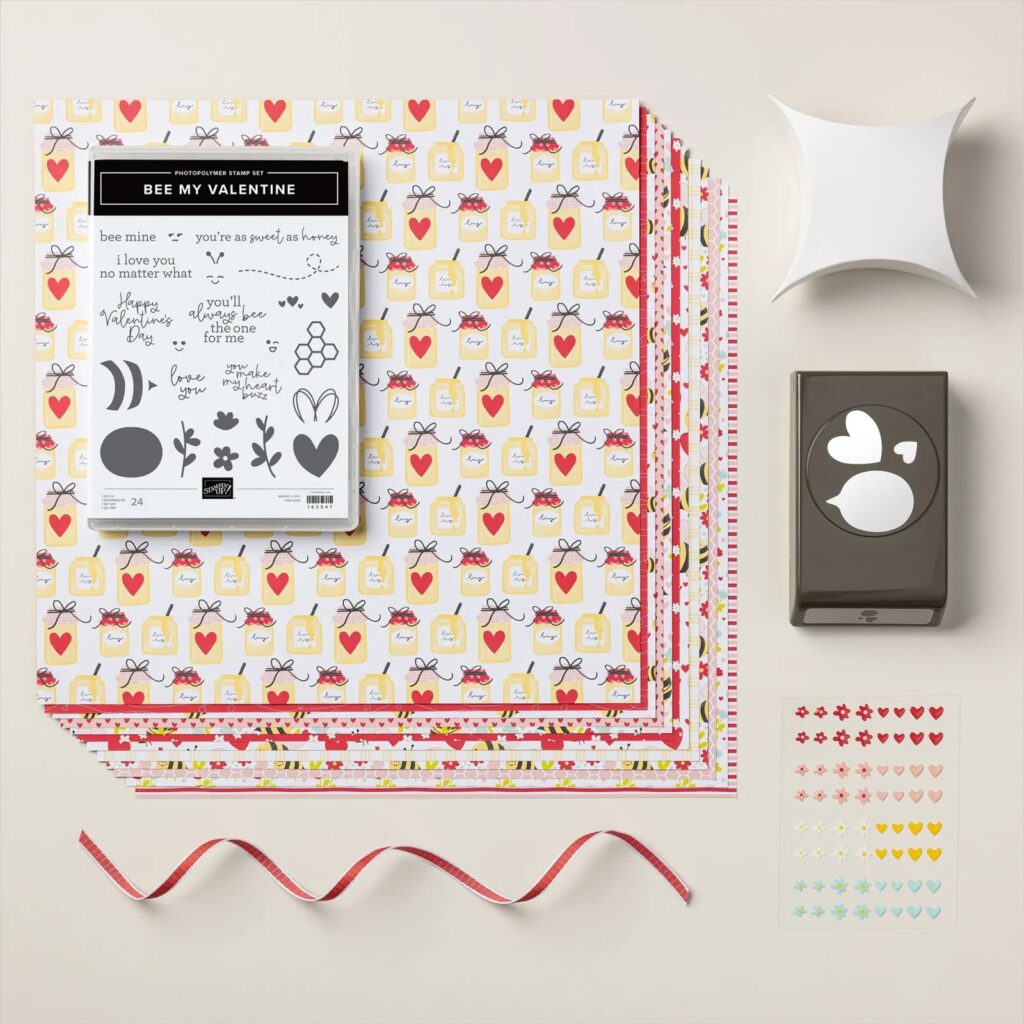
Shopping List

Recommended Stamper’s Toolkit

Product List
Order online from the convenience of your own home or send me your order and I’ll take care of you. ❤ Either way, please use the host code ANTD9UHS. Order online AND, if your order is $50 or more using host code ANTD9UHS between now and the end of the month you’ll receive a free pack of embellishment as a THANK YOU gift from me. ❤ If your order is over $150, skip the host code, earn Stampin’ Rewards for free stuff yourself and I’ll still send you a free pack of embellishment as a THANK YOU gift from me. ❤

You’re As Sweet As Honey

Check out the yellow plaid paper with those happy little bees! This whole card reminds me of a certain mouse that lives in Orlando. LOL. I could see this design with the Hello Lady Bug, Little Monkey, Little Dreamers, or the Rhino Ready stamp sets.

Create adorable crafts for all your occasions centered around love with the Bee Mine Suite Collection! This suite is filled with bright colors and unique patterns you can mix and match. The darling bee images were hand designed with symmetrical shapes for versatility and have a coordinating punch. Add special details to your crafts with the included embellishments and ribbon. Whether you are making a card or looking for customized treat packaging, this suite has everything you need for bee-utiful paper crafts! Also available in French.

Measurements

Full list of supplies needed, listed below. A die cutting machine is needed for this card.

Basic White

  • 5 ½” x 8 ½”  scored and folded on the long-side at 4 ¼” 
  • 3 ¾” x 1 ⅞”
  • 3 ¾” x ⅝”
  • 2 ¾” x 5” (for stamping & punching bees and wings)

Daffodil Delight

  • 5 ⅜” x 4 ⅛”

Basic Black

  • 5 ⅛” x 3 ⅞”
  • 3 ¾” x 2” 

Bee Mine Designer Series Paper

  • 5” x 3 ¾” – Yellow plaid print

Let’s Create

  1. Affix all stamps to Acrylic Blocks.  
  2. Fold the Card Base in half using a Bone Folder to sharpen the crease.
  3. On the 3 ¾” x 1 ⅞” Basic White Cardstock, stamp flower stems (use both stem stamps, alternating) using Lemon Lime Twist ink pad.
  4. On the taller stems, stamp the 4 petal flower using Sweet Sorbet ink pad.  One the shorter stems, stam the 4 petal flower using Daffodil Delight ink pad.
  5. On the 3 ¾” x ⅝” Basic White cardstock, stamp the sentiment using Black Memento ink pad. Trim each of the ends at an angle.
  6. On 5” x 2 ¾” Basic White cardstock, stamp 2 Bees using Black Memento and Daffodil Delight ink pads.  I found that stamping the black strips first made it easier to line up the Daffodil Delight Body.  Stamp the face in Black Memento ink. Be sure to make the bees facing opposite directions.  When stamping the face, one of the bees will be facing the other way.  Using a Sweet Sorbet light Stampin’ Blend, put small dots for the cheeks on the bee.  Stamp 2 sets of wings using Daffodil Delight.  The outline of the wings is straight ink, the inside part is using the same color stamped off once,  Again, stamping the darker first makes it easier to line up the Daffodil Delight inside of wings (heart).  Punch out all of the bee pieces using the Bee Builder Punch. 
  7. Assembling the Card: Adhere the wings to the top of each bee. 
  8. Adhere the stamped Basic White panel to the Basic Black cardstock that measures 3 ¾” x 2”
  9. Adhere the Daffodil Delight Designer Series Paper to the 5 ⅛” x 3 ⅞” Basic Black cardstock.
  10. Adhere these layers to the Daffodil Delight Panel.
  11. Using Stampin’ Dimensionals, adhere the sentiment to the lower edge of the Designer Series Paper. Just above the sentiment, adhere the stamped Basic White layers.
  12. Position the bees where they fit the best – do not tape down quite yet – This will give you an idea where to stamp the antennae for each bee using Black Memento ink.
  13. Adhere the bees to the card, the lower bee is taped flat, the bee towards the top right is adhered using Stampin’ Dimensionals.
  14. Place a Petal Pink adhesive-backed flower from the Adhesive-Backed “Hearts & Flowers” in the center of each of the Sweet Sorbet flowers.  Position a couple of Petal Pink hearts among the flowers. 
  15. Be sure to decorate the inside of the card and the envelope before sending it off to a sweet friend.
Product List
Bee My Valentine Bundle (English)
$38.50
Basic White 8 1/2" X 11" Cardstock
$10.50
Daffodil Delight 8-1/2" X 11" Cardstock
$10.00
Basic Black 8-1/2" X 11" Cardstock
$10.00
Bee Mine 12" X 12" (30.5 X 30.5 Cm) Designer Series Paper
$12.50
Tuxedo Black Memento Ink Pad
$6.50
Daffodil Delight Classic Stampin' Pad
$9.00
Sweet Sorbet Classic Stampin' Pad
$9.00
Sweet Sorbet Stampin' Blends Combo Pack
$10.00
Adhesive Backed Hearts & Flowers
$8.00
Stampin' Dimensionals
$4.25

Recommended Stamper’s Toolkit

Product List
Order online from the convenience of your own home or send me your order and I’ll take care of you. ❤ Either way, please use the host code ANTD9UHS. Order online AND, if your order is $50 or more using host code ANTD9UHS between now and the end of the month you’ll receive a free pack of embellishment as a THANK YOU gift from me. ❤ If your order is over $150, skip the host code, earn Stampin’ Rewards for free stuff yourself and I’ll still send you a free pack of embellishment as a THANK YOU gift from me. ❤

Happy Valentine’s Day

How adorable is this little bee from the Bee Mine Suite Collection in the new mini catalog? And I love the cheery color combination that shows off your designer series paper.

Create adorable crafts for all your occasions centered around love with the Bee Mine Suite Collection! This suite is filled with bright colors and unique patterns you can mix and match. The darling bee images were hand designed with symmetrical shapes for versatility and have a coordinating punch. Add special details to your crafts with the included embellishments and ribbon. Whether you are making a card or looking for customized treat packaging, this suite has everything you need for bee-utiful paper crafts! Also available in French.

Measurements

Full list of supplies needed, listed below. A die cutting machine is needed for this card.

Sweet Sorbet

  • 5 ½” x 8 ½” scored and folded in half on the long side

Lemon Lime Twist

  • 5 ⅜” x 4 ⅛” (cut 2 – one for the inside of card)

Basic White

  • 5 ⅜” x 4 ⅛” (for inside of card)
  • 3 ⅜” x 2 ⅛”
  • 2 ¾” x 5” (for stamping & punching bees and wings)

Bee Mine Designer Series Paper

  • 2 ⅛” x 2 ¾” sweet sorbet with small white flowers print
  • 1 ¾” x 1 ¾” sweet sorbet with small white flowers print
  • 3 ⅜” x 1 ¾” petal pink honeycomb print

Vellum Basics 

  • 2 ½” x 1 ½” polka dot for punch 2 (heart shapes) wings


Let’s Create

  1. Affix all stamps to Acrylic Blocks.  
  2. Fold the Card Base on score line using a Bone Folder to sharpen the crease.
  3. On 5” x 2 ¾” Basic White cardstock, stamp the Bee using Black Memento and Daffodil Delight ink pads.  I found that stamping the black strips first made it easier to line up the Daffodil Delight Body.  Stamp the face in Black Memento ink. Stamp the antennae also in Black Memento ink.  Stamp 2 sets of wings.  Again, stamping the Black first makes it easier to line up the Petal Pink inside of wings (heart).  The antennae are fussy cut, the other pieces are all punched out using the Bee Builder Punch.
  4. Punch 2 hearts (wings) using the Polka Dot Vellum.
  5. Assemble the bee.  Adhere the wings to each side with the Vellum wings on the top of the Petal Pink wings. 
  6. Stamp the “Happy Valentine’s Day” sentiment using Black memento ink, onto the lower part of the Petal Pink Honeycomb print of Designer Series Paper.
  7. Using Black Memento Ink Pad, stamp the bee trail toward the lower left of the 3 ⅜” x 2 ⅛” Basic White. Using Lemon Lime Twist, stamp the flower stem.  Stamp the flower using Petal Pink Ink. Using Sweet Sorbet In, stamp 2 hearts towards the upper right corner.
  8. Assembling the card: Adhere the 1 ¾” x 1 ¾” Designer Series Paper to the upper left corner of the 5 ⅜” x 4 ⅛” Lemon Lime Twist panel leaving a small border along the top and the left edge. Adhere the Petal Pink Honeycomb Designer Series Paper below the 1 ¾” x 1 ¾” piece, keeping the borders about the same. 
  9. Adhere the stamped white pane to the upper right of the Lemon Lime Twist panel, once again, be sure to keep the borders consistent. Adhere the 2 ¾” x 2 ⅛” Designer Series Paper below the stamped white panel.
  10. Using Stampin’ Dimensionals, adhere the bee.  Be sure the trail lines up with the stinger on the bee. 
  11. Finish the card by placing a sweet sorbet flower from the Adhesive-backed Hearts & Flowers to the center of the Petal Pink Flower.  Place a Sweet Sorbet Heart above the sentiment.
  12. Be sure to decorate the inside of your card and the envelope before sending it off to wish someone a “Happy Valentine’s Day”!
Product List
Bee My Valentine Bundle (English)
$38.50
Sweet Sorbet 8 1/2" X 11" Cardstock
$10.00
Lemon Lime Twist 8-1/2" X 11" Cardstock
$10.00
Basic White 8 1/2" X 11" Cardstock
$10.50
Vellum Basics 12" X 12" (30.5 X 30.5 Cm) Specialty Designer Series Paper
$10.00
Bee Mine 12" X 12" (30.5 X 30.5 Cm) Designer Series Paper
$12.50
Tuxedo Black Memento Ink Pad
$6.50
Daffodil Delight Classic Stampin' Pad
$9.00
Sweet Sorbet Classic Stampin' Pad
$9.00
Petal Pink Classic Stampin' Pad
$9.00
Lemon Lime Twist Classic Stampin' Pad
$9.00
Adhesive Backed Hearts & Flowers
$8.00
Stampin' Dimensionals
$4.25

Recommended Stamper’s Toolkit

Product List
Order online from the convenience of your own home or send me your order and I’ll take care of you. ❤ Either way, please use the host code ANTD9UHS. Order online AND, if your order is $50 or more using host code ANTD9UHS between now and the end of the month you’ll receive a free pack of embellishment as a THANK YOU gift from me. ❤ If your order is over $150, skip the host code, earn Stampin’ Rewards for free stuff yourself and I’ll still send you a free pack of embellishment as a THANK YOU gift from me. ❤