Use Blending Brushes to Add Color To An Embossed Panel

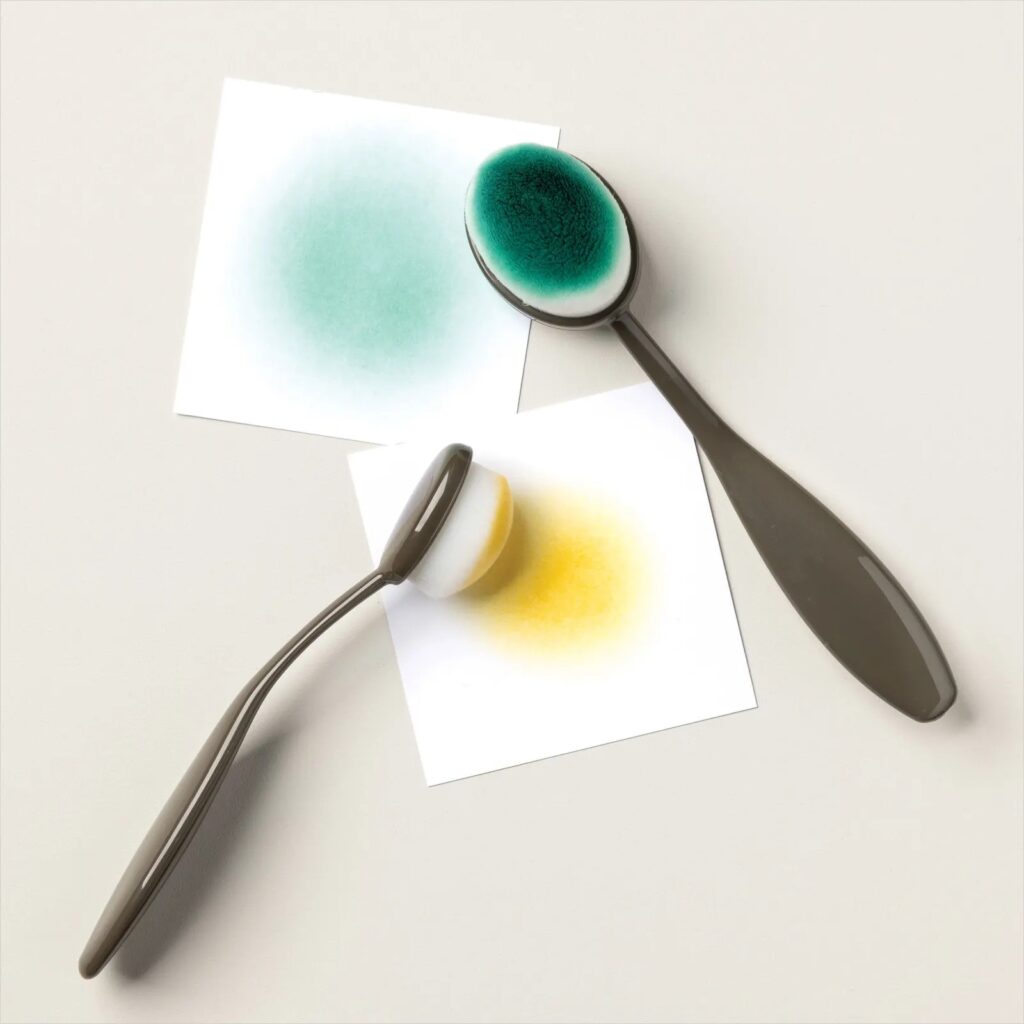
Show off your embossed panel by adding a bit of color using a blending brush.

Measurements

Full list of supplies needed, listed below. A die cutting machine is needed for this card.
Card Base Basic White Thick 8 ½” x 5 ½”, scored at 4 ¼”
Layer 1 Berry Burst – 4” x 5 ¼”
Layer 2 Basic White – 3 ¾” x 5”,
Die Cut Countryside Corners label die (~1 3.4” x 3 1/2”) in Basic White
Stamp and punch leaves and little flowers

Let’s Create

  1. Affix all stamps to Acrylic Blocks.
  2. Fold the Card Base in half using a Bone Folder to sharpen the crease.
  3. Emboss the 3 ¾” x 5” Basic White with Exposed Brick 3D Embossing Folder
  4. Die Cut the Countryside Corners label die  (~1 3.4” x 3 1/2”) in Basic White
  5. Stamp and punch leaves and little flowers. Use the two-step stamping technique. Stamp-off the solid part of the leaves first.  (Granny Apple Green and Berry Burst)
  6. Adhere Berry Burst layer to card base with Stampin’ Seal.
  7. Use Blending Brush to lightly brush Bubble Bath across the bricks. Truly, use just the very lightest touch for just a hint of color. Adhere layer to card front with Stampin’ Seal.
  8. Use dauber to add color to the edges of the Countryside Corners die cut, in Berry Burst.
  9. Stamp sentiment in Berry Burst.
  10. Adhere label to card front with DImensionals.
  11. Arrange leaves in a pleasing manner and adhere with Mini Glue Dots or Multipurpose-glue.
  12. Add a sweet little bow
  13. Sprinkle on a trio of gems.
  14. Tuck two little flowers behind the upper left corner of the label.
  15. Stamp and decorate the inside.
  16. Decorate your envelope.
  17. Love it! Now send it to someone special.

Shopping List

Recommended Stamper’s Toolkit ❤


Thanks for Your Kindness

So this design came out of nowhere and I’m really digging the look. When I started, I was intending to take it in a completely different look. I love when that happens! I used the Soft Succulent Brushed Metallic Specialty DSP, Gold Foil Sheets, Vellum Basics, Soft Shimmer, Lost Lagoon cardstock, and a piece from the Hello, Irresistible pack for the various layers in this card.

The Beauty of the Deep Bundle is perfect for all your underwater card making adventures! This bundle comes with nine stamps of oceanic features and eleven dies that coordinate perfectly. You can easily stamp and cut out any of the images to make your own scene! Stamp background images, layer detailed die-cut pieces, and add color. Descend into the deep blue waters and discover the possibilities of the ocean!

Measurements

Full list of supplies needed, listed below. A die cutting machine is needed for this card.

  • Lost Lagoon Cardstock:
    • 5 ½” h x 8 ½” w scored and folded on the long-side at 4 ¼” w.
    • Scrap for Country Corners die cut
  • Hello, Irresistible Designer Series Paper (DSP): 5 ¼” h x 4” w
  • Soft Succulent Dry Brushed Metallic Specialty DSP: scrap for coral die cut
  • Gold Foil Sheets: scrap for sentiment tag and fish.
  • Vellum Basics: scrap for seaweed. I used the striped piece
  • Soft Shimmer Specialty DSP: scrap for coral

Basic White cardstock:  5 ¼” w x 4” h


Let’s Create

  1. Affix all stamps to Acrylic Blocks.
  2. Fold the Card Base in half using a Bone Folder to sharpen the crease.
  3. Attach the Hello, Irresistible DSP with Stampin’ Seal.
  4. Use the Country Corners die to make a Lost Lagoon layer. 
  5. Stamp the fish and sentiment on the Gold Foil using Stazon ink. Let it dry.
  6. Die cut:
    1. Seaweed from Vellum Basics and Soft Shimmer Specialty DSP
    2.  For the Pretty Peacock Soft Shimmer, first die cut a Country Corners piece. Then, run it through again with the Coral die. 
    3. Coral from the Soft Succulent Brushed Metallic scrap.
    4. Once dry, die cut the fish and sentiment label. 
  7. Layout your card layers.
    1. Attach the vellum seaweed and brushed metallic coral so they will be behind the Lost Lagoon layer.
    2. Attach the Pretty Peacock coral to the Lost Lagoon layer. Use Stampin’ Seal for the top and bottom and tiny Dimensional pieces for the middle.  
    3. Attach the Lost Lagoon layer with Stampin’ Dimensionals.
    4. Then attach the rest of the Soft Shimmer coral pieces with Multipurpose Liquid Glue.
    5. Attach the fish and sentiment with Stampin’ Dimensionals 
  8. Sprinkle on some Pretty Peacock sequins from the Adhesive-Backed Sequins Trio.
  9. Stamp and decorate the 5 ¼” w x 4” h for inside
  10. Decorate your envelope.
  11. So nice! Put this in the mail.
Product List

Recommended Stamper’s Toolkit ❤


Wishing You Everything Wonderful

Stamp on patterned paper to create a scene for your background. I’ll show you how!

The Beauty of the Deep Bundle is perfect for all your underwater card making adventures! This bundle comes with nine stamps of oceanic features and eleven dies that coordinate perfectly. You can easily stamp and cut out any of the images to make your own scene! Stamp background images, layer detailed die-cut pieces, and add color. Descend into the deep blue waters and discover the possibilities of the ocean!

Measurements

Full list of supplies needed, listed below. A die cutting machine is needed for this card.

Pretty Peacock Cardstock: 

  • 5 ½” w x 8 ½” h scored and folded on the long-side at 4 ¼”
  • 2 ¾” h x 4 ¼” scrap 

Basic White Cardstock: 

  • 5 ¼” w x 4” h for inside
  • Scrap for sentiment label and fish

Calypso Coral Cardstock: scrap

Earthen Elegance Designer Series Paper (DSP): 4”” h x 5 ¼” w

Let’s Create

  1. Affix all stamps to Acrylic Blocks.
  2. Fold the Card Base in half using a Bone Folder to sharpen the crease.
  3. Stamp various coral and seaweed on the DSP. Colors I used the following stamp pads:
    1. Blueberry Bushel
    2. Daffodil Delight
    3. Old Olive
    4. Cajun Craze
    5. Pretty Peacock
  4. From the Deckled Rectangle Dies, die cut
    1. The center of the DSP with the 2” h x 3 ½” w die
    2. The Pretty Peacock Cardstock with the 2 ½” h x 4” w die.
  5. Attach the outer DSP frame to the front of the card with Stampin’ Seal.
  6. Attach the center of the DSP to the Pretty Peacock Deckled Rectangle with Stampin’ Seal. 
  7. Attach the Pretty Peacock with Stampin’ Dimensionals.
  8. On Basic White scrap, stamp the sentiment from Charming Sentiments with Pretty Peacock, two fish with Blueberry Bushel and two with Tuxedo Black, then die cut the sentiment with the Sentiment Silhouettes Dies and the fish from the Beauty of the Deep dies.
  9. Attach Adhesive sheets to the back of the Calypso Coral scrap and then die cut the coral from Calypso Coral cardstock and then use a sponge dauber to add a bit of Calypso Coral ink on the edges of the die cut coral.
  10. Set the Coral so it’s overhanging the Pretty Peacock layer. Use Paper Snips to trim the excess.
  11. Remove the adhesive backing from the Calypso Coral cardstock and attach to the Pretty Peacock and the DSP. 
  12. Attach the sentiment and fish with Stampin’ Dimensionals and Stampin’ Seal.
  13. Sprinkle on some Pretty Peacock sequins from the Adhesive-Backed Sequins Trio.
  14. Stamp and decorate the 5 ¼” w x 4” h for inside
  15.  Decorate your envelope.
  16. Lovely! Who can you send it to? Put it in the mail.

Shopping List

Recommended Stamper’s Toolkit ❤