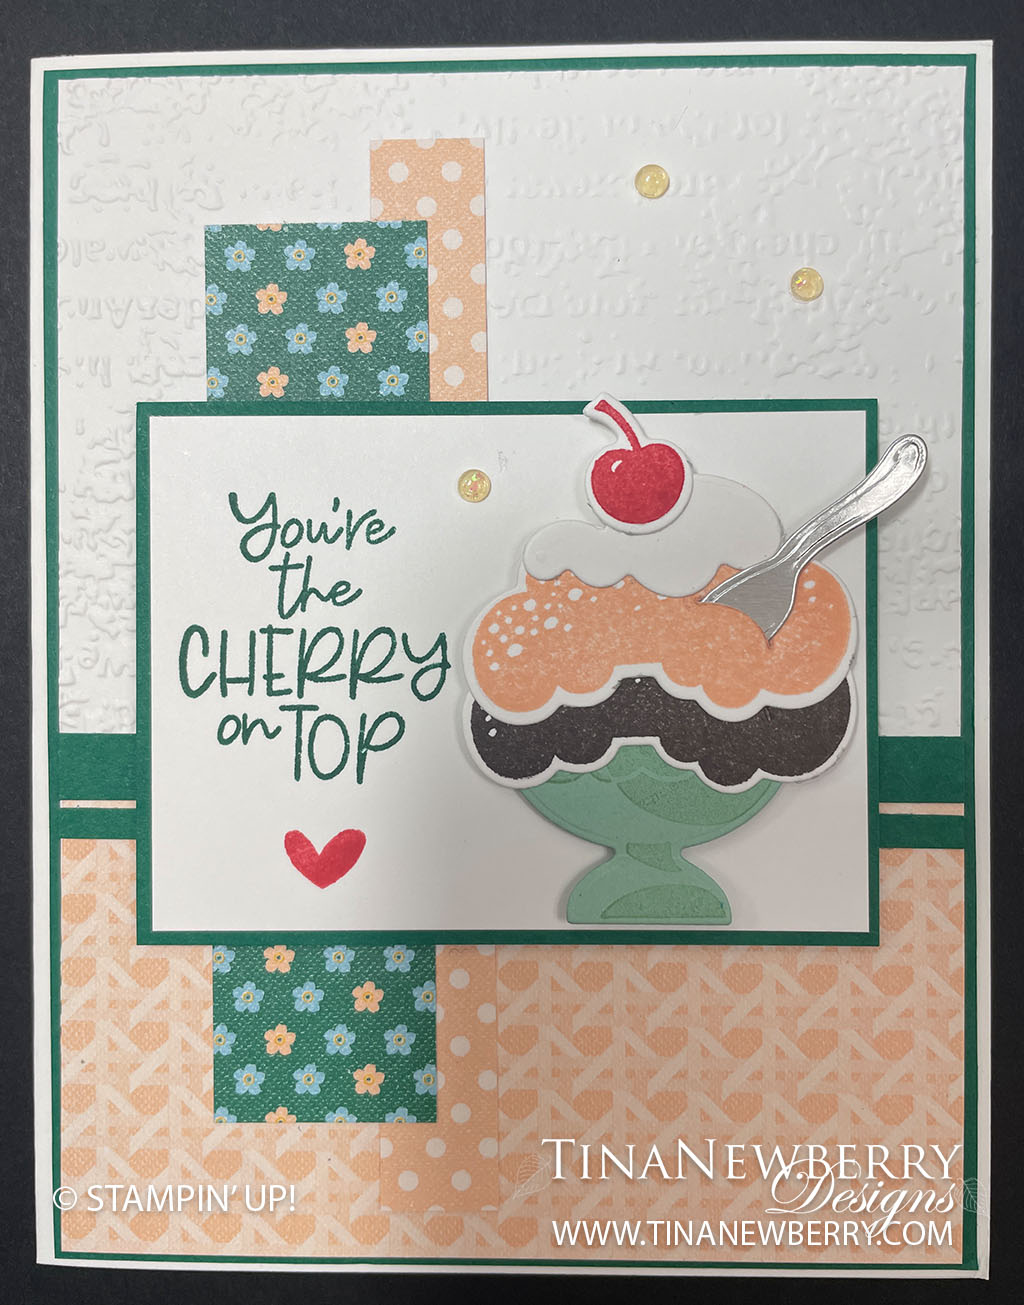
Is your mouth watering? Like a good commercial, I want ice cream! You’re the Cherry on Top – I love that. Change up the colors and papers in this fun card to match your mood – or your cravings. Ha!
Measurements
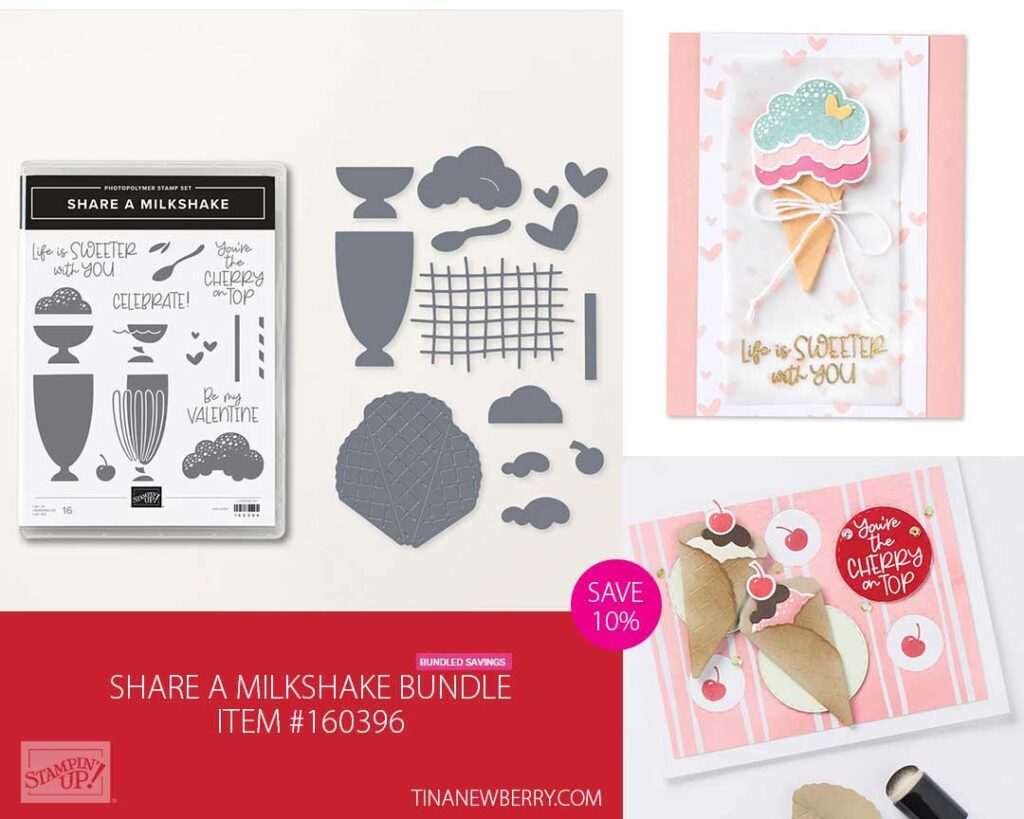
Full list of supplies needed, listed below. A die cutting machine is needed for this card.
Basic White
- 5 ½” x 8 ½” scored and folded on the long-side at 4 ¼”
- 5 ¼” x 4”
- 2 ¼” x 3 ⅛”
- 2 ½” x 2 (for stamping and die cutting ice cream sundae parts)
Shaded Spruce
- 4 ⅛” x 5 ⅜”
- 2 ⅜” x 3 ¼”
- 4” x ¼”
- 4 x ⅛”
Silver Foil
- 1 ½” x ½” (for die cutting spoon)
Mint Macaron
- 1 ¾” x 1 ¼”
Regency Park Designer Series Paper
- 4” x 2” (Petal Pink)
- 4” x 1” (Shaded Spruce with small flowers)
- 4 ¾” x ½” (Petal Pink with white polka dots)
Let’s Create
- Affix all stamps to Acrylic Blocks.
- Fold the Card Base in half using a Bone Folder to sharpen the crease.
- Using Mint Macaron ink, stamp the Detail part of the Ice Cream Sundae Cup onto the Mint Macaron cardstock & die cut using the coordinating die from the Share A Milkshake Die Set.
- Using Petal Pink ink, stamp the largest Ice Cream onto 2 ½” x 2” Basic White Scrap. Using the same stamp, stamp one using Early Espresso ink. Using Sweet Sorbet ink, stamp the cherry all on the same Basic White Scrap. Die cut using the coordinating dies from the Share A Milkshake Die Set. Using the smallest (cloud looking) die, cut a plain white piece for the whipped cream layer.
- Die cut the spoon using the silver foil paper.
- Slip the tip of the spoon into the little slit in the Petal Pink ice cream layer and tape down on the back.
- Place a thin line of multi purpose liquid glue along the top edge of the cup. Adhere the chocolate ice cream layer. Place a thin line of liquid glue to the top edge of the chocolate ice cream layer. Repeat this step with the Petal Pink ice cream layer, the whipped cream layer and the cherry.
- Using a Shaded Spruce ink pad, Stamp the sentiment towards the left side of the 3 ⅛” x 2 ¼” piece of Basic White Cardstock.
- Using a Sweet Sorbet ink pad, ink just the largest heart on the stamp with the 3 hearts. This is easily done using the corner of the ink pad and carefully inking one part of the image. S
- Stamp it just under the sentiment.
- Adhere this stamped Basic White Panel to its coordinating Shaded Spruce layer.
- Emboss the 5 ¼” x 4” Basic White Panel using the Timeworn 3-D Embossing Folder and Adhere to the 5 ⅜” x 4 ⅛” Shaded Spruce Panel. Adhere these layers to the folded Card Base.
- Adhere the 4” x 2” Petal Pink Designer Series Paper to the lower edge of the embossed Basic White cardstock.
- Adhere the 2 narrow strips of Shaded Spruce. The thicker piece goes right to the top edge of the Petal pink and the narrower piece just a slight bit under.
- Adhere the 4 ¾” x ½” Petal Pink Designer Series Paper going vertical on the card just to the left of the center. Adhere the 4” x 1” Shaded Spruce Designer Series Paper over lapping this piece on the right just about ¼”.
- Using Stampin’ Dimensionals, adhere the stamped Basic White layers to the center of the card. Using Stampin’ Dimensionals, adhere the ice cream sundae to the right side of this layer.
- Embellish with 3 in color opal rounds.
- Stamp and decorate the inside of your card and the envelope. And it’s ready to send off to someone special!
Shopping List
")
 Specialty Pack")


 Designer Series Paper")


Recommended Stamper’s Toolkit ❤
Product List
$12.00

$7.00

$4.25

$5.75

$5.50

$11.00

$26.00

$7.00

$6.50

$11.00

$20.00

$11.00

$80.75

$128.00


$16.00

$13.00


